There’s something incredibly comforting about a good, hearty casserole that hits all the right notes—melty cheese, savory sausage, and those pillowy pierogies. This Baked Kielbasa Pierogi Casserole Recipe is exactly that, and it’s become one of my go-to dishes when I want a warm, satisfying meal that everyone loves.

Jump to:
Why You'll Love This Recipe
What makes this casserole stand out for me is how effortlessly it comes together while delivering big flavors and a luscious, creamy texture. It’s perfect for busy weeknights or even casual weekend gatherings when you want to impress without the fuss.
- Easy assembly: Tossing everything in a baking dish saves you time and cleanup.
- Comfort food vibes: The creamy cheese sauce with kielbasa and pierogies is soul-warming.
- Customizable: You can swap cheeses, add veggies, or tailor the seasoning to your taste.
- Great for leftovers: It reheats wonderfully and tastes just as delicious the next day.

Ingredients & Why They Work
Each ingredient in the Baked Kielbasa Pierogi Casserole Recipe plays its part to create that perfect balance of creaminess and savory goodness. Picking quality components will seriously elevate the final dish.
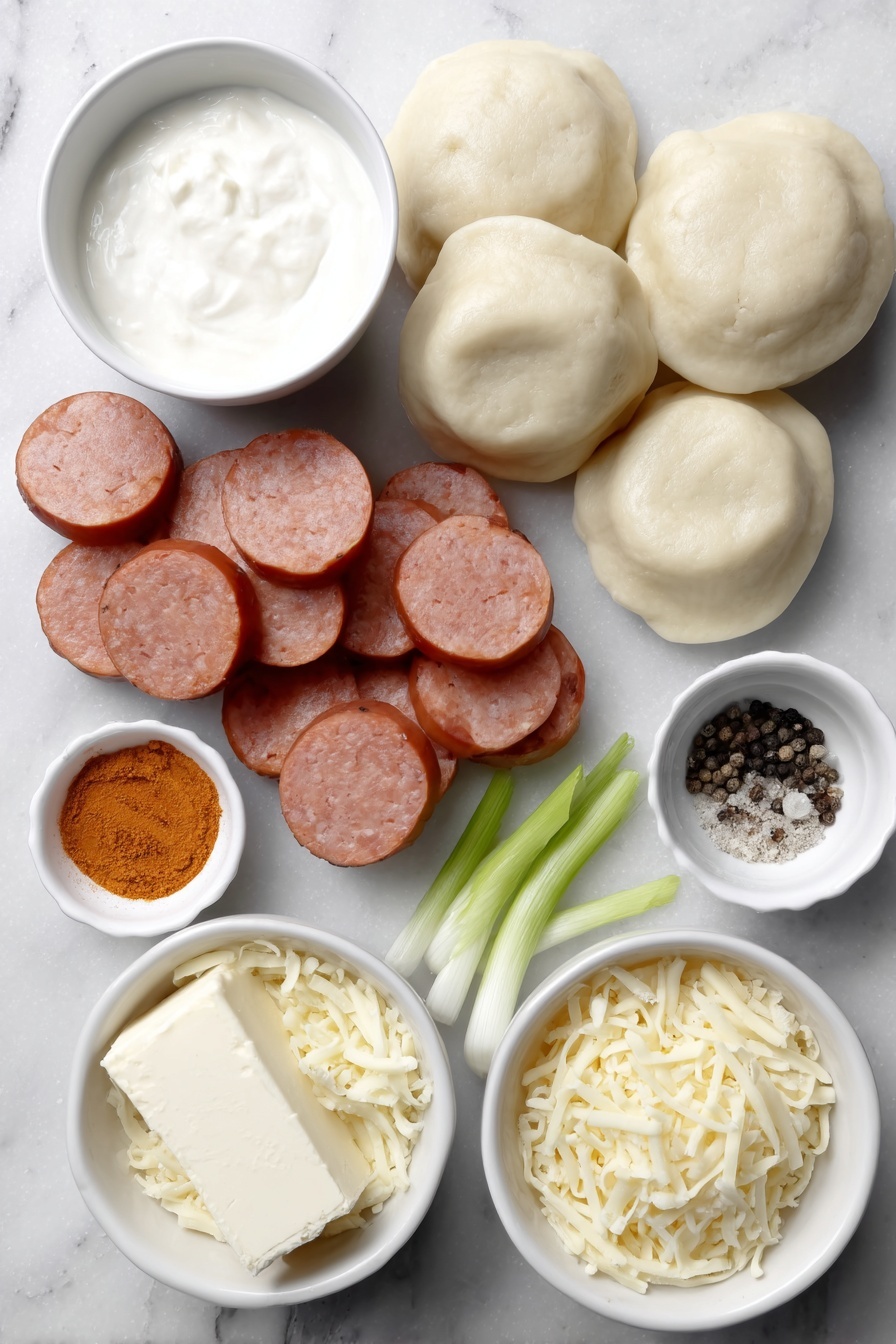
- Kielbasa sausage: Its smoky, garlicky flavor adds a meaty richness that pairs beautifully with pierogies.
- Frozen pierogies: These are the stars of the dish—dumplings stuffed with potatoes or cheese, they're sturdy enough to bake and soak up all those flavors.
- Cream cheese: Softens into a luxuriously creamy sauce when mixed with sour cream and broth.
- Sour cream: Adds tang and smoothness, balancing the richness.
- Chicken broth: Thins out the sauce just enough to coat everything perfectly without being heavy.
- Onion and garlic powder: Bring warmth and depth—these little flavor boosters can’t be skipped.
- Cheddar and mozzarella cheeses: Cheddar gives sharpness, while mozzarella melts into gooey goodness on top.
- Green onions: Used as garnish, they add a fresh, slightly pungent crunch that brightens the casserole.
Make It Your Way
I love mixing things up depending on what I have on hand. Sometimes I sneak in sautéed mushrooms or caramelized onions before baking, which adds even more depth to the casserole. You’ll find it’s a flexible recipe that invites your creativity.
- Vegetable add-ins: Roasted bell peppers or spinach make this dish feel a bit lighter and add color—and you can hide greens in here for picky eaters.
- Spice it up: For a little kick, sprinkle some smoked paprika or cayenne into the cheese sauce before baking.
- Dairy-free version: Use dairy-free cream cheese and cheese alternatives to make this recipe suitable for lactose intolerant friends.
- Extra crispy: After baking, pop the casserole under the broiler for a couple of minutes for an irresistible bubbly, golden crust.
Step-by-Step: How I Make Baked Kielbasa Pierogi Casserole Recipe
Step 1: Ready Your Baking Dish and Ingredients
Start by preheating your oven to 375°F and spraying a 9×13-inch baking dish with non-stick spray. This prevents any sticky mess later and helps with cleanup—trust me, it makes a difference! Then, slice your kielbasa into about ¼-inch rounds and toss those along with the frozen pierogies into your dish. There's no need to thaw the pierogies first—this saves time and works wonderfully.
Step 2: Whip Up the Creamy Cheese Sauce
Grab a mixing bowl and whip the softened cream cheese with sour cream using a hand mixer or whisk until smooth and creamy. Next, pour in chicken broth, then sprinkle in onion powder, garlic powder, salt, and pepper. Finally, mix in half of your shredded cheddar and mozzarella cheeses. The sauce should be silky and well combined, ready to coat every pierogi and sausage slice.
Step 3: Combine and Layer the Casserole
Pour the cheese sauce over the pierogies and kielbasa in the dish. Use a spatula or spoon to gently toss everything so the sauce covers all the ingredients without breaking the pierogies apart. Even layering ensures great flavor distribution. Then sprinkle the remaining cheddar and mozzarella cheeses on top—this will create that irresistible golden crust.
Step 4: Bake Until Bubbly and Golden
Cover the casserole with foil—this keeps moisture in so the pierogies stay tender—and bake for 30 minutes. Then, remove the foil and bake uncovered for another 10 minutes until you see those bubbly cheese edges and a lightly golden top. A perfectly baked casserole will smell amazing and be nice and bubbly around the sides.
Step 5: Rest and Garnish
Once out of the oven, let it cool for a few minutes—this helps the sauce settle and makes serving easier. Finish with a sprinkle of thinly sliced green onions. These add a fresh pop of color and a gentle bite that’s just right. Then dive in and enjoy!
Top Tip
Over the years cooking this Baked Kielbasa Pierogi Casserole Recipe, I learned a few key tricks that really elevate the results and make the process smoother:
- Don’t overmix the pierogies: When stirring the sauce in, be gentle to avoid breaking the delicate pierogi dough.
- Choose the right cheese: Using a combo of sharp cheddar and mild mozzarella gives the perfect balance of flavor and meltability.
- Let it rest before serving: The casserole firms up while cooling, making it easier to scoop out perfect portions without collapsing.
- Use foil for the first bake: This prevents drying out and helps those frozen pierogies cook evenly and stay tender.
How to Serve Baked Kielbasa Pierogi Casserole Recipe

Garnishes
I usually top the casserole with freshly sliced green onions—they give such a nice bright contrast to the rich, cheesy casserole. Sometimes I add a dollop of sour cream on the side for an extra creamy touch. If you’re feeling adventurous, a sprinkle of crispy fried onions adds fantastic crunch and flavor.
Side Dishes
What pairs well with this rich casserole? A crisp green salad with a tangy vinaigrette complements it beautifully. I also like roasted or steamed green beans to add that fresh vegetable balance. For heartier meals, sautéed cabbage or even a simple cucumber salad with dill keeps the meal feeling fresh and not too heavy.
Creative Ways to Present
For special occasions, I’ve layered the casserole in individual ramekins for a charming personal touch—perfect for potlucks or family dinners. You can also sprinkle everything with a handful of chopped fresh parsley or chives for a burst of color. Pairing it with a rustic loaf of crusty bread turns this into a full, hearty feast.
Make Ahead and Storage
Storing Leftovers
I usually store leftovers in an airtight container in the fridge. This casserole keeps really well for 3 to 4 days and reheats nicely without drying out, which is something I appreciate after a busy week.
Freezing
If I’m making this ahead for a crowd, I sometimes freeze it after assembling but before baking. Just cover tightly with foil and a lid or plastic wrap, then thaw overnight in the fridge before baking as directed. It freezes beautifully without losing texture or flavor.
Reheating
For leftovers, I reheat in a 350°F oven covered with foil for about 15-20 minutes to warm through without drying out. You can uncover the last few minutes to refresh the crispy cheese topping. Microwaving works too if you’re in a rush, but the oven gives better texture.
Frequently Asked Questions:
Absolutely! Fresh pierogies will work just as well and might even shorten the baking time slightly since they’re not frozen. Just keep an eye on them to avoid overcooking.
I recommend using your favorite smoked kielbasa—whether it’s pork or a beef blend. Smoked kielbasa offers that deep, savory flavor that complements the creamy sauce. Avoid fresh or uncooked sausage since this recipe calls for baking, not cooking raw sausage thoroughly.
Definitely! Just make sure to use gluten-free pierogies (many brands offer gluten-free versions nowadays) and check that your chicken broth and sausages don’t contain any gluten additives. The rest of the ingredients should be naturally gluten-free.
Tossing the frozen pierogies evenly with the cheese sauce helps them stay separate, but if you’re worried, you can lightly spray the baking dish before adding them. Also, stirring gently after adding the sauce is key—not too vigorous to avoid tearing the pierogi skins.
Final Thoughts
This Baked Kielbasa Pierogi Casserole Recipe feels like a warm hug on a plate, packed with nostalgic comfort and rich, creamy goodness. I love sharing it with friends because it’s so approachable, yet impressive enough to put on the table when guests come over. I can’t wait for you to try it and make it your own—it might just become your new favorite casserole too!
Print
Baked Kielbasa Pierogi Casserole Recipe
- Prep Time: 10 minutes
- Cook Time: 40 minutes
- Total Time: 50 minutes
- Yield: 6 servings
- Category: Main Course
- Method: Baking
- Cuisine: American
Description
A comforting and hearty Baked Kielbasa Pierogi Casserole featuring tender pierogies and savory kielbasa sausage baked in a creamy cheese sauce with cheddar and mozzarella, topped with fresh green onions for a perfect weeknight dinner.
Ingredients
Main Ingredients
- 14 ounces sliced kielbasa sausage, ¼-inch thick
- 32 ounces frozen pierogies
Sauce Ingredients
- 1 (8-ounce) block softened cream cheese
- ½ cup sour cream
- ½ cup chicken broth
- 1 teaspoon onion powder
- 1 teaspoon garlic powder
- ½ teaspoon salt
- ½ teaspoon pepper
- 1 cup shredded cheddar cheese, divided
- 1 cup mozzarella cheese, divided
Garnish
- Sliced green onions for garnish
Instructions
- Preheat and Prepare Dish: Preheat the oven to 375 degrees Fahrenheit and spray a 9×13-inch baking dish with non-stick cooking spray to prevent sticking.
- Arrange Kielbasa and Pierogies: Place the 14 ounces of sliced kielbasa sausage and 32 ounces of frozen pierogies evenly in the prepared baking dish.
- Make the Creamy Sauce: In a bowl, use a hand mixer to whisk together the softened cream cheese and sour cream until smooth. Add chicken broth, onion powder, garlic powder, salt, pepper, half of the shredded cheddar cheese, and half of the shredded mozzarella cheese. Whisk until the mixture is well combined and smooth.
- Combine and Coat: Pour the prepared sauce over the kielbasa and pierogies in the baking dish, gently mixing to coat everything thoroughly.
- Add Remaining Cheese: Sprinkle the remaining cheddar and mozzarella cheese evenly over the top of the casserole.
- Bake Covered: Cover the baking dish with foil and bake in the preheated oven for 30 minutes to heat through and meld flavors.
- Bake Uncovered: Remove the foil and continue baking for an additional 10 minutes until the cheese topping is bubbly and golden brown.
- Cool and Garnish: Remove the casserole from the oven and let it cool for a few minutes before garnishing with sliced green onions and serving.
Notes
- Use fully cooked kielbasa sausage for convenience and best flavor.
- Frozen pierogies do not need to be thawed before baking.
- Adjust seasoning to taste; you can add more garlic or onion powder if desired.
- For a lighter version, substitute sour cream with Greek yogurt.
- This casserole can be prepared ahead and refrigerated before baking.
Nutrition
- Serving Size: 1 serving
- Calories: 450 kcal
- Sugar: 3 g
- Sodium: 900 mg
- Fat: 28 g
- Saturated Fat: 12 g
- Unsaturated Fat: 14 g
- Trans Fat: 0.5 g
- Carbohydrates: 30 g
- Fiber: 2 g
- Protein: 20 g
- Cholesterol: 70 mg


Leave a Reply