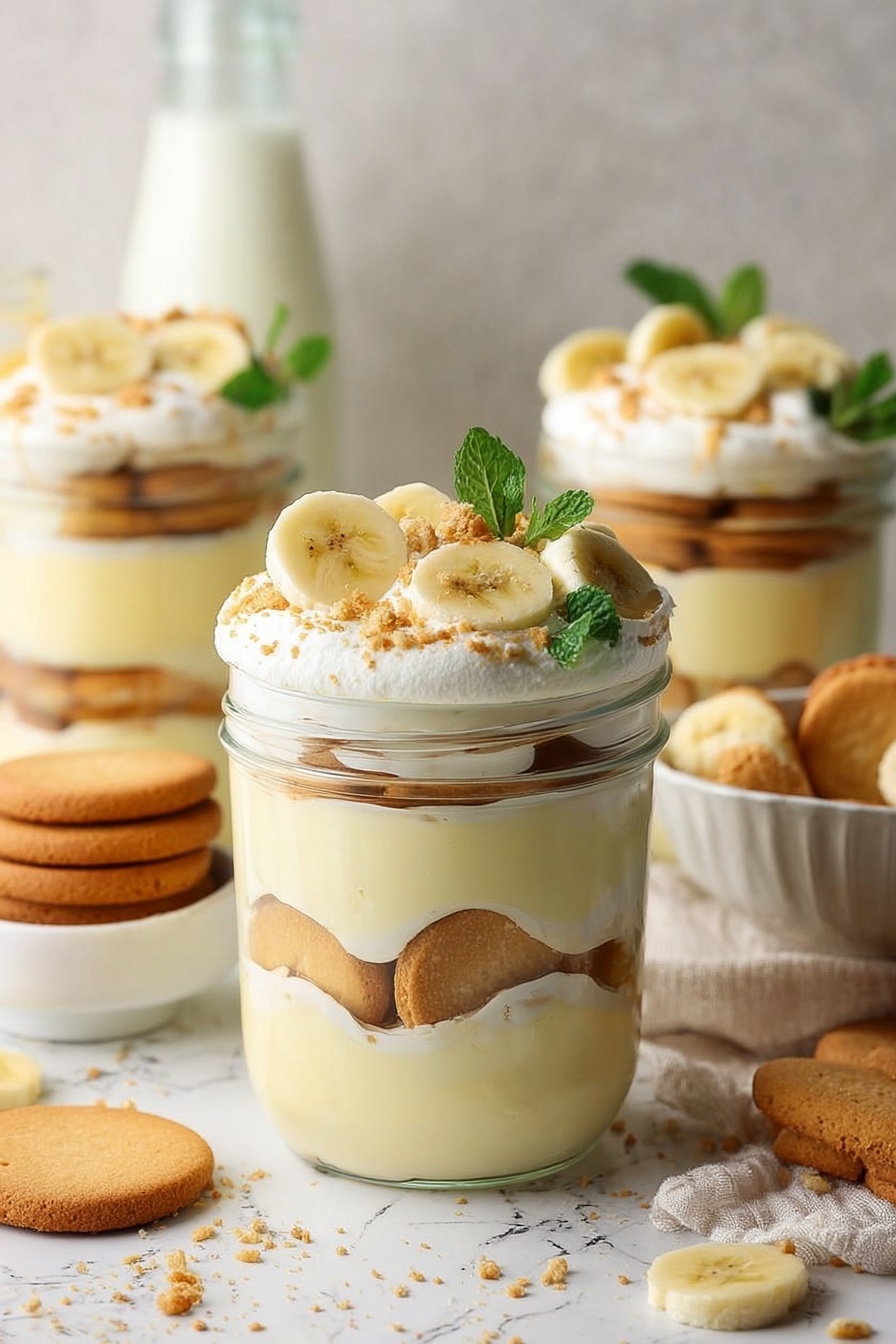
There's something about the smooth, sweet layers of banana and creamy pudding that just feels like a warm hug in dessert form. This Homemade Banana Pudding Recipe captures that perfect balance between nostalgic comfort and fresh, homemade goodness—making every bite truly worth savoring.

Jump to:
Why You'll Love This Recipe
I’ve tried quite a few banana puddings over the years, but this one stands out like a beacon of creamy, banana-y goodness. It’s not just a dessert—it’s a mood lifter, a crowd-pleaser, and one of those recipes you’ll find yourself wanting to share with everyone.
- Real, rich pudding: No instant mix here—just scratch-made pudding with fresh eggs and quality dairy for unbeatable flavor.
- Layered textures: From silky pudding to crisp Nilla wafers and fresh bananas, every bite has a delightful contrast.
- The creamy topping magic: With cream cheese and Cool Whip blended in, it’s a luscious balance that’s not too sweet but oh-so-satisfying.
- Make-ahead friendly: It tastes even better after chilling, and assembling it beforehand means less stress before guests arrive.
Ingredients & Why They Work
Every ingredient in this homemade banana pudding recipe pulls double duty, bringing flavor and texture that pair perfectly to create that classic Southern dessert vibe you’re aiming for.
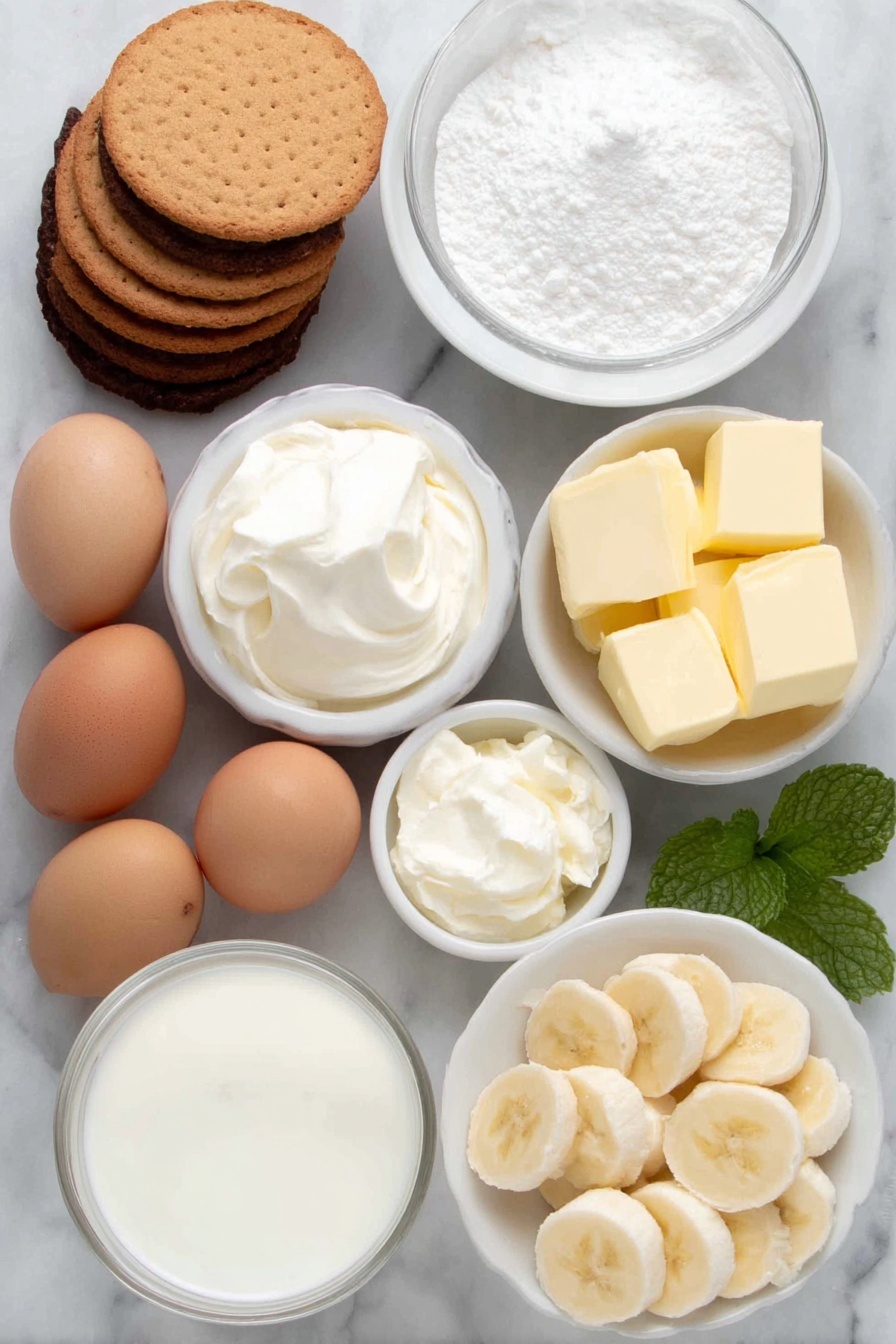
- Whole Milk: Provides the creamy base without overwhelming richness—perfect to balance the pudding.
- Heavy Whipping Cream: Adds a luscious silkiness and richness to the pudding mixture.
- Bourbon (optional): Just a splash for depth and warmth; it’s subtle but adds a grown-up twist.
- Egg Yolks: The true secret to that thick, custardy pudding texture you want.
- Vanilla Bean Paste: A punch of fragrant vanilla flavor that beats plain extract in richness and aroma.
- Cornstarch: Your thickening hero, creating that perfect pudding consistency.
- Sugar (caster or granulated): Sweetens gently while letting the natural banana shine.
- Salted Butter: Adds a velvety richness and a touch of saltiness to round out the flavors.
- Banana/Banana Cream Extract: Amplifies banana flavor without overpowering the natural fruit.
- Cream Cheese (full-fat brick): Creates a smooth, tangy topping that balances the sweetness.
- Cool Whip: Lightens up the cream cheese so the topping doesn’t feel heavy.
- Sweetened Condensed Milk: The perfect touch of sweetness and creaminess for the topping.
- Nilla Wafers: Classic crisp wafers add wonderful crunch and flavor contrast.
- Bananas (fresh): Go for ripe but firm bananas—they’ll hold their shape and taste naturally sweet.
- Fresh Mint Leaves (optional): Adds a fresh, pretty garnish that brightens up the look and taste.
Make It Your Way
I love playing around with this banana pudding recipe, especially with the toppings. You can really make it your own by swapping out ingredients or adding unique twists that suit your taste or the season.
- Variation: Sometimes I pour the pudding into individual glasses and layer with crushed cookies and banana slices for a pretty, personalized presentation. It always feels extra special.
- Dietary swaps: Using almond or oat milk instead of whole milk can lighten it up and cater to dairy sensitivities. Just keep an eye on the pudding thickness.
- Seasonal twist: Adding a handful of fresh berries or a sprinkle of toasted coconut on top gives it a summery vibe that’s irresistible.
- Extra boozy: A splash of rum instead of bourbon can be a fun adult upgrade, just adjust the amount so it doesn’t overpower.
Step-by-Step: How I Make Homemade Banana Pudding Recipe
Step 1: Warm up your dairy gently
Start by heating the whole milk, heavy cream, and bourbon (if you’re using it) in a saucepan over medium-high heat. You want the mixture hot and steamy—just shy of a simmer with no bubbles breaking the surface. This gentle warming is key to infusing the flavors without scalding the milk. It usually takes about 5 to 7 minutes, so don’t rush it.
Step 2: Mix the egg yolks and thickeners
While the dairy heats, whisk together the egg yolks, vanilla bean paste, cornstarch, and sugar in a medium bowl until smooth. It should look thick, like a creamy paste—that's what helps the pudding set beautifully later on. Getting this as smooth as possible upfront will help avoid lumps down the road.
Step 3: Temper the eggs carefully
This step really makes the difference between silky pudding and scrambled eggs in your dessert, so pay attention here! Slowly whisk a spoonful of the hot cream mixture into the yolks—stir as you go—then repeat two or three times. This gradual warming helps the eggs adjust and prevents them from cooking too fast or curdling.
Step 4: Cook the pudding until thick and glossy
Pour your tempered egg mixture back into the saucepan with the warmed cream. Keep whisking constantly while over medium heat to avoid lumps and ensure even cooking. In about 4 to 5 minutes, you'll see the pudding thicken to a beautiful, glossy consistency that coats the back of a spoon. Take it off the heat and stir in the butter cubes and banana extract right away—the residual warmth melts the butter perfectly and locks in the flavors.
Step 5: Chill and prevent pudding skin
Transfer the pudding to an airtight container, then press a piece of plastic wrap directly onto the surface. This trick keeps the pudding from forming a skin as it cools. Pop it in the fridge for at least 4 hours or overnight if you can; the flavor really deepens and the texture firms up beautifully.
Step 6: Whip up the dreamy topping
When you’re ready, beat together the softened cream cheese, Cool Whip, sweetened condensed milk, and vanilla bean paste until smooth and fluffy. This topping is what makes this homemade banana pudding recipe stand out—it’s rich without being overpowering, and it balances the sweetness of the pudding perfectly.
Step 7: Assemble your layers with love
Layer time! Whether you’re using a big trifle bowl or individual glasses, start with pudding, then add Nilla wafers, a dollop of creamy topping, and banana slices. Repeat until you reach the top, finishing off with a generous scoop of the creamy topping and some crushed wafers for a little crunch. Chill for at least an hour so everything melds together before serving.
Top Tip
This recipe is such a joy to make, but I learned a few tips that save a lot of headaches and make your pudding silky smooth and irresistible every time.
- Slow and steady temperature control: Heating your dairy slowly and tempering the eggs with patience is key to smooth pudding, no lumps or scrambled bits.
- Press plastic wrap on the pudding surface: Don’t skip this classic trick—it prevents that annoying thick skin from forming while chilling.
- Don’t rush assembly: Let your pudding chill fully before layering to ensure it sets well and the flavors blend beautifully.
- Use ripe but firm bananas: Super ripe bananas get mushy and brown quickly; slightly firm ones hold their shape and add fresh flavor.
How to Serve Homemade Banana Pudding Recipe

Garnishes
I usually keep it simple with fresh mint leaves for a pop of color and a refreshing contrast to the sweet pudding. Occasionally, I'll sprinkle a light dusting of cinnamon or a few toasted pecans on top to add nice warmth and crunch. It’s all about what you’re in the mood for!
Side Dishes
This banana pudding shines as a standalone dessert, but I’ve found it pairs wonderfully alongside a strong cup of coffee or a scoop of vanilla ice cream for an extra indulgent treat after a simple meal.
Creative Ways to Present
For holidays or dinner parties, I love serving this banana pudding in small mason jars tied with twine or pretty ribbons—makes it feel like a special gift. Layered in clear parfait glasses, it’s a beautiful dessert centerpiece. You can even turn it into banana pudding pops by freezing it in molds for a fun twist!
Make Ahead and Storage
Storing Leftovers
I store leftover banana pudding in an airtight container in the fridge with the plastic wrap directly on the surface to keep it fresh and creamy. It usually lasts 3 to 4 days, but honestly, it rarely sticks around that long at my house!
Freezing
Freezing banana pudding is a bit tricky as the texture can change once thawed. I’ve successfully frozen it in small portions for up to a month, but I recommend letting it thaw slowly in the fridge and giving it a gentle stir before serving. It’s best enjoyed fresh for that signature creamy mouthfeel.
Reheating
Since banana pudding is best served cold, I usually skip reheating. But if you want to warm it up gently (say, if you’re serving it warm with a crisp topping), do so over very low heat on the stove while stirring frequently to prevent curdling. Otherwise, I find it tastes perfect cold straight from the fridge.
Frequently Asked Questions:
Absolutely! In fact, chilling the pudding for several hours or overnight helps the flavors develop and the consistency to firm up perfectly before assembling your layers.
You can substitute vanilla extract if you don’t have vanilla bean paste. Use about one and a half teaspoons for a comparable flavor, though the color won’t be as rich or speckled.
Definitely! While Nilla wafers are classic, you can try vanilla sandwich cookies, shortbread, or graham crackers for a different texture and flavor. Just keep in mind that some cookies may soften more quickly.
Using raw egg yolks tempered with hot milk and cooked on the stove is what gives the pudding its luxurious texture and flavor. Make sure to whisk constantly and cook gently to avoid scrambling the eggs; this method is safe when done carefully.
Final Thoughts
This Homemade Banana Pudding Recipe holds a special place in my kitchen and heart—it’s one of those desserts that brings a smile to everyone's face and a little nostalgia with every spoonful. I genuinely think once you try it, you’ll keep coming back to it for celebrations, family dinners, or whenever you just need a bit of sweet comfort. Give it a shot—you’re going to love making and sharing every creamy, dreamy bite!
Print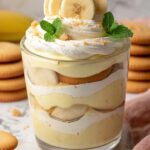
Homemade Banana Pudding Recipe
- Prep Time: 25 minutes
- Cook Time: 10 minutes
- Total Time: 35 minutes
- Yield: 6 servings
- Category: Dessert
- Method: Stovetop
- Cuisine: American
Description
This best homemade banana pudding recipe features a rich, creamy pudding layered with nilla wafers, fresh bananas, and a luscious cream cheese topping. Perfectly chilled and garnished with fresh mint, this classic dessert is comforting, flavorful, and ideal for gatherings or a sweet treat.
Ingredients
Banana Pudding
- 2 cups whole milk
- 1 cup heavy whipping cream
- 1 tablespoon bourbon (optional)
- 5 large egg yolks
- 1 tablespoon vanilla bean paste
- ¼ cup cornstarch
- ½ cup caster sugar (or granulated sugar)
- ¼ cup salted butter, cut into cubes
- 1 tablespoon banana or banana cream extract
Creamy Topping
- 8 ounces full-fat brick cream cheese, room temperature
- 8 ounces Cool Whip, room temperature
- ½ cup sweetened condensed milk
- 1 tablespoon vanilla bean paste
Assembly
- 1 (11-ounce) box Nilla wafers
- 4 medium bananas, sliced into ½-inch thick slices/coins
- Fresh mint leaves for garnish (optional)
Instructions
- Prepare the pudding base: In a saucepan over medium-high heat, combine whole milk, heavy cream, and bourbon (if using). Heat the mixture until it is barely hot but not boiling, about 7 minutes.
- Whisk egg yolk mixture: In a medium bowl, whisk together egg yolks, vanilla bean paste, cornstarch, and sugar until smooth and paste-like in consistency.
- Temper the egg yolks: Gradually add about a tablespoon of the hot milk mixture to the egg yolk mixture, stirring immediately to combine. Repeat this 2 to 3 more times to temper the yolks and prevent curdling.
- Combine and thicken pudding: Remove the saucepan from heat but keep it hot. Pour the tempered egg yolk mixture back into the pan with the hot milk mixture, whisking constantly to avoid scrambling the eggs, for about 2 minutes.
- Cook pudding: Return the pan to medium heat and continue whisking until the pudding thickens, about 4 to 5 minutes. Turn off the heat, then stir in cubed salted butter and banana extract until fully melted and combined.
- Chill pudding: Transfer pudding to an airtight container. Press plastic wrap directly onto the surface to prevent skin formation, cover with a lid, and refrigerate for at least 4 hours or overnight for best results.
- Make creamy topping: In a large bowl, using a handheld electric mixer or vigorous whisking, combine softened cream cheese, Cool Whip, sweetened condensed milk, and vanilla bean paste. Whisk until smooth and well combined.
- Assemble the banana pudding: In a trifle dish or individual glasses, layer pudding, Nilla wafers, creamy topping, and banana slices. Repeat the layers until the dish is filled, finishing with creamy topping and some wafer crumbs on top.
- Chill assembled pudding: Refrigerate the fully assembled banana pudding for at least 1 hour before serving.
- Garnish and serve: Garnish with fresh mint leaves if desired, then serve and enjoy your homemade banana pudding.
Notes
- Use full-fat dairy for the creamiest texture and richest flavor.
- Tempering the egg yolks is essential to prevent curdling when combining hot milk and eggs.
- Cover pudding surface with plastic wrap to avoid a skin forming during chilling.
- Allowing the pudding to chill overnight enhances flavor and thickens the texture.
- You can substitute banana extract with fresh mashed bananas if desired for a more natural flavor.
- For a lighter version, substitute Cool Whip with whipped cream, though consistency will be slightly different.
- Use firm, ripe bananas to avoid mushy layers in the pudding.
- The bourbon is optional but adds a subtle depth of flavor.
- If desired, garnish with nuts or caramel drizzle for extra texture and flavor variation.
Nutrition
- Serving Size: 1 serving
- Calories: 380 kcal
- Sugar: 35 g
- Sodium: 180 mg
- Fat: 22 g
- Saturated Fat: 13 g
- Unsaturated Fat: 7 g
- Trans Fat: 0 g
- Carbohydrates: 38 g
- Fiber: 2 g
- Protein: 5 g
- Cholesterol: 120 mg


Leave a Reply