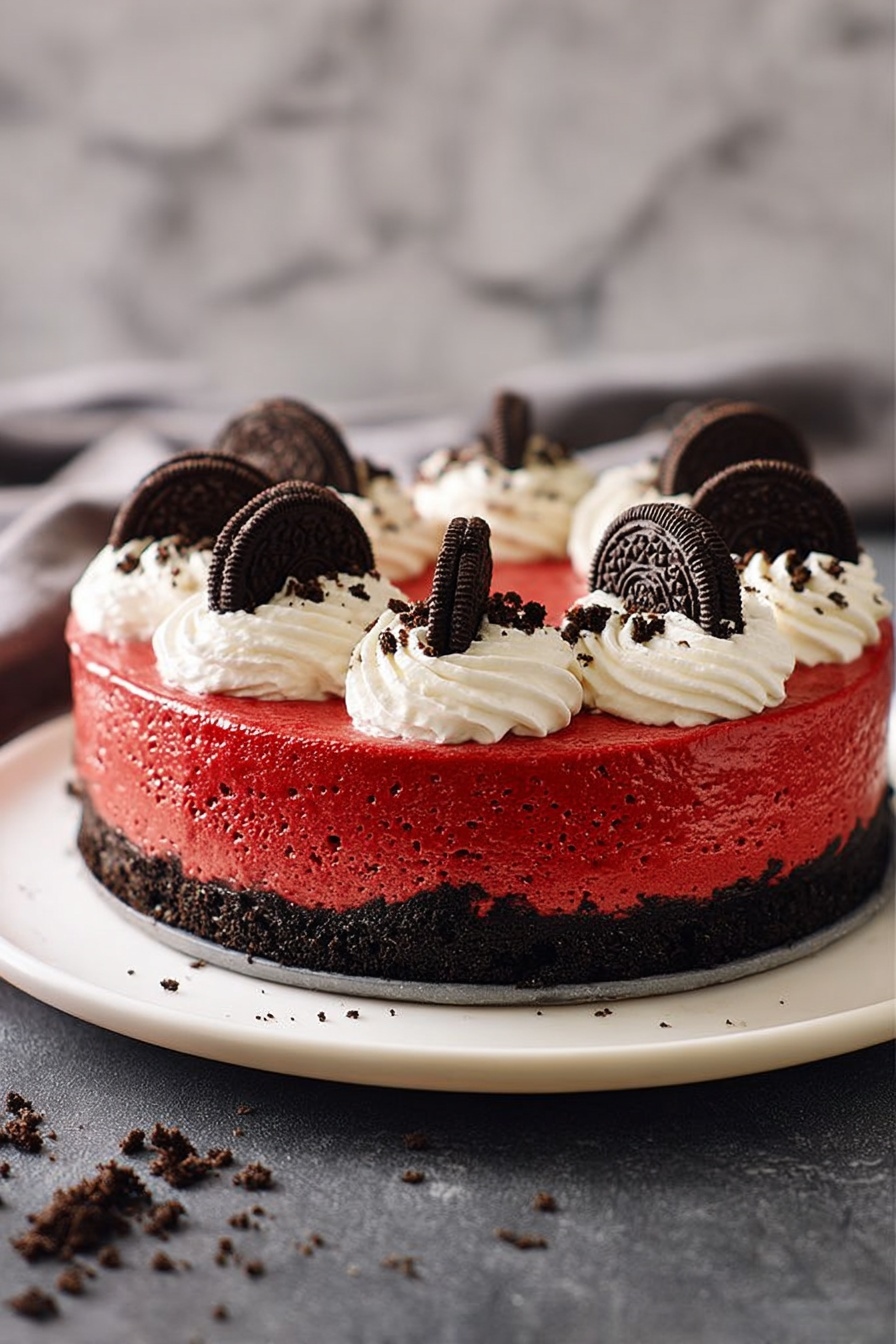
There’s something magical about the way velvety red cake meets creamy cheesecake and crunchy cookies. This Red Velvet Oreo Cheesecake Recipe captures all that with a festive twist—perfect for feeling those cozy holiday vibes any time of year.

Jump to:
Why You'll Love This Recipe
I’m so excited to share this because it’s one of those desserts I keep coming back to whenever the mood strikes. The charm lies in its layers—rich cream cheese goodness paired with the subtle cocoa and festive red hue, plus bits of Oreo for that extra crunch.
- Creamy meets crunchy: The Oreo crust adds just the right texture contrast to the silky cheesecake layer.
- Perfect festive flair: The red velvet twist brings a fun, vibrant color that’s great for holidays or any celebration.
- Easy but impressive: It looks like a bakery treat but comes together with simple ingredients and straightforward steps.
- Flexible pan sizes: This recipe adapts well whether you’re baking in a 6-inch or 7-inch springform pan without fuss.
Ingredients & Why They Work
Let’s talk about why I love these ingredients and how they come together. You want full-fat cream cheese and sour cream for that luscious texture and tang. Oreo crumbs give you a chocolatey, crunchy base. And that splash of red food coloring? Helps capture red velvet’s iconic look without weighing down the batter.
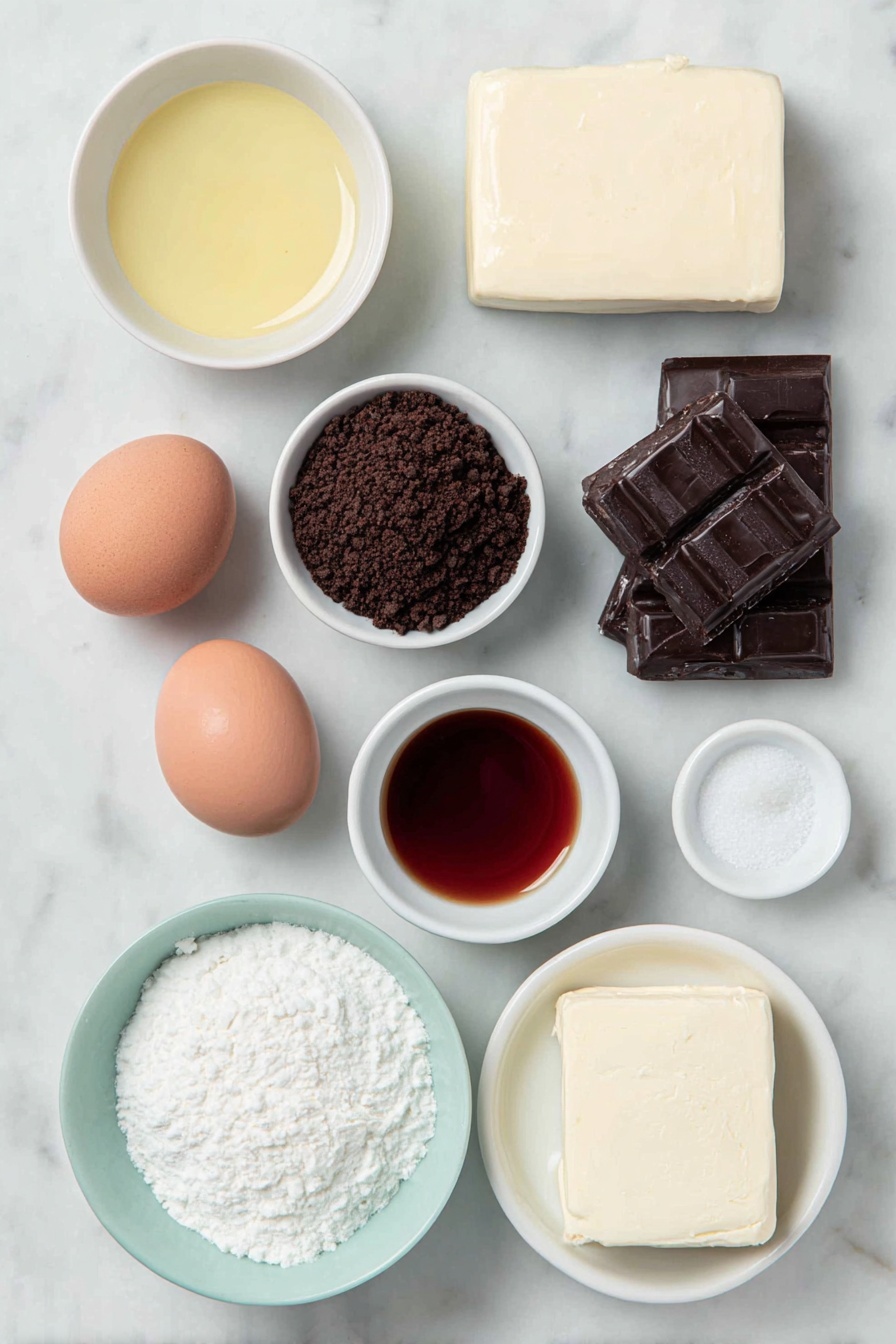
- Chocolate sandwich cookie crumbs: Oreo crumbs are perfect here, providing richness and a firm base to hold the cheesecake.
- Unsalted butter: Melting and mixing this with cookie crumbs binds the crust so it’s crisp but not crumbly.
- Full-fat cream cheese: Essential for creamy richness — I always avoid any low-fat or whipped varieties to keep texture perfect.
- Granulated sugar: Just enough sweetness to balance the slight tanginess of the cream cheese.
- Full-fat sour cream: Adds moisture and depth, making the cake tender with a subtle tang.
- Eggs: These bring structure and help the cheesecake set — room temperature ones work best for smooth blending.
- Unsweetened cocoa powder: Gives you that chocolatey undertone that’s signature to red velvet.
- Liquid red food coloring: I prefer brands like McCormick for vibrant, consistent color without bitterness.
- Vanilla extract: A touch deepens flavor and rounds everything out.
- Cream Cheese Whipped Cream: The perfect topping that complements the dense cake with airy sweetness.
Make It Your Way
This Red Velvet Oreo Cheesecake Recipe is already a stunner, but I love tweaking it depending on the occasion. It’s all about making it yours—whether that means adding extra Oreo chunks inside or experimenting with alternative toppings.
- Variation: I once swapped the sour cream for Greek yogurt—added a little tang and made it just a smidge lighter. Totally worked and my family didn’t notice!
- Dietary tweak: For a gluten-free twist, grab gluten-free chocolate sandwich cookies instead of Oreos.
- Extra flair: Try folding mini white chocolate chips into the batter for little pockets of sweetness.
Step-by-Step: How I Make Red Velvet Oreo Cheesecake Recipe
Step 1: Prepare the Crust with Love
First things first, preheat your oven to 325°F, and don’t skip wrapping the springform pan in foil—it’s a lifesaver to prevent water from sneaking in during the water bath. Combine your Oreo crumbs with melted butter and press the mix firmly into the bottom of your pan. I like to use the bottom of a glass to really pack it down evenly—that way you get that perfect crunch. Pop it in the oven for 10 minutes to set before the cheesecake batter goes in.
Step 2: Beat That Batter Until Silky
While the crust is baking, whip up your cream cheese, sugar, and sour cream until it’s light and fluffy—about 2 to 3 minutes. I like to scrape the bowl down once or twice; otherwise, you might end up with lumps. Then add the eggs slowly, one by one, beating well but not overmixing — overbeating can lead to cracks later. The last step is folding in cocoa, red food coloring, and vanilla extract for that iconic look and flavor.
Step 3: Water Bath & Bake Like a Pro
Pour your batter onto the pre-baked crust, and nestle your springform pan inside a larger pan. Carefully pour hot water into the pan until it reaches halfway up the sides—this water bath method keeps the cheesecake from drying out and helps it cook evenly with no cracks. Bake for about 65 to 75 minutes until the edges are set and slightly browned, and the center wiggles only a little. Keep an eye on your oven; every one behaves differently!
Step 4: Cooling & Chilling Is Key
This part takes patience but is worth it. When you take the cheesecake out, run a knife around the edges while it’s still warm to loosen it from the pan and prevent cracks. Cool it right there in the water bath for 15 minutes, then move it to room temperature for about an hour. Finally, cover and chill in the fridge for at least 4 hours or overnight. This letting it set fully makes slicing neat and keeps the flavor lush.
Top Tip
I’ve made this cheesecake dozens of times, and a few insights helped it turn out perfectly every time. Here’s what I’ve learned in the kitchen:
- Room Temperature Ingredients: Make sure your cream cheese, eggs, and sour cream aren’t cold straight from the fridge—it prevents lumps and helps the batter blend super smooth.
- Water Bath Wrapping: Don’t skip wrapping your springform pan in foil tightly to avoid water leaks that can soggy the crust.
- Don’t Overbake: Look for the center to still “jiggle” like gelatin but not be liquidy. This gives you that silky creamy texture after chilling.
- Knife Around the Edge: Running a sharp knife around the pan edge while still warm prevents unsightly cracks from forming.
How to Serve Red Velvet Oreo Cheesecake Recipe

Garnishes
I love topping this cheesecake with a homemade cream cheese whipped cream for a light, tangy finish. Sometimes I add crushed Oreo pieces or a few fresh raspberries to brighten the plate and add some tartness—it complements the richness beautifully.
Side Dishes
Pair your slice with a scoop of vanilla bean ice cream or even a simple cup of hot coffee or tea. For parties, fresh fruit salad balances the richness wonderfully, keeping things fresh and lively.
Creative Ways to Present
When I’m feeling fancy, I’ve made mini cheesecakes in cupcake molds using the same recipe—perfect for grab-and-go holiday treats. For celebrations, piping whipped cream rosettes around the edge and dusting with a little cocoa powder really makes it pop!
Make Ahead and Storage
Storing Leftovers
Once chilled, I keep leftovers tightly covered in the fridge. This cheesecake stays fresh and creamy for up to 5-7 days if wrapped well—I usually put it under a cake dome or tightly in plastic wrap, then foil for measured protection.
Freezing
For longer storage, freezing works like a charm. I slice it into portions and individually wrap each piece in plastic wrap and foil, then tuck them in a freezer-safe bag. When ready to enjoy, thaw overnight in the fridge to keep that smooth texture intact.
Reheating
I usually don’t reheat cheesecake, but if you want it a bit softer, just let it sit at room temp for about 30 minutes before serving. That brings out the flavors without losing that creamy feel.
Frequently Asked Questions:
While you can use a regular cake pan, a springform pan is ideal for easy removal without damaging the cheesecake’s delicate edges. If you must substitute, line the pan well with parchment and be extra careful when unmolding.
You can use gel food coloring as a substitute—just use about half the amount since it’s more concentrated. Natural colorings like beet juice may also work but can alter the flavor slightly.
Cracks often come from overbeating or overbaking. Use room temperature ingredients, avoid overmixing, bake in a water bath to regulate temperature, and loosen the edges with a knife right after baking. Cooling gradually also helps.
Yes, doubling is possible, but I recommend using a larger springform pan, around 9 inches, and adjusting baking time accordingly. Also, ensure your oven can accommodate the larger pan with a water bath.
Final Thoughts
This Red Velvet Oreo Cheesecake Recipe holds a special spot in my heart because it’s a wonderful mix of classic flavors and a fun, festive appearance that impresses without fuss. I love sharing it with friends and family—it always feels like a celebration. Give it a try, and I think you’ll find yourself making it again and again, just like I do.
Print
Red Velvet Oreo Cheesecake Recipe
- Prep Time: 20 minutes
- Cook Time: 1 hour 15 minutes
- Total Time: 6 hours 35 minutes
- Yield: 6 servings
- Category: Dessert
- Method: Baking
- Cuisine: American
- Diet: Vegetarian
Description
This Christmas Red Velvet Oreo Cheesecake combines the rich, creamy texture of classic cheesecake with festive red velvet flavors and a chocolate Oreo crust. Perfect for holiday celebrations, this decadent dessert is topped with whipped cream and features a moist, vibrant red batter baked to perfection in a water bath to ensure a smooth, crack-free finish.
Ingredients
Crust
- 1 cup chocolate sandwich cookie crumbs, such as Oreo
- 2 tablespoons unsalted butter, melted
Cheesecake Filling
- 16 ounces full-fat cream cheese, room temperature
- ½ cup granulated sugar
- 2 tablespoons full-fat sour cream, room temperature
- 2 eggs, room temperature
- 1 tablespoon unsweetened cocoa powder
- 2 teaspoons liquid red food coloring (McCormick brand or similar)
- 1 teaspoon vanilla extract
Topping
- Cream Cheese Whipped Cream or Small Batch Whipped Cream
Instructions
- Prepare the Oven and Pan: Preheat the oven to 325 degrees Fahrenheit. Wrap the outside of a 6x2 or 6x3 inch springform pan with foil to prevent water from seeping in during the water bath. Lightly grease the inside of the pan. This recipe also works in a 7-inch springform pan without adjustments.
- Make the Crust: In a large bowl, combine the chocolate sandwich cookie crumbs and melted butter. Press the mixture firmly into the bottom of the prepared springform pan. Bake the crust in the preheated oven for 10 minutes to set.
- Mix the Cheesecake Batter: In a large mixing bowl fitted with the paddle attachment of a stand mixer, beat the cream cheese, granulated sugar, and sour cream on medium-high speed until the mixture is light and fluffy, approximately 2 to 3 minutes. Scrape down the bowl as necessary.
- Add Eggs: Beat in the eggs one at a time, mixing each egg for about 1 minute until fully incorporated and the batter is smooth. Avoid overbeating to prevent excess air in the batter.
- Add Flavorings: Scrape down the bowl again, then beat in the cocoa powder, red food coloring, and vanilla extract until evenly combined and the batter has a rich red velvet color.
- Assemble for Baking: Pour the cheesecake batter onto the pre-baked crust. If using a 6x2 pan, the batter will fill to the top. Place the springform pan inside a larger 8x8-inch or bigger pan to prepare for a water bath.
- Prepare the Water Bath and Bake: Carefully pour hot water into the outer pan until it reaches halfway up the sides of the springform pan, avoiding water contact with the foil wrapping or inside the pan. Bake the cheesecake for 75 minutes or until the edges are set and brown, the center mostly set but slightly wobbly, and the internal temperature reaches 150 degrees Fahrenheit.
- Cool the Cheesecake in Water Bath: Remove the cheesecake from the oven and run a knife carefully along the edges to loosen it from the pan. Let the cheesecake cool in the water bath for 15 minutes.
- Cool at Room Temperature: Remove the springform pan from the water bath and allow it to cool at room temperature for 1 hour, allowing the cheesecake to set more fully.
- Chill Before Serving: Cover the cheesecake and refrigerate for at least 4 hours or overnight to fully chill and develop flavors. Before serving, top with cream cheese whipped cream or your preferred frosting. Store leftovers in an airtight container in the refrigerator for up to 5 to 7 days.
Notes
- For a 9-inch cheesecake, use a different recipe by omitting the chocolate in the crust, then adding ¼ cup sour cream, 2 tablespoons cocoa powder, and 1 tablespoon red food coloring to the filling.
- Try other small cheesecake recipes such as 6 Inch Cheesecake, Chocolate Cheesecake with Oreo Crust, Small Pumpkin Cheesecake, and Peanut Butter Cheesecake for variety.
- For additional red velvet treats, consider Small Red Velvet Cake, Red Velvet Cupcakes, Red Velvet Sugar Cookies, and Red Velvet Bars.
- Make sure all dairy ingredients and eggs are at room temperature for a smooth batter and even baking.
- Using a water bath during baking helps prevent cracks and ensures even cooking.
- If you do not have liquid red food coloring, gel food coloring can be substituted in the same quantity.
Nutrition
- Serving Size: 1 slice (approx. ⅙ of cheesecake)
- Calories: 450 kcal
- Sugar: 35 g
- Sodium: 320 mg
- Fat: 32 g
- Saturated Fat: 19 g
- Unsaturated Fat: 10 g
- Trans Fat: 0.5 g
- Carbohydrates: 30 g
- Fiber: 1 g
- Protein: 7 g
- Cholesterol: 100 mg


Leave a Reply