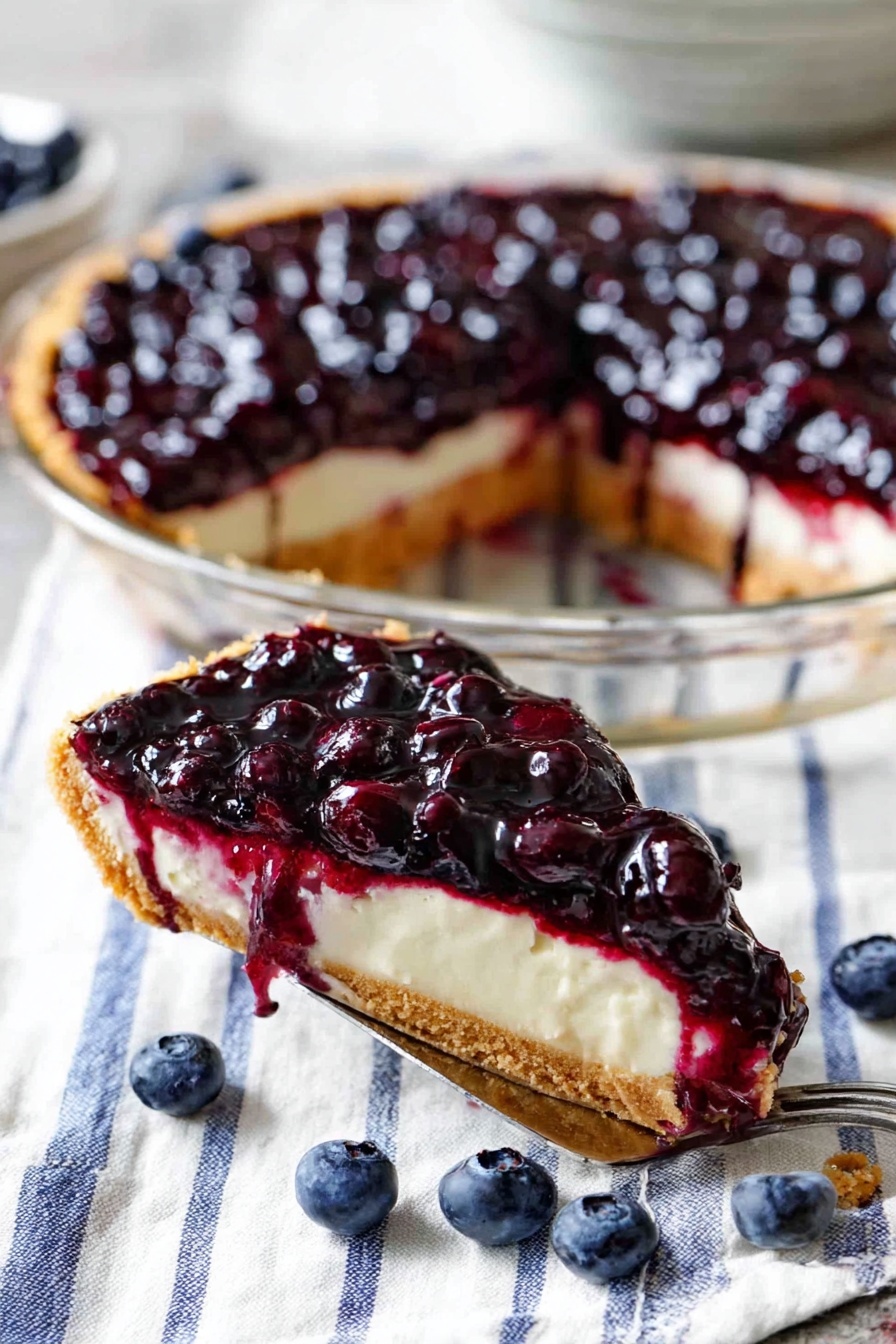
There’s something truly irresistible about the creamy texture of a perfectly baked cheesecake paired with the bright pop of fresh blueberries. This Blueberry Cheesecake Recipe is one of my all-time favorites to make for celebrations or a cozy weekend treat—it's fresh, tangy, and just the right amount of sweet that never disappoints.

Jump to:
Why You'll Love This Recipe
I’m always excited to share this blueberry cheesecake recipe because it strikes the perfect balance of ease and elegance. The rich, smooth cream cheese filling combined with a crunchy vanilla wafer crust makes it feel both comforting and special.
- Simple ingredients: You probably already have most of these staples in your kitchen, which makes this recipe quick to pull together.
- Water bath baking: This technique keeps the cheesecake silky and crack-free every time.
- Fresh blueberry sauce: Homemade sauce brightens the richness with just the right fruity zing.
- Make-ahead friendly: Chill overnight for a no-fuss dessert ready when you want it.
Ingredients & Why They Work
Each ingredient in this Blueberry Cheesecake Recipe plays a crucial role—whether it’s the velvety cream cheese for that perfect texture or the buttery vanilla wafer crust that adds irresistible crunch. Choosing quality ingredients up front makes all the difference in the final taste and consistency.
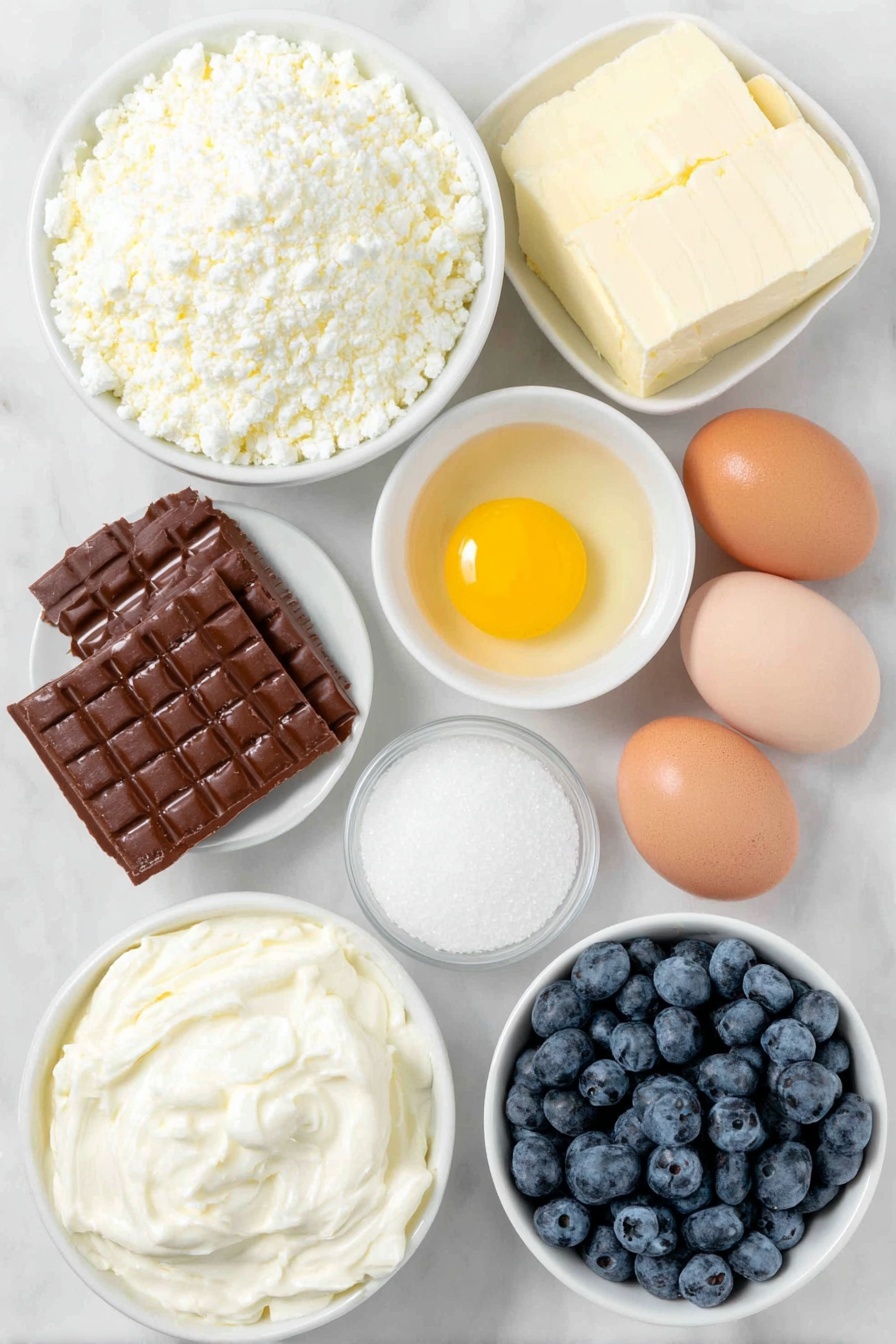
- Vanilla wafers: Ground into crumbs, they form a fragrant, tender crust that’s a lovely alternative to graham crackers.
- Sugar: Sweetens both crust and filling without overpowering the natural tartness of the cream cheese and blueberries.
- Butter: Melted and mixed with the wafer crumbs, it binds the crust together and adds richness.
- Cream cheese: The foundation of your cheesecake—make sure it's softened to room temperature for smooth mixing and no lumps.
- Eggs and egg yolk: These bind the filling and give it a luscious, creamy texture when baked gently.
- Sour cream: Adds a subtle tang and silkiness that balances sweetness perfectly.
- Vanilla extract: Enhances the flavors and adds that classic cheesecake aroma.
- Blueberries: Fresh or frozen, boiled down into a sauce, they bring a bright, natural burst of flavor.
Make It Your Way
I love swapping up the topping on this Blueberry Cheesecake Recipe depending on the season or my mood. You can easily make it with other berries or even a salted caramel drizzle for a fun twist that keeps everyone guessing.
- Lemon zest: Adding a teaspoon of lemon zest into the filling brightens the flavor and complements the blueberries beautifully—I tried this last summer and loved how fresh it tasted!
- Gluten-free crust: Use gluten-free vanilla wafers or almond flour crust to make it friendly for gluten sensitivities without compromising on taste.
- Mini cheesecakes: I’ve made this recipe in a muffin tin for bite-sized treats—perfect for parties or after-school snacks.
Step-by-Step: How I Make Blueberry Cheesecake Recipe
Step 1: Craft the Perfect Vanilla Wafer Crust
First, pulse those vanilla wafers in a food processor until you have fine crumbs. If you don’t have a processor, pop them in a zip-top bag and crush with a rolling pin—either way works. Mix the crumbs with sugar and melted butter until everything looks like wet sand, then press the mixture evenly into a 9-inch pie pan, making sure to go up the sides for that classic cheesecake feel. Bake it at 350°F for about 8-10 minutes until it’s just beginning to brown—this step locks in that lovely crunch, so don’t skip it! Let it cool completely before moving on.
Step 2: Beat Up a Silky Smooth Cheesecake Filling
Room temperature ingredients are your secret weapon here. Beat the cream cheese until it's super smooth and fluffy—don’t rush this; it can take a good 3-5 minutes with a mixer. Once silky, add sugar and keep beating for another 3 minutes. Then, add the eggs and yolk one at a time, mixing just until combined to avoid air bubbles. Finally, blend in sour cream and vanilla extract. Pour this luscious mixture over your cooled crust and get ready for the baking magic.
Step 3: Water Bath Time for a Flawless Bake
This step makes all the difference between cracked, sad cheesecake and a velvety masterpiece. Place your pie pan inside a large roasting pan and fill the roasting pan with warm water halfway up the sides of the cheesecake pan. Bake at 325°F for 45 minutes. You'll want the center to still jiggle slightly—that wobble means it's perfectly cooked. Resist opening the oven door to peek; it can cause the cheesecake to sink and crack.
Step 4: Cool Gently and Chill
When time’s up, turn off the oven and prop it open a bit, letting your cheesecake cool gently for about 30 minutes. Then move it to a wire rack until fully cooled before refrigerating for at least 4 hours or overnight. This slow cool-down is another trick to avoid cracks and ensures that creamy texture you’re aiming for.
Step 5: Prepare the Blueberry Sauce
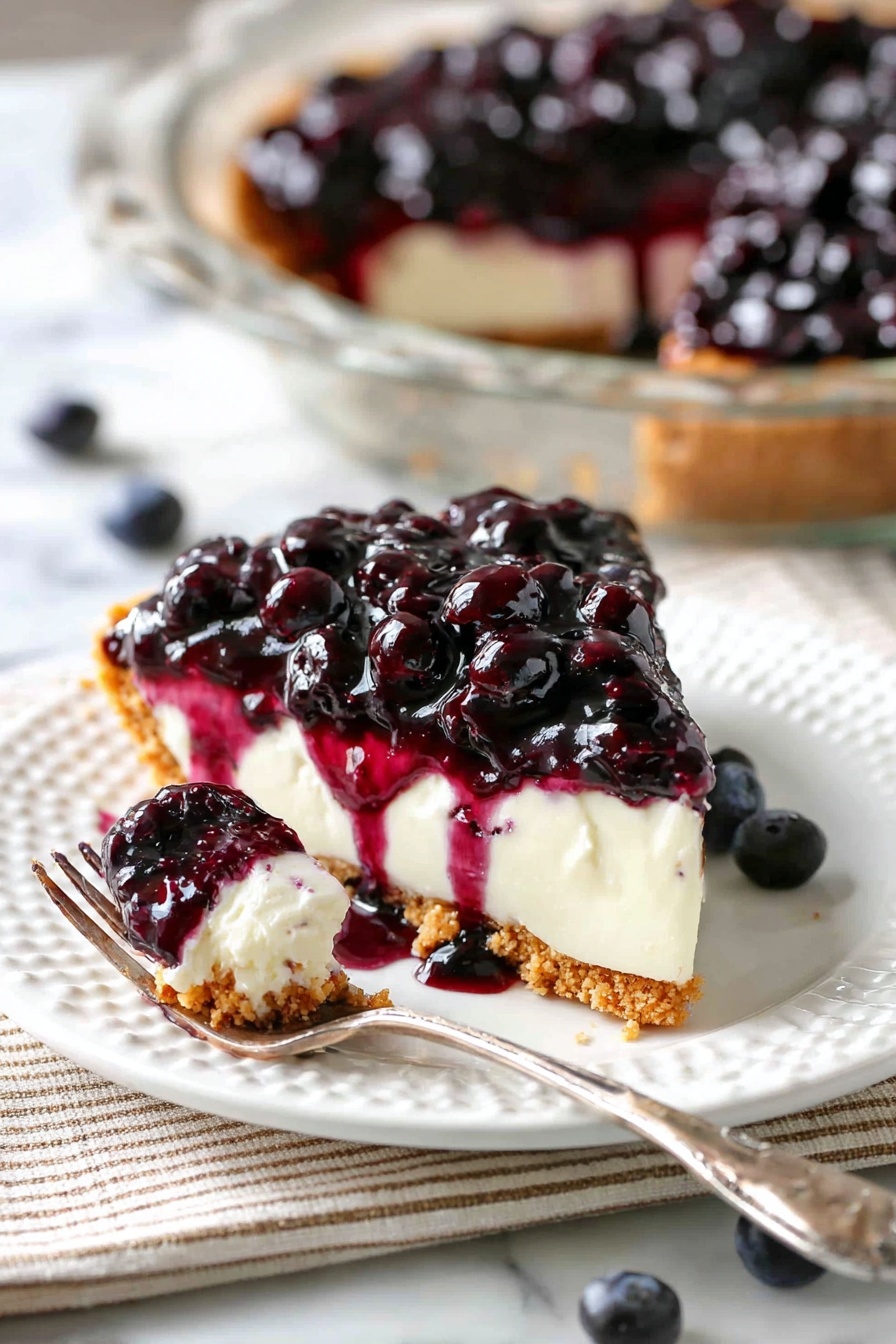
While the cheesecake bakes and cools, make the blueberry sauce separately following your favorite method or the recipe at the bottom here—it thickens nicely as it chills. Spoon the cool, glossy sauce over each slice just before serving for a fresh burst of flavor and that beautiful blueberry shine.
Top Tip
From my many cheesecake adventures, here are the essentials that take this blueberry cheesecake from good to unforgettable—and help you avoid common pitfalls.
- Use room temperature ingredients: It sounds simple, but I can’t stress enough how much this prevents lumps and cracks. Plan ahead and let everything sit out for about 30 minutes before mixing.
- Water bath magic: Baking the cheesecake in a water bath is a game changer for that creamy, crack-free texture. It keeps things moist and bakes evenly.
- Don’t peek while baking: I’ve learned the hard way that opening the oven door to check causes temperature drops that make your cheesecake sink or crack—resist the urge, I promise it’s worth it.
- Cool slow and steady: Letting the cheesecake cool inside the warm oven with the door cracked, then gradually to room temperature before chilling, keeps the filling smooth without ugly cracks.
How to Serve Blueberry Cheesecake Recipe
Garnishes
I like to keep it simple with a dollop of the blueberry sauce and maybe a few fresh blueberries and mint leaves scattered on top for a fresh, pretty touch. Sometimes a light dusting of powdered sugar adds that elegant, bakery-style finish.
Side Dishes
This cheesecake pairs wonderfully with lighter, refreshing sides like a crisp green salad or a citrus sorbet if you’re serving multiple courses. For a special brunch, I often add some fresh fruit and a cup of strong coffee to complete the experience.
Creative Ways to Present
For birthdays or gatherings, I’ve layered individual servings in clear jars topped with blueberry sauce, whipped cream, and a sprig of mint—this makes a stunning presentation and keeps everyone’s portions neat and easy to serve.
Make Ahead and Storage
Storing Leftovers
Leftover cheesecake should be tightly covered and stored in the fridge—it keeps beautifully for up to 4 days. I like to slice before storing; it’s easier to grab a portion and keeps the cheesecake fresh.
Freezing
Freezing cheesecake works well if you wrap it tightly with plastic wrap and then foil. I usually freeze whole or by slices for up to two months. When ready to enjoy, thaw overnight in the fridge to keep the texture creamy and smooth.
Reheating
I typically serve cheesecake chilled, but if you want it closer to room temperature, take it out of the fridge about 20-30 minutes beforehand. This softens it nicely without melting or ruining the texture.
Frequently Asked Questions:
The key is baking in a water bath, using room temperature ingredients, not opening the oven while baking, and allowing the cheesecake to cool gradually. These methods keep the filling smooth and prevent cracks.
Yes! Frozen blueberries work perfectly for the sauce. Just thaw them and cook down as usual. The sauce may be a bit thicker after chilling, but the flavor is just as fresh.
Chilling the cheesecake for at least 4 hours is essential for the filling to set properly, but overnight chilling gives the best texture and flavor.
Absolutely! Using a muffin tin or small tart pans makes delightful individual cheesecakes. Just adjust the baking time to around 20-25 minutes and watch for a slight jiggle in the center.
Final Thoughts
This Blueberry Cheesecake Recipe isn’t just dessert to me—it’s a celebration of simple ingredients coming together in a truly special way. Whether you’re baking for family, friends, or just indulging yourself, it’s a surefire way to impress without stressing. Give it a try, and I’m confident you’ll find yourself reaching for this recipe again and again.
Print
Blueberry Cheesecake Recipe
- Prep Time: 25 minutes
- Cook Time: 45 minutes
- Total Time: 1 hour 10 minutes
- Yield: 12 servings
- Category: Dessert
- Method: Baking
- Cuisine: American
- Diet: Vegetarian
Description
This Fresh Blueberry Cheesecake features a crisp vanilla wafer crust filled with a smooth, creamy cheesecake topped with a luscious homemade blueberry sauce. Baked gently in a water bath for a crack-free texture and chilled to perfection, it makes an elegant dessert perfect for any occasion.
Ingredients
Vanilla Wafer Crust
- 45 vanilla wafers (heaping 1-½ cups crumbs)
- 2 tablespoons sugar
- 6 tablespoons butter, melted
Cheesecake
- 2 8 oz. blocks cream cheese, softened
- 2 eggs, room temperature
- 1 egg yolk, room temperature
- 1 cup sugar
- 1 cup sour cream, room temperature
- 1 teaspoon vanilla extract
Blueberry Sauce
- 1 Recipe Blueberry Sauce (prepared separately)
Instructions
- Prepare the Crust: Add vanilla wafers to a food processor and pulse until finely ground or crush by hand. Combine the crumbs with melted butter and sugar in the processor and pulse until evenly combined. Press the mixture evenly onto the bottom and up the sides of an ungreased 9-inch pie pan. Bake at 350 degrees F for 10 minutes or until the crust begins to brown. Allow to cool completely.
- Make the Cheesecake Filling: Preheat the oven to 325°F. Beat the softened cream cheese until very smooth, about 5 minutes, ensuring no lumps remain. Add sugar and beat for another 3 minutes. Incorporate eggs and egg yolk one at a time, mixing gently just until combined after each addition. Beat in sour cream and vanilla extract until just combined. Pour the filling over the cooled crust.
- Bake in a Water Bath: Place the pie pan inside a larger roasting pan. Pour warm water into the roasting pan until it reaches halfway up the sides of the pie pan. Bake at 325°F for 45 minutes. The cheesecake should jiggle slightly in the center while the edges set.
- Cool Gradually: After 45 minutes, turn off the oven but leave the cheesecake inside with the door cracked open for 30 minutes to cool slowly. Remove from oven and let cool completely on a wire rack, then refrigerate for at least 4 hours, preferably overnight.
- Prepare Blueberry Sauce: While the cheesecake bakes, prepare the blueberry sauce according to its recipe. Chill separately in the refrigerator; it will thicken as it cools.
- Serve: Spoon the chilled blueberry sauce over the cheesecake just before serving.
Notes
- Watch the recipe video to master the technique and ensure perfect results.
- Use a water bath to prevent cracks by insulating the cheesecake edges.
- Bring all dairy and eggs to room temperature for smooth mixing and to avoid lumps or cracks.
- Beat the cream cheese thoroughly until fluffy to achieve a smooth filling.
- Do not open the oven door while baking to maintain stable temperature and prevent cracking.
- Remove the cheesecake once edges are set but center still jiggles to avoid overbaking.
- Cool gradually in the oven then at room temperature before refrigeration to prevent cracking from sudden temperature changes.
- If cracking occurs, cover imperfections with blueberry sauce for an appealing look.
Nutrition
- Serving Size: 1 slice (1/12th of cheesecake)
- Calories: 380 kcal
- Sugar: 30 g
- Sodium: 220 mg
- Fat: 28 g
- Saturated Fat: 17 g
- Unsaturated Fat: 9 g
- Trans Fat: 0 g
- Carbohydrates: 25 g
- Fiber: 1 g
- Protein: 6 g
- Cholesterol: 120 mg


Leave a Reply