There’s something utterly satisfying about a homemade Cherry Pie with Lattice Crust Recipe—that perfect balance of sweet and tart cherries wrapped in a flaky, buttery crust that you just can’t get enough of. If you love baking pies that taste like summer in every bite, you’re going to adore this one.

Jump to:
Why You'll Love This Recipe
I can’t tell you how many times this cherry pie has been the star dessert at our family gatherings. It’s one of those recipes that feels both special and totally doable, even if lattice crust seems intimidating at first!
- Bright & Bold Flavor: Tart frozen cherries combine with warm spices for a filling that’s bursting with flavor.
- Beautiful Lattice Crust: The homemade lattice gives an impressive, classic look that’s easier to make than you think.
- Make-Ahead Friendly: You can prepare the dough and filling a day ahead, making baking day stress-free.
- Perfect Serving: Best enjoyed cooled and topped with vanilla ice cream for a timeless dessert experience.
Ingredients & Why They Work
Before you start, make sure you have high-quality frozen tart cherries—they bring the perfect tang and balance sweetness beautifully. Also, having your pie crust dough well chilled makes shaping and baking a breeze.
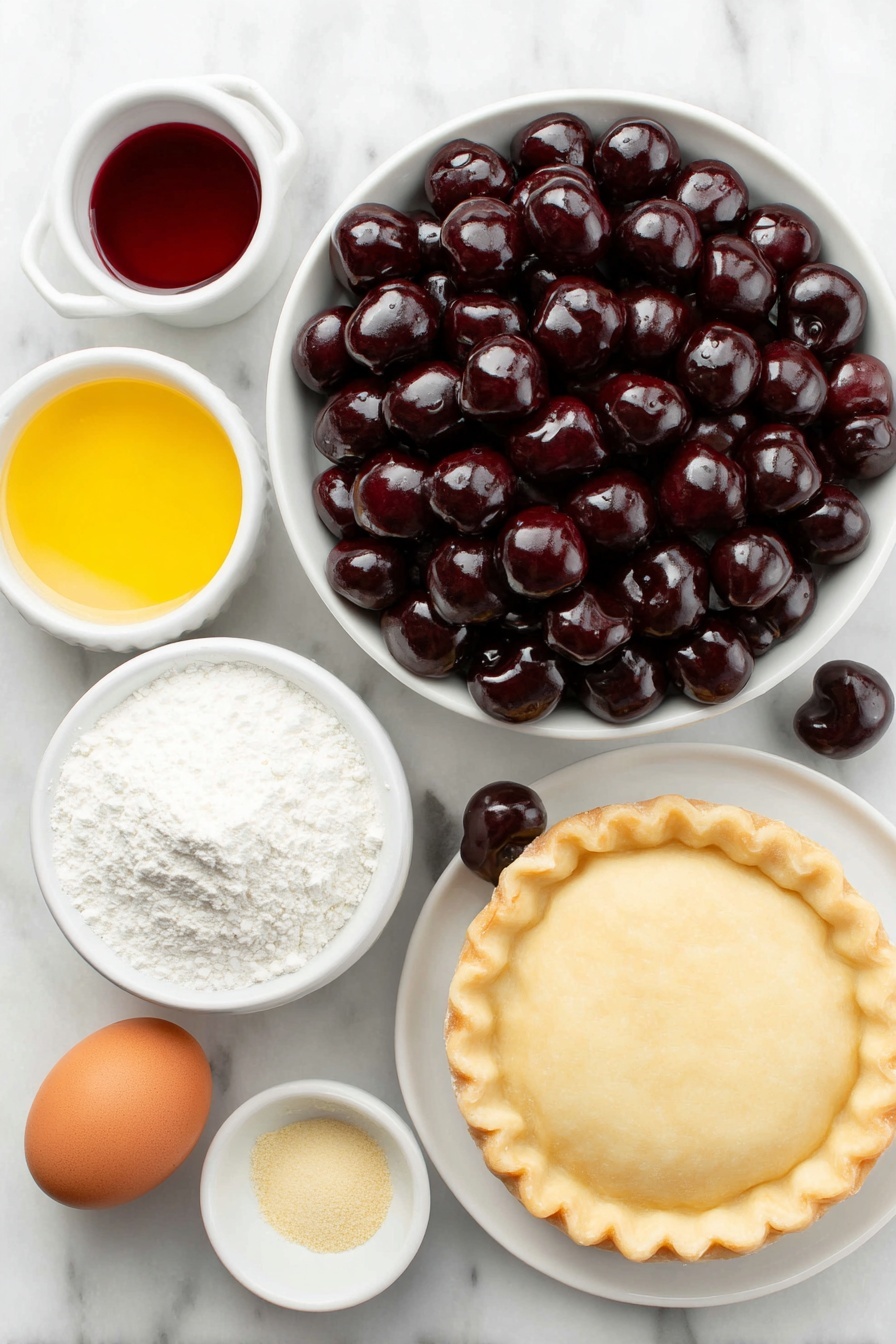
- Frozen pitted tart cherries: Tart cherries provide that signature tang that brightens the whole pie, plus using frozen means you can enjoy this dessert year-round.
- Cornstarch: Helps thicken the cherry juices into that glossy, luscious filling without a gummy texture.
- Water: Used in the thickener and egg wash to get the perfect consistency and a golden crust.
- Cane sugar: Adds natural sweetness that complements the cherries and spices.
- Cinnamon and ground ginger: Warm spices that add depth and cozy notes to the pie’s flavor.
- Almond extract: A little goes a long way to bring out the rich cherry flavor.
- Pinch of salt: Enhances all the flavors, balancing sweetness and tartness.
- Pie crust dough: The foundation of your pie—make sure it’s well-chilled for easy rolling and a flaky, buttery finish.
- Large egg: Combined with water to create an egg wash that gives your lattice crust a beautiful golden shine.
- Coarse sugar (optional): Adds a delightful sparkle and slight crunch on top once baked.
- Vanilla ice cream: The classic pairing to serve alongside your cherry pie for that perfect finishing touch.
Make It Your Way
The beauty of this Cherry Pie with Lattice Crust Recipe is how adaptable it is. Whether you want to add a twist or cater to dietary preferences, a few tweaks can make this classic truly your own.
- Gluten-Free Crust: Substitute your traditional pie crust with a gluten-free version—I've had terrific results using almond flour and a bit of tapioca starch. The crust stays tender and pairs beautifully with the tart cherry filling.
- Spice It Up: Feel free to experiment with spices! A pinch of cardamom or nutmeg can add extra warmth, making it perfect for cozy evenings.
- Sweet Cherry Substitute: If tart cherries aren't your favorite, sweet cherries work too. Just reduce the sugar slightly to keep the filling balanced and not overly sweet.
- Vegan Adaptation: Replace the egg wash with a mixture of maple syrup and almond milk for a glossy finish. The lattice still weaves together perfectly, and the crust crisps up wonderfully.
- Mini Pies: Try using this filling in mini pie tins for individual servings. It's a crowd-pleaser and keeps baking times a bit shorter.
Step-by-Step: How I Make Cherry Pie with Lattice Crust Recipe
Step 1: Prep Those Juicy Cherries
Start by placing your thawed tart cherries in a strainer set over a bowl to catch all the juice. This step feels like harvesting liquid gold! You’ll want exactly 1 cup of this vivid, flavorful juice to make the filling shine — if you’re short, just microwave the cherries in 15-second bursts until you have enough. Save any extra juice for smoothies or sauces. Once the cherries are drained, transfer them to a large bowl, ready to soak up all the delicious syrup we’re about to make.
Step 2: Whisk Up the Thickening Magic
In a small bowl, mix the cornstarch with ¼ cup of water until perfectly smooth — no lumps here! This simple slurry is what will give your cherry filling that glossy, luscious texture. Set it aside; you’ll be adding it to the bubbling cherry juice shortly.
Step 3: Cook the Cherry Filling
Bring the reserved 1 cup of cherry juice to a boil in a small saucepan. Stir in the sugar and keep boiling until it’s fully dissolved—watch as the liquid becomes clear and enticing. Now stir in your cornstarch mixture; the moment the liquid thickens and becomes glossy, remove from heat. Pour this magical syrup over your cherries, then add cinnamon, ginger, almond extract, and a pinch of salt for depth and warmth. Give it a gentle stir and set aside to cool completely. Patience here is key—cool filling means a pie that slices beautifully without a watery bottom.
Step 4: Chill and Roll the Pie Crust
Roll out the chilled pie dough for your bottom crust, leaving a neat ½-inch overhang around your pie plate. Cover this carefully with plastic wrap and pop it in the fridge for 30 minutes — this chilling step keeps the crust flaky and helps avoid shrinkage. While it chills, place a baking sheet on the oven’s bottom rack and preheat to 425°F with the sheet inside, so it’s scorching hot when your pie goes in. Meanwhile, roll out the remaining dough for the lattice topping, cover it loosely, and chill alongside the bottom crust.
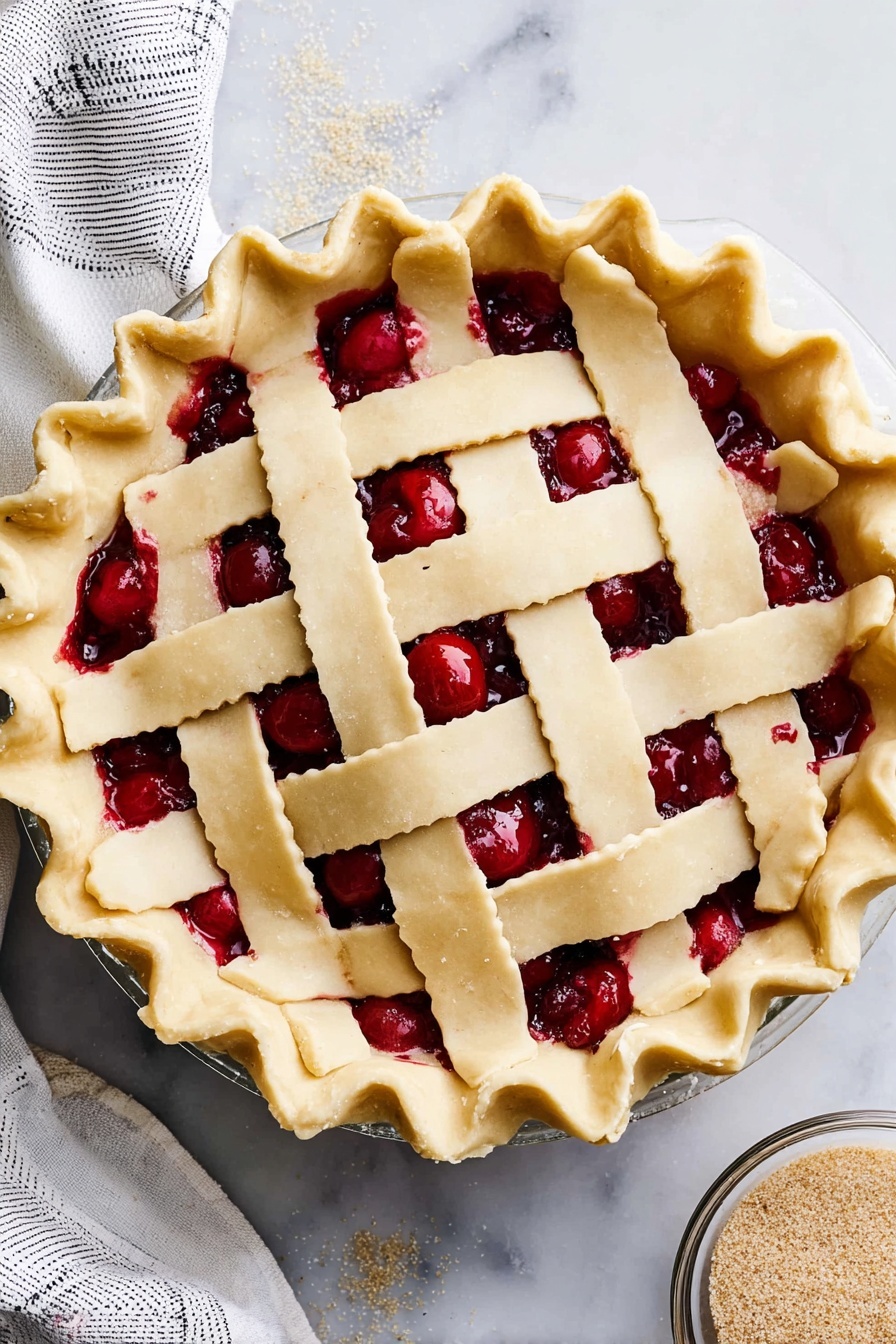
Step 5: Time to Weave Your Lattice Crust
In a small bowl, whisk together the egg and remaining tablespoon of water to create your egg wash, which will give your crust that irresistible golden sheen. Pour the cooled cherry filling into your chilled bottom crust. Transfer the top crust to a cutting board and cut it into 1-inch wide strips using a sharp knife or pizza cutter—this cuts down on stress and keeps the strips straight. Start by laying 4 to 5 strips evenly spaced across the pie. Then weave another 4 to 5 strips perpendicular to create the classic lattice weave, gently pulling back your crosswise strips to weave the new strips under and over. Trim the excess strips flush with the pie edge, fold the bottom crust’s edge up over the lattice, and crimp all around with your fingers or a fork to seal everything securely.
Step 6: Bake Your Cherry Masterpiece
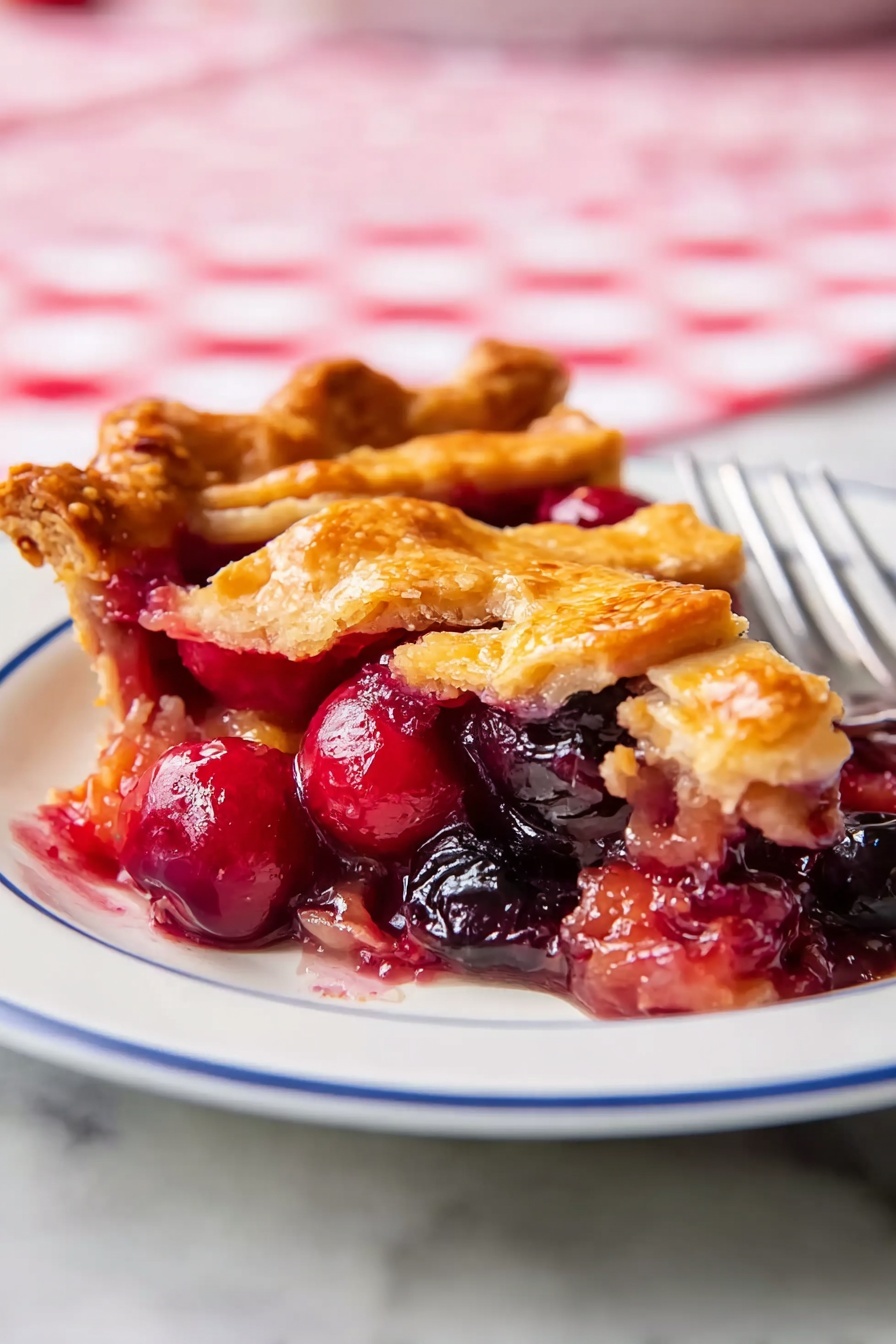
Brush your lattice crust with egg wash and sprinkle with coarse sugar if you like a bit of sparkle and crunch. Carefully transfer the pie onto the preheated baking sheet in the oven. Bake at 425°F for 20 minutes to kickstart a golden crust, then lower the oven temperature to 375°F and bake an additional 50 minutes. Keep a close eye on the edges—if they brown too quickly, tent foil around the perimeter to prevent burning. You’ll know it’s ready when the crust is a deep golden brown and the cherry filling bubbles joyfully beneath.
Step 7: Cool and Celebrate
This is the hardest part: letting the pie cool completely, about 4 hours, so the filling sets perfectly for clean slices. But trust me, it’s worth the wait. Serve each slice with a scoop of creamy vanilla ice cream, and watch as your family or friends fall in love bite after bite of this classic Cherry Pie with Lattice Crust Recipe.
Top Tip
These tips will help you master the Cherry Pie with Lattice Crust Recipe with confidence and ease, ensuring a beautiful, delicious pie every time.
- Perfect Lattice Crust: Use a sharp knife or pizza cutter to cut clean, even 1-inch strips for your lattice top. It makes weaving easier and your pie looks stunningly professional.
- Prevent Soggy Bottom: Chill your bottom crust with a ½-inch overhang for at least 30 minutes before assembly. This extra step helps keep the crust flaky and crisp after baking.
- Keep Your Filling Glossy: Make sure to boil the cherry juice and sugar well before adding the cornstarch slurry. This ensures your filling sets beautifully with a shiny finish.
- Protect Crust Edges: If your crust edges brown too quickly during baking, tent them with foil partway through to avoid burning while the rest of the pie finishes baking.
How to Serve Cherry Pie with Lattice Crust Recipe
Garnishes
A classic scoop of vanilla ice cream is a must for serving this cherry pie—it complements the tartness perfectly. You can also add a dollop of freshly whipped cream or a sprinkle of toasted almond slivers for extra texture and nutty notes. A light dusting of powdered sugar over the lattice crust adds a pretty finishing touch if you’re serving it for guests.
Side Dishes
Serve this pie as the grand finale to a summer meal alongside simple sides like fresh fruit salad or a cheese platter featuring sharp cheddar or creamy brie. If you’re hosting a larger meal, try pairing with lightly sweetened iced tea or a sparkling rosé for a refreshing balance.
Make Ahead and Storage
Storing Leftovers
Once cooled completely—which takes about 4 hours—cover your cherry pie tightly with plastic wrap or store it in an airtight container. It will keep fresh at room temperature for up to 2 days. For longer storage, refrigerate the pie for up to 5 days to maintain freshness and prevent the crust from getting soggy.
Freezing
You can freeze your fully baked cherry pie wrapped tightly in plastic wrap and then aluminum foil. Freeze for up to 2 months. When ready to enjoy, thaw it overnight in the refrigerator and reheat gently in a 350°F oven for 15–20 minutes to refresh the crust crispness.
Reheating
To warm up leftover slices, place them on a baking sheet in a 350°F oven for about 15 minutes. This will heat the filling and crisp the crust again, making each bite just as delightful as freshly baked.
Frequently Asked Questions:
Absolutely! If fresh tart cherries are in season, they will work wonderfully. You may want to adjust the sugar slightly depending on their tartness, but the rest of the recipe stays the same.
Chilling the bottom crust before adding the filling and baking on a preheated baking sheet help keep the crust crisp. Also, tent the edges with foil if they brown too fast to ensure even baking.
Yes! The filling can be made a day ahead and refrigerated. Just make sure it’s completely cool before filling the pie crust.
If you don’t have a full cup of juice, microwave the cherries in short 15-second bursts to release more juice until you reach 1 cup. Any extra juice can be saved for smoothies or other recipes.
Final Thoughts
The Cherry Pie with Lattice Crust Recipe holds a special place in my kitchen. There’s something so comforting about the combination of tart cherries enveloped in warm, buttery pastry, especially when topped with a scoop of vanilla ice cream on a sunny afternoon. I hope this recipe brings a little homemade joy to your table, whether for a summer gathering or cozy night in. Enjoy every delicious slice!
Print
Cherry Pie with Lattice Crust Recipe
- Prep Time: 2 hours
- Cooling Time: 4 hours
- Cook Time: 1 hour
- Total Time: 3 hours
- Yield: 8 servings
- Category: Dessert
- Method: Baking
- Cuisine: American
- Diet: Vegetarian
Description
This classic cherry pie recipe features a sweet and tart filling made with frozen tart cherries thickened in a glossy spiced syrup, housed in a buttery homemade lattice crust. Perfect for summer or year-round with frozen cherries, the pie is baked to golden perfection and best served with vanilla ice cream.
Ingredients
Filling
- 2 pounds frozen pitted tart cherries, thawed, juices reserved
- ¼ cup cornstarch
- ¼ cup plus 1 tablespoon water, divided
- ¾ cup cane sugar
- ½ teaspoon cinnamon
- ½ teaspoon ground ginger
- ¼ teaspoon almond extract
- Pinch salt
Pie Crust
- 1 recipe Pie Crust, chilled at least 2 hours
For Assembly
- 1 large egg
- Coarse sugar, optional
- Vanilla ice cream, for serving
Instructions
- Prepare cherries: Place the thawed cherries in a strainer over a bowl to catch the juices. Measure 1 cup of the cherry juice and save any extra. Transfer the cherries to a large bowl.
- Make thickener: In a small bowl, mix the cornstarch and ¼ cup water until smooth, then set aside.
- Cook filling: Bring the 1 cup cherry juice to a boil in a small saucepan. Stir in the sugar and continue boiling until dissolved. Add the cornstarch mixture and stir until the liquid thickens and becomes clear and glossy. Remove from heat and pour over cherries. Stir in cinnamon, ginger, almond extract, and salt. Let the filling cool completely.
- Roll bottom crust: Roll out the chilled pie crust with a ½-inch overhang on the pie plate. Cover loosely with plastic wrap and chill for 30 minutes. Meanwhile, place a baking sheet in the oven and preheat to 425°F with the sheet inside on the bottom rack.
- Roll top crust: Roll out the remaining dough, place on a baking sheet, cover loosely, and chill in the fridge until the bottom crust is ready.
- Prepare egg wash: Whisk together the egg and remaining 1 tablespoon water in a small bowl. Set aside.
- Assemble pie: Pour the cooled cherry filling into the bottom crust. Cut the top crust into 1-inch strips and create a lattice by weaving strips over the filling. Trim edges and fold the bottom crust edge over the lattice strips. Crimp edges to seal.
- Finish and bake: Brush the lattice with egg wash and sprinkle with coarse sugar if desired. Place the pie on the hot baking sheet in the oven. Bake for 20 minutes at 425°F, then reduce heat to 375°F and bake for an additional 50 minutes or until the crust is golden and filling is bubbly. If edges brown too fast, cover with foil.
- Cool and serve: Let the pie cool completely, about 4 hours, before slicing. Serve with vanilla ice cream.
Notes
- If you don’t have 1 cup of cherry juice, microwave the cherries in 15-second increments to release more juice until you reach 1 cup. Save extra juice for another use.
- Make the pie dough and cherry filling a day ahead to save time on baking day.
- Use a sharp knife or pizza cutter to cut lattice strips neatly.
- If edges brown too quickly during baking, cover with foil to prevent burning.
- Use tart cherries for best flavor but sweet cherries can be substituted with adjusted sugar.
Nutrition
- Serving Size: 1 slice (⅛ pie)
- Calories: 350 kcal
- Sugar: 25 g
- Sodium: 150 mg
- Fat: 14 g
- Saturated Fat: 6 g
- Unsaturated Fat: 7 g
- Trans Fat: 0 g
- Carbohydrates: 50 g
- Fiber: 3 g
- Protein: 3 g
- Cholesterol: 35 mg


Leave a Reply