There’s something truly magical about the combination of rich chocolate and refreshing peppermint, and that’s exactly what makes this Chocolate Peppermint Cake Recipe stand out. It’s perfect for holidays or any time you want that festive, cozy vibe right in your kitchen.

Jump to:
Why You'll Love This Recipe
I absolutely adore this cake because it balances two classic flavors in such a sophisticated way. Every bite delivers moist, tender chocolate cake with just the right hint of peppermint, complimented by an irresistible Swiss meringue buttercream that’s fluffy and smooth.
- Deep, chocolaty base: The use of Dutch-processed cocoa makes the cake layers super rich and velvety.
- Refreshing peppermint twist: Peppermint extract in both the cake and frosting adds that crisp, cool note without overpowering.
- Swiss meringue buttercream: This frosting is lighter and silkier than typical buttercream, making the cake feel indulgent, not heavy.
- Visually stunning: The red and white frosting swirls with crushed candy canes make it a centerpiece-worthy dessert.

Ingredients & Why They Work
Each ingredient in this Chocolate Peppermint Cake Recipe plays a key role—from the moisture-boosting buttermilk to the hot coffee that enhances the chocolate flavor. I always recommend using quality extracts and fresh candy canes for the best results.

- All-purpose flour: Provides structure to the cake without weighing it down.
- Granulated sugar: Sweetens the cake and helps create a tender crumb.
- Dutch-processed cocoa powder: Offers a smooth, rich chocolate taste with less acidity.
- Baking soda & baking powder: Combined leavening agents ensure the cake rises perfectly and stays light.
- Salt: Balances flavors and enhances the chocolate’s depth.
- Vegetable oil: Keeps the cake moist and tender—much better than butter for this recipe.
- Buttermilk: Adds tang and moisture, which complements the cocoa beautifully.
- Hot water or hot coffee: Intensifies the chocolate flavor and loosens the batter for a better texture.
- Eggs: Bind ingredients together and contribute to a fluffy texture.
- Vanilla extract: Deepens flavor and rounds out the chocolate notes.
- Peppermint extract: Optional but highly recommended for that classic peppermint kick.
- Egg whites & granulated sugar (for Swiss meringue buttercream): Create a light, stable meringue base for frosting.
- Unsalted butter: Gives the buttercream its rich, creamy texture.
- Powdered sugar & color gels: Used to tint the frosting for the festive red and bright white look.
- Crushed candy canes & sprinkles: Provide crunchy, colorful finishing touches for extra holiday cheer.
Make It Your Way
I enjoy personalizing this Chocolate Peppermint Cake Recipe depending on the occasion. For a lighter flavor, I sometimes reduce the peppermint extract, and for the chocolate lovers among my friends, I add a chocolate ganache drizzle on top.
- Variation: I once swapped the peppermint extract for a splash of orange extract to make a chocolate-orange twist—delicious and unexpected!
- Dietary adaptation: You can substitute the buttermilk with a plant-based milk mixed with vinegar to make it dairy-free.
- For extra texture: Mixing in chopped dark chocolate or even peppermint bark into the batter works beautifully.
Step-by-Step: How I Make Chocolate Peppermint Cake Recipe
Step 1: Prepping Your Pans & Dry Ingredients
I always start by preheating my oven to 350°F and prepping three 6-inch round pans. Greasing and dusting with cocoa powder—not flour—is a little trick that prevents sticking without leaving a white cast on the cake. Lining the bottoms with parchment means the cakes release easily after baking.
Step 2: Mixing Dry Ingredients
Into my stand mixer bowl, I combine the flour, sugar, cocoa powder, baking soda, baking powder, and salt. I give them a quick stir with the paddle attachment just to make sure everything blends evenly—this helps the cake rise uniformly.
Step 3: Whisking the Wet Ingredients Together
This part is fun: whisk the vegetable oil, buttermilk, eggs, vanilla, and peppermint extracts together. Then, carefully pour in the hot water or hot coffee slowly while whisking—hot liquid here helps deepen the cocoa flavor but you don’t want scrambled eggs, so slow and steady wins the race.
Step 4: Mixing Wet & Dry Ingredients
Add the wet ingredients to your dry mix and beat on medium speed for 2 to 3 minutes. The batter is going to be thin—that’s exactly how it should be. Using a kitchen scale to evenly divide the batter into pans is a small step that really pays off with even layers.
Step 5: Baking & Cooling
Bake for about 30 to 35 minutes and test with a toothpick or cake tester; it should come out mostly clean. Let the cakes cool in the pans for 10 minutes before you carefully flip them onto a wire rack to cool completely. Patience here keeps the layers from breaking.
Step 6: Making the Peppermint Swiss Meringue Buttercream
This frosting is the star of the show! Whisk egg whites and sugar over a hot water bath until warm and smooth, then mix on your stand mixer until stiff peaks form and the mixture cools. Switch to the paddle attachment and slowly add cubed butter. It may look curdled at first, but keep mixing until smooth and silky. Add vanilla and peppermint extracts, then whip until light and fluffy.
Step 7: Coloring & Assembling
Separate out some frosting to tint red with powdered sugar and gel color; leave the rest bright white (using white color gel if needed). Layer cake, frosting, and crushed candy canes, then crumb coat and chill. Finally, frost the outside smoothly, pipe decorative dollops of red and white buttercream, and add extra crushed candy canes and sprinkles for that festive look.
Top Tip
Having mastered this recipe through a few batches, I can tell you these little tips save a lot of headaches and improve the final cake quality.
- Egg White Cleanliness: Make sure no yolk sneaks into the egg whites and your mixing bowls are totally grease-free; otherwise, your Swiss meringue won’t reach stiff peaks.
- Patience with Buttercream: The frosting might look like it’s broken or curdled—don’t panic! Just keep mixing; it will come together into a silky smooth texture.
- Even Layers: Using a kitchen scale to divide the batter equally into pans helps your cake layers bake evenly and look professional.
- Coloring Frosting: Gel colors work best for vibrant shades without changing the texture. Resist adding too much liquid color.
How to Serve Chocolate Peppermint Cake Recipe

Garnishes
I love topping the cake with extra crushed candy canes and festive sprinkles. It adds that perfect crunch and makes the cake look like it’s straight from a holiday cookie shop. Peppermint sticks or even edible silver stars work beautifully, too.
Side Dishes
This cake pairs wonderfully with a simple cup of coffee or rich hot chocolate. For something lighter, a scoop of vanilla bean ice cream or fresh whipped cream complements the peppermint flavor without overwhelming your palate.
Creative Ways to Present
For holiday gatherings, I’ve arranged this cake on a rustic wooden board surrounded by pine sprigs and peppermint candies—it makes a beautiful centerpiece. You can also slice it into mini squares, wrap each piece in cellophane, and tie them with festive ribbon as thoughtful edible gifts.
Make Ahead and Storage
Storing Leftovers
I usually keep leftover cake covered tightly in the fridge, wrapped with plastic wrap or stored in an airtight container. This keeps it moist and the frosting fresh for up to 4 days. Taking the cake out 30 minutes before serving brings it back to the perfect texture.
Freezing
This cake freezes really well! After assembling and chilling, I wrap it carefully with plastic wrap and then foil to prevent freezer burn. It can keep for up to 2 months. Thaw overnight in the fridge and then bring to room temperature before serving for that fresh-baked feel.
Reheating
Because this cake is best enjoyed cool, I don’t recommend reheating slices. Instead, let the cake warm naturally at room temperature to soften the frosting slightly. This way, you maintain the perfect balance of flavors and texture.
Frequently Asked Questions:
Absolutely! While peppermint extract enhances the festive flavor, the cake will still be delicious without it. You can also substitute with vanilla or almond extract for a different twist.
This happens when the butter is added too quickly or the mixture is too warm. Keep mixing continuously—the buttercream will come together and become smooth if you’re patient. You can also chill the bowl briefly if needed before continuing.
You can, but it may affect the cake’s rise and flavor slightly since Dutch-processed cocoa is less acidic. If using regular cocoa, consider adding a little extra baking soda to balance.
Greasing the pans thoroughly and dusting with cocoa powder rather than flour works best. Also, lining the bottom with parchment paper ensures easy removal. Let the cakes cool slightly before turning out to avoid tearing.
Final Thoughts
This Chocolate Peppermint Cake Recipe holds a special place in my heart—it’s the go-to dessert when I want something that feels both classic and a little fancy. I hope you enjoy making it as much as I do, and that it brings a little extra joy and sweetness to your table. Trust me, your family and friends are going to ask for this one again and again.
Print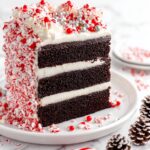
Chocolate Peppermint Cake Recipe
- Prep Time: 2 hours
- Cook Time: 35 minutes
- Total Time: 2 hours 35 minutes
- Yield: 12 servings
- Category: Dessert
- Method: Baking
- Cuisine: American
- Diet: Vegetarian
Description
This Chocolate Peppermint Cake is a festive and decadent dessert combining rich Dutch-processed cocoa powder cake layers with a creamy peppermint Swiss meringue buttercream. The cake layers are moist and fluffy with a hint of peppermint extract, while the smooth buttercream frosting is beautifully decorated with red and white piped dollops and crushed candy canes for a refreshing holiday touch.
Ingredients
Chocolate Peppermint Cake:
- 1 ½ cup all-purpose flour
- 1 ½ cups granulated sugar
- ¾ cup Dutch-processed cocoa powder, sifted
- 1 ½ teaspoon baking soda
- 1 teaspoon baking powder
- 1 teaspoon salt
- ¼ cup vegetable oil
- ¾ cup buttermilk, room temperature
- ¾ cup hot water or hot coffee
- 2 large eggs, room temperature
- 2 teaspoon vanilla extract
- 1 teaspoon peppermint extract, optional
Peppermint Swiss Meringue Buttercream:
- 6 large egg whites
- 2 cup granulated sugar, lightly packed
- 2 cups unsalted butter, cubed, room temperature
- 1 teaspoon vanilla extract
- 1 teaspoon peppermint extract or more to taste
- Bright white color gel
- 2 tablespoon powdered sugar
- Red color gel
Assembly:
- ½ cup crushed candy canes, plus more for outside of cake
- Candy cane sprinkles
Instructions
- Prepare the cake pans: Preheat oven to 350°F. Grease three 6-inch round baking pans and dust them with cocoa powder. Line the bottoms with parchment paper to prevent sticking.
- Mix dry ingredients: In the bowl of a stand mixer fitted with a paddle attachment, combine all dry ingredients: flour, sugar, cocoa powder, baking soda, baking powder, and salt. Stir to combine evenly.
- Mix wet ingredients: In a medium bowl, whisk together the vegetable oil, buttermilk, hot water or coffee (adding it slowly so as not to cook the eggs), eggs, vanilla extract, and peppermint extract if using, until smooth.
- Combine wet and dry: Add the wet ingredients to the dry ingredients and mix on medium speed for 2-3 minutes. The batter will be very thin and smooth.
- Bake the cake: Pour batter evenly into the prepared pans, using a kitchen scale to ensure equal distribution if desired. Bake in the preheated oven for 35 minutes or until a cake tester inserted in the center comes out mostly clean.
- Cool the cakes: Let the cakes cool in their pans for 10 minutes before removing them onto a wire rack to cool completely.
- Make the Swiss meringue buttercream - heat mixture: Place egg whites and sugar into the bowl of a stand mixer. Whisk to combine, then set the bowl over a hot water bath on the stove. Whisk constantly until the mixture reaches 160°F and is no longer grainy, about 3 minutes.
- Whip meringue: Transfer the bowl to the stand mixer and whisk on medium-high speed until stiff peaks form and the bowl is no longer warm to the touch, approximately 5-10 minutes.
- Add butter: Switch to the paddle attachment and slowly add cubed, room temperature butter while mixing until the buttercream is smooth and glossy. It may curdle initially, but continue mixing until smooth.
- Flavor and color buttercream: Add vanilla and peppermint extracts, mixing until combined. Remove about 1 ½ cups of buttercream and add powdered sugar and enough red color gel to achieve the desired red color. Use bright white color gel to whiten the remaining buttercream if desired.
- Assemble the cake: Place one cake layer on a cake stand or plate and spread about ⅔ cup of buttercream on top. Sprinkle with ¼ cup crushed candy canes if desired. Repeat with remaining layers.
- Crumb coat and chill: Apply a thin layer of buttercream over the entire cake to seal in crumbs. Chill the cake in the refrigerator for 20 minutes to set the crumb coat.
- Final frosting and smoothing: Generously frost the outside of the cake and smooth with an icing smoother. Use a cake comb on the sides to create texture, scraping off excess frosting between passes until smooth.
- Decorate: Using a piping bag fitted with a 1M tip, pipe red buttercream dollops spaced evenly on top of the cake. Pipe smaller white buttercream dollops between the red ones using a 4B tip. Decorate the base of the cake with crushed candy canes and candy cane sprinkles.
Notes
- Ensure there are no traces of egg yolks in your egg whites and that your mixer bowl and whisk are completely grease-free to help the meringue stiffen properly.
- The buttercream may appear curdled during mixing; continue stirring until it becomes smooth and glossy.
- Using hot coffee instead of water enhances the chocolate flavor of the cake.
- If you prefer a stronger peppermint flavor, you can adjust the amount of peppermint extract in both the batter and buttercream to taste.
- To achieve a bright white buttercream, the bright white color gel helps counteract the natural yellow tint from the butter.
- Using a kitchen scale ensures even cake layers and professional-looking results.
Nutrition
- Serving Size: 1 slice
- Calories: 450 kcal
- Sugar: 40 g
- Sodium: 220 mg
- Fat: 27 g
- Saturated Fat: 15 g
- Unsaturated Fat: 10 g
- Trans Fat: 0 g
- Carbohydrates: 50 g
- Fiber: 3 g
- Protein: 5 g
- Cholesterol: 70 mg


Leave a Reply