There’s something mesmerizingly fun about the swirl of chocolate and vanilla in these cookies, isn’t there? This Chocolate Pinwheel Cookies Recipe combines buttery richness with a beautiful, eye-catching design that’s as delicious as it is fun to make—trust me, they’re worth every bit of the effort.

Jump to:
Why You'll Love This Recipe
I still remember the delighted faces of my family when I first served these cookies fresh from the oven—the perfect blend of chocolate and vanilla, making each bite a little celebration. I love how the straightforward ingredients come together into a cookie that looks fancy but feels homemade.
- Classic Visual Appeal: The classic black-and-white swirl is not only pretty but impressive enough for special occasions or gift-giving.
- Simple Ingredients: No complicated components or hard-to-find items—just pantry staples you likely already have.
- Great Texture: These cookies have a tender, buttery crumb with just enough crisp edges that I adore.
- Customizable: You can easily tweak the recipe with different flavors or chocolate coatings to suit your taste.

Ingredients & Why They Work
The magic in this Chocolate Pinwheel Cookies Recipe comes down to simple, quality ingredients working in harmony. The all-purpose flour gives structure, the butter brings richness, and a touch of vanilla adds warmth. The cocoa powder creates a vibrant contrast without overpowering the cookie’s buttery goodness.

- All-purpose flour: Provides the sturdy base for the cookie, and spooning & leveling ensures you don’t accidentally add too much.
- Baking powder: Offers just a touch of lift to keep the cookies tender, not cakey.
- Salt: Balances sweetness and elevates the chocolate and vanilla flavors beautifully.
- Unsalted butter: The star of the show—softened to room temperature for easy creaming, it gives the cookie its buttery richness and tender crumb.
- Granulated sugar: Sweetens without adding moisture, helping the dough hold together.
- Egg and egg yolk: Provide structure and chewiness; the additional yolk helps keep the cookies tender.
- Vanilla extract: Adds a cozy, familiar aroma that ties the whole dough together.
- Cocoa powder: Unsweetened to avoid extra sugar, gives the dough that lovely dark chocolate color and flavor.
- Milk: Helps incorporate the cocoa powder smoothly into the dough.
- Espresso powder (optional): A little secret weapon that intensifies the chocolate flavor without tasting like coffee.
- Chocolate for dipping (optional): Finely chopped baking chocolate melts better and gives you that beautiful glossy coating.
Make It Your Way
One of the best parts of this Chocolate Pinwheel Cookies Recipe is how easy it is to make it your own. I love adding a pinch of espresso powder for a deeper chocolate punch, but you could swap in your favorite flavor extracts or even tint the vanilla dough with gel food coloring for a fun twist.
- Variation: I once made red and green dough for Christmas by tinting the vanilla dough and skipped cocoa, which made for a festive and fun pinwheel!
- Dietary changes: I've experimented with swapping half the flour for almond flour for a nuttier note, but be sure to adjust chilling times as the dough can get softer.
- Add-ons: Adding sprinkles rolled onto the log before slicing makes these cookies extra colorful and party-ready.
Step-by-Step: How I Make Chocolate Pinwheel Cookies Recipe
Step 1: Whisk and Cream
First, whisk your flour, baking powder, and salt together in a separate bowl to keep things evenly distributed. Then, in your mixer, beat softened butter with sugar until it’s light, fluffy, and looks like clouds—about three minutes. I always scrape down the sides a few times so everything gets mixed evenly. Next, beat in your egg, egg yolk, and vanilla extract on high speed until everything’s beautifully combined.
Step 2: Flour Meets Butter
Now it’s time to slowly add the flour mixture to your butter-sugar mixture on low speed. You’ll notice the dough turns thick and sticky—that’s exactly how it should be! Once mixed, split the dough roughly in half; the smaller half will become your chocolate dough.
Step 3: Chocolate Dough Magic
Add cocoa powder, milk, and the optional espresso powder to your smaller dough half. Beat gently at low speed until the dough looks uniformly chocolate. The milk helps the cocoa dissolve evenly, which I’ve found helps prevent streaks or blotches in your swirl.
Step 4: Shape and Chill
Shape each dough half into a rectangle about 4×5 inches and 1 inch thick. Because the dough is sticky, lightly flour your hands and work surface—using cocoa powder on the chocolate dough feels less messy to me! Wrap each dough block and refrigerate for 60–90 minutes. The dough should be firm but still soft enough to roll without cracking.
Step 5: Roll Out and Layer
Roll the vanilla dough between floured parchment to an 8×14-inch rectangle. Keep it cool—placing it on a silicone baking mat taped down really helps prevent slipping. Then do the same with the chocolate dough, using cocoa powder instead of flour. Carefully layer the chocolate dough on top of the vanilla dough and gently pat to remove air bubbles. If the edges are uneven or torn, a quick patch-up with your fingers works wonders.
Step 6: The Pinwheel Roll
Starting at a long edge, roll the two dough layers tightly into a log. Use the parchment paper underneath to help guide the roll and avoid gaps between layers. It’s normal for the roll to look a little rustic—perfection isn’t required here. Once rolled, slice the log in half to create two manageable logs, then wrap and chill for 2 more hours.
Step 7: Slice and Bake
Preheat your oven to 350°F (177°C) and line baking sheets with parchment or silicone mats. Slice each log into 14 cookies, about ½ inch thick. Arrange the cookies with a couple inches between them—you’ll see them spread a bit during baking. If your cookie slices softened while you were handling them, pop the tray in the fridge for 10 minutes before baking.
Bake for 14–15 minutes, watching for a light golden edge. Let them cool on the baking sheet for 5 minutes, then transfer to a cooling rack.
Step 8: Optional Dipping (Totally Worth It!)
If you’re feeling fancy, chop your favorite baking chocolate finely and melt it gently. I use a double boiler, but the microwave works fine if you stir every 20 seconds. Dip half of each cooled cookie and add sprinkles if you like. Let the chocolate set at room temp or in the fridge before serving.
Top Tip
From my own cookie adventures, I’ve noticed the chilling times are crucial—they balance dough softness for rolling and firmness for sharp cookie shapes. Don’t skip or rush those chill stages!
- Chill, but Don’t Freeze Dough Before Rolling: If chilled too long or frozen hard, the dough cracks when you roll it. Aim for pliable, not rock solid.
- Use Parchment & Silicone Mats: These keep the dough from sticking or sliding while rolling. I tape the parchment down lightly to avoid frustration.
- Be Gentle When Layering Dough: Pat the chocolate layer without stretching it. Torn edges are fine—patch them with your fingertips for a seamless look.
- Refrigerate Cookie Slices Before Baking If Needed: This helps prevent spreading and keeps the pretty pinwheel shape intact.
How to Serve Chocolate Pinwheel Cookies Recipe

Garnishes
I usually keep garnishes simple with these—sometimes a dusting of powdered sugar or a drizzle of melted white chocolate adds a subtle flair. When dipping in chocolate, I love to add festive sprinkles like gold shimmer or colorful nonpareils. It adds an irresistible crunch and visual fun.
Side Dishes
These cookies pair beautifully with a glass of cold milk or a frothy cappuccino—both help balance the richness. For holiday gatherings, I like to serve them alongside spiced nuts or a simple fruit platter for a contrast of flavors.
Creative Ways to Present
For special occasions, I arrange the cookies in a spiral on a large platter to emphasize their swirled design. Wrapping small stacks with colorful ribbons or placing each cookie in a mini cupcake liner makes a charming gift or party favor. It's a real showstopper, and people always ask for the recipe!
Make Ahead and Storage
Storing Leftovers
I store leftover cookies in an airtight container at room temperature, where they stay fresh and soft for up to a week. If the cookies are dipped in chocolate, I refrigerate them after a couple of days to keep the coating from melting.
Freezing
These cookies freeze wonderfully. You can freeze either the baked cookies or the dough logs. Just wrap tightly and freeze for up to three months. When ready, thaw the logs overnight in the fridge, then slice and bake as usual. For baked cookies, thaw at room temperature and enjoy.
Reheating
If you want to enjoy them warm, pop a few frozen or leftover cookies in the oven at 300°F for 5–7 minutes—this revives their soft texture and makes the chocolate aroma waft through your kitchen all over again.
Frequently Asked Questions:
Yes, you can use either natural or Dutch-processed cocoa powder. Just note that Dutch-processed will give a milder flavor and darker color, while natural cocoa is a bit more acidic and sharper in taste.
Chilling the dough logs thoroughly before slicing helps maintain shape. Also, if the sliced cookies soften before baking, refrigerate them on the baking sheet for 10 minutes prior to putting them in the oven to prevent excessive spreading.
Absolutely! To keep the pinwheel design, you can tint one half of the vanilla dough with gel food coloring and skip the cocoa powder. Adding different extracts like peppermint or coconut can give your cookies a unique twist.
Use baking chocolate bars such as Bakers or Ghirardelli for melting. They melt smoothly and give a glossy finish. Avoid chocolate chips because stabilizers in them prevent proper melting.
Final Thoughts
This Chocolate Pinwheel Cookies Recipe has become one of my go-to treats whenever I want something both classic and fun to share. The buttery richness paired with that twirled chocolate pattern makes it feel special, yet you can easily whip it up with ingredients you have on hand. I hope you enjoy making these as much as I’ve loved sharing them with friends over coffee and celebrations. Give it a try—you might just find it becomes your new favorite cookie!
Print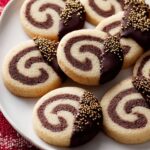
Chocolate Pinwheel Cookies Recipe
- Prep Time: 4 hours 15 minutes
- Cook Time: 15 minutes
- Total Time: 4 hours 30 minutes
- Yield: 28 cookies
- Category: Dessert
- Method: Baking
- Cuisine: American
Description
Pinwheel Cookies are a visually stunning and delicious treat featuring a swirl of vanilla and chocolate doughs. These classic cookies combine a tender base with a touch of cocoa and optional espresso for depth, perfect for any occasion. Easy to make with simple ingredients, they can also be dipped in chocolate and decorated with sprinkles for a festive touch.
Ingredients
Base Cookie Dough
- 2 and ⅔ cups (333g) all-purpose flour (spooned & leveled)
- ¾ teaspoon baking powder
- ½ teaspoon salt
- 1 cup (16 Tbsp; 226g) unsalted butter, softened to room temperature
- 1 cup (200g) granulated sugar
- 1 large egg + 1 egg yolk, at room temperature
- 1 and ½ teaspoons pure vanilla extract
Chocolate Dough
- 2 Tablespoons (10g) unsweetened natural or dutch-process cocoa powder
- 1 Tablespoon (15ml) milk
- optional: ½ teaspoon espresso powder
Optional for Dipping
- 6 ounces (170g) white, semi-sweet, or dark chocolate, finely chopped
- optional: sprinkles
Instructions
- Make the dough: Whisk the flour, baking powder, and salt together in a medium bowl. Set aside.
- Cream butter and sugar: In a large bowl using a hand mixer or stand mixer with a paddle attachment, beat the butter and sugar on medium-high speed for about 3 minutes until creamed. Scrape down the bowl as needed. Add the egg, egg yolk, and vanilla extract, then beat on high speed for about 1 minute until combined. Scrape the bowl again and mix to ensure even incorporation.
- Add dry ingredients: Add the flour mixture to the wet ingredients and mix on low speed until combined. The dough will be thick and sticky. Remove from the bowl.
- Divide dough: Divide the dough roughly in half (about 800–900g total). If one half is smaller, use that half for the chocolate dough.
- Make chocolate dough: Place half the dough back into the mixing bowl. Add cocoa powder, milk, and espresso powder if using. Beat on low speed until well combined.
- Shape and chill: On a lightly floured surface (use cocoa powder for chocolate dough), shape each dough half into a 1-inch-thick rectangle approximately 4×5 inches. Wrap tightly with plastic wrap or parchment and refrigerate for 60 to 90 minutes until dough is less sticky but pliable. If chilled longer than 90 minutes, let sit at room temperature for 15–30 minutes before continuing.
- Roll out doughs: Remove vanilla dough from fridge and place on lightly floured parchment paper set on a silicone mat or taped counter to prevent sliding. Roll out to an 8×14-inch rectangle between ⅛ and ¼ inch thick. Refrigerate the rolled vanilla dough. Repeat rolling with chocolate dough on another piece of parchment paper, rolling to slightly smaller than vanilla dough. Peel chocolate dough carefully and place on top of vanilla dough, aligning edges. Pat gently to remove air bubbles and patch any tears. Trim edges with a knife or pizza cutter for straight sides.
- Roll into log: Starting from a long edge, tightly roll the two layers together using the parchment paper to help. Press doughs together with fingers as needed to seal. Patch any cracks with dough. Cut resulting log in half to make two 7-inch-long logs.
- Chill again: Wrap logs tightly in plastic wrap or parchment and refrigerate for 2 hours up to 4 days.
- Preheat oven: Heat oven to 350°F (177°C). Line two baking sheets with parchment paper or silicone baking mats.
- Slice and bake: Slice each log into 14 cookies about ½ inch thick. Arrange cookies 2 inches apart on prepared baking sheets. If dough softened, chill cookies on the sheet for 10 minutes before baking. Bake 14–15 minutes until edges are very lightly browned.
- Cool: Remove from oven and cool on baking sheets 5 minutes before transferring to wire racks to cool completely.
- Optional chocolate dipping: Melt chopped chocolate in a double boiler or microwave (stir every 20 seconds). Dip half of cooled cookies in melted chocolate and add sprinkles if desired. Let chocolate set at room temperature or refrigerate.
Notes
- Baked cookies freeze well up to 3 months. Thaw overnight in refrigerator before serving.
- Dough logs can be shaped and refrigerated for up to 4 days or frozen for 3 months.
- To tint vanilla dough, add gel food coloring after dividing dough in half before chilling.
- You can substitute flavors by omitting the chocolate dough and tinting both dough halves different colors or adding extracts like peppermint or coconut.
- Roll logs in sprinkles or coarse sugar after chilling for added texture.
- Use high-quality baking chocolate bars (Bakers or Ghirardelli) for dipping; chocolate chips are not recommended due to melting issues.
- Use cocoa powder to handle chocolate dough to prevent sticking during shaping and rolling.
Nutrition
- Serving Size: 1 cookie
- Calories: 150 kcal
- Sugar: 10 g
- Sodium: 75 mg
- Fat: 8 g
- Saturated Fat: 5 g
- Unsaturated Fat: 3 g
- Trans Fat: 0 g
- Carbohydrates: 18 g
- Fiber: 1 g
- Protein: 2 g
- Cholesterol: 30 mg


Leave a Reply