The crisp, cool burst of mint is a classic holiday vibe I just can't resist. This Christmas Peppermint Mints Recipe is a nostalgic treat that brings festive cheer and a refreshing finish after holiday feasts. Trust me, these little candies will quickly become a favorite tradition once you make them at home.

Jump to:
Why You'll Love This Recipe
I’ve made these Christmas peppermint mints for a few holiday seasons now, and every year, they vanish almost as quickly as I can place them on the table. They’re easy, customizable, and the perfect balance of creamy, sweet, and minty freshness that everyone looks forward to.
- Simple Ingredients: You probably already have almost everything in your pantry, making it a no-fuss festive treat.
- Customizable Colors & Flavors: You can easily tweak the colors or intensify the peppermint to match your holiday mood.
- Perfect Texture: Creamy and melt-in-your-mouth with just the right amount of chewiness—no gritty sugar surprises.
- Great for Gifting and Parties: They look adorable in jars or on platters and hold up well, so no stress when making ahead.

Ingredients & Why They Work
This Christmas Peppermint Mints Recipe blends classic ingredients for a smooth, luscious candy that holds its shape and flavor perfectly. Each element plays a key role—from the tangy cream cheese to the sweet, powdery sugar, creating that iconic minty treat.

- Granulated Sugar: Used for coating the mints, it adds a satisfying crunch and sparkle on the outside.
- Cream Cheese: Gives the mints a creamy base with a subtle tang that balances the sweet sugar.
- Unsalted Butter: Adds richness without overpowering, ensuring a smooth texture.
- Light/Clear Corn Syrup: Keeps the mixture from crystallizing and adds a silky consistency.
- Peppermint Extract: This is your flavor star—choose a good quality one for that fresh, cool peppermint punch.
- Powdered Sugar: Absorbs moisture and sweetens while making the dough pliable enough to shape.
- Liquid Food Coloring: These drops give you those festive red and green hues—gel food coloring works well if you want intense color without extra moisture.
Make It Your Way
I love playing around with the colors and peppermint intensity depending on the year. Some holidays, I give these mints a bolder green and a little extra peppermint extract to up the cool factor. Feel free to tweak it until it feels just right for you.
- Variation: Once, I tried adding a tiny bit of vanilla extract along with peppermint—gave a subtle warmth that was surprisingly delightful!
- Dietary Swap: If you're avoiding dairy, you could experiment replacing cream cheese and butter with non-dairy alternatives, though expect the texture to change slightly.
- Color Mix: To mix things up, try swirling the red and green dough together for a marbled peppermint effect—looks magical on the platter!
Step-by-Step: How I Make Christmas Peppermint Mints Recipe
Step 1: Cream it Smooth
Start by lining a baking tray with parchment because your mints will need a resting spot. Then, beat together room temperature cream cheese, unsalted butter, corn syrup, and peppermint extract until everything is silky and blended. Using a handheld mixer on low speed helps you get that smooth texture without overmixing.
Step 2: Sugar Time
Now, slowly add your powdered sugar—half a cup at a time—still mixing on low. When your dough gets thick (this is normal), swap your mixer for a sturdy spatula or wooden spoon to finish working in the sugar. It’ll start to resemble a soft dough, just what we want.
Step 3: Divide and Color
Flip your dough out onto parchment dusted with powdered sugar, then divide it into three equal parts. Make a little well in two of the balls and add your red coloring to one and green to the other. The last ball stays white. Knead each colored dough ball to mix evenly, adding just a little more powdered sugar as needed—liquid colors can make the dough sticky, so take it slow.
Step 4: Roll, Slice, and Shape
Roll each dough ball into ropes about 18 inches long and roughly an inch thick. Slice into ½-inch pieces along the rope—this is where the mints start taking shape. Then, roll each piece into a little ball in your palm. It’s a fun, tactile step that always brings me back to childhood cookie-making memories.
Step 5: Sugar Coat and Press
Toss a few of those little dough balls in granulated sugar at a time, coating them nicely. Lay them out on your parchment-lined tray. Then, push them lightly with the tines of a fork to press into discs—the classic striped pattern on top is the cherry on top and makes these mints look extra festive.
Step 6: Let Them Set
Patience is key here—leave the mints out at room temperature for up to 24 hours to dry and set. This makes all the difference in the texture and how nicely they hold together when you bite in.
Top Tip
From my years of making this Christmas Peppermint Mints Recipe, I’ve learned a few tricks that keep things smooth and stress-free. These tips ensure your mints come out perfect every time, even if you’re new to candy-making!
- Slow Sugar Addition: Adding powdered sugar gradually prevents your dough from getting dry and helps you control the consistency better.
- Knead Carefully: Use just enough powdered sugar when kneading colored dough to avoid overly stiff or crumbly mints.
- Press Gently With Fork: Don’t press too hard or the mints will flatten too thin; a light touch gives a pretty pattern and perfect thickness.
- Set Time Matters: Allowing them to dry at room temp overnight lets the flavors meld and texture firm up beautifully.
How to Serve Christmas Peppermint Mints Recipe

Garnishes
I usually skip extra garnishes since these mints are colorful and charming on their own. But if you want to jazz them up, a sprinkle of crushed candy canes or edible glitter adds a glamorous holiday sparkle.
Side Dishes
These mints are a fantastic finishing touch after rich desserts like chocolate cake or peppermint brownies. They clean the palate beautifully, making them the perfect companion to heavier sweets or coffee service.
Creative Ways to Present
I’ve gifted these mints in clear jars tied with festive ribbons, nestled in holiday cookie boxes, and even arranged on tiered serving trays for parties. Mixing the red, green, and white pieces creates a joyful color pop that instantly brightens the table.
Make Ahead and Storage
Storing Leftovers
Store your Christmas peppermint mints in an airtight container in the refrigerator to keep them fresh and chewy. I’ve kept mine for up to two weeks with no loss of flavor or texture, which makes them great for making early and enjoying throughout the season.
Freezing
For longer storage, these mints freeze beautifully. I pop them in a freezer-safe container and thaw them slowly in the fridge before serving. The texture stays intact, and the peppermint flavor comes through perfectly.
Reheating
Since these are candies, reheating isn't really necessary or recommended. Just let them come to room temperature if they've been chilled—that way, their creaminess shines through in every bite.
Frequently Asked Questions:
Yes! Gel food coloring is actually a great choice because it adds vibrant color without extra liquid, which helps keep the dough from getting too sticky.
When stored properly in an airtight container in the refrigerator, these mints last about 2 weeks, perfect for holiday parties and gifting.
The cream cheese provides the signature creamy texture and slight tang, so omitting it will change the texture quite a bit. If you want a dairy-free version, try substituting with a vegan cream cheese alternative and see how you like it.
Letting the mints sit out for up to 24 hours allows them to dry and set properly, which improves their texture and appearance—especially that pretty striped indentation on top.
Final Thoughts
There’s something truly special about homemade Christmas peppermint mints that store-bought just can’t match. This recipe has become part of my holiday ritual, and I can’t recommend it enough if you want a beautiful, tasty treat that brings joy to the season. Give it a try—you’ll love how easy and festive these mints are, plus the satisfaction of making something classic with your own hands only adds to the magic.
Print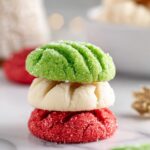
Christmas Peppermint Mints Recipe
- Prep Time: 15 minutes
- Cook Time: 0 minutes
- Total Time: 1 hour 15 minutes
- Yield: 100 servings
- Category: Snack
- Method: No-Cook
- Cuisine: American
Description
These festive Christmas Mints are colorful, creamy peppermint patties coated in sugar with a beautiful striped pattern made using a fork. They are easy to prepare, require no baking, and make perfect holiday treats or gifts with vibrant red, green, and white colors.
Ingredients
Main Ingredients
- ⅓ cup granulated sugar
- 4 ounces cream cheese, room temperature
- 2 tablespoons unsalted butter, room temperature
- 2 tablespoons light/clear corn syrup
- 1 teaspoon peppermint extract
- 4¼ cups powdered sugar
- 6 drops green liquid food coloring
- 6 drops red liquid food coloring
Instructions
- Prepare Baking Tray: Line a large rimmed baking tray with parchment paper to prevent sticking and set aside.
- Beat Wet Ingredients: In a large bowl, use a handheld mixer on low speed to beat together the cream cheese, unsalted butter, light corn syrup, and peppermint extract for 1 minute until smooth and well combined.
- Add Powdered Sugar: Gradually add 4¼ cups powdered sugar, about ½ cup at a time, mixing on low speed. When the dough becomes too thick to mix with the mixer, switch to a spatula or wooden spoon and finish combining by hand.
- Prepare Dough Surface: Lay a piece of parchment paper on a clean counter and sprinkle with ¼ cup powdered sugar. Turn out the dough onto this paper to prevent sticking.
- Divide and Color Dough: Divide the dough into three equal parts. Make a shallow well in the center of two parts; add red food coloring to one and green food coloring to the other. The third part remains white.
- Knead Dough with Color: Knead the red and green dough balls until color is evenly distributed, adding up to ¼ cup additional powdered sugar as needed to manage stickiness. Knead the white dough lightly with a tablespoon or two of powdered sugar if necessary.
- Shape Dough Ropes: Roll each colored dough ball into a rope approximately 18 inches long and about 1 inch thick.
- Slice into Pieces: Slice each rope into ½-inch thick pieces starting from one end until fully cut.
- Form Balls: Roll each cut piece between your palms to create small balls and set aside.
- Coat in Sugar: Toss 2-3 dough balls at a time in the granulated sugar until fully coated, then place them spaced evenly on the prepared baking tray. Repeat until all balls are coated and placed on the tray.
- Flatten and Decorate: Using the tip of a fork, gently press down on each sugar-coated ball to form a flat peppermint patty about ½-inch thick and create a striped pattern on top.
- Dry and Set: Let the peppermint patties sit at room temperature on the tray for up to 24 hours to dry and set before serving or transferring to a serving platter.
Notes
- Yield is approximately 100 peppermint candies.
- Store mints in an airtight container in the refrigerator for up to 2 weeks to keep fresh.
- For longer storage, freeze mints in a freezer-safe container for up to 3 months; thaw in the refrigerator before serving.
- For deeper colors, add up to ½ teaspoon of liquid food coloring as desired.
- Adjust powdered sugar amount as needed to achieve dough consistency that is firm but not sticky.
- Gel food coloring is recommended for more vibrant colors without making the dough too wet and is safe for those with nut allergies.
Nutrition
- Serving Size: 1 candy
- Calories: 25 kcal
- Sugar: 4 g
- Sodium: 10 mg
- Fat: 1 g
- Saturated Fat: 0.6 g
- Unsaturated Fat: 0.3 g
- Trans Fat: 0 g
- Carbohydrates: 4.5 g
- Fiber: 0 g
- Protein: 0.3 g
- Cholesterol: 5 mg


Leave a Reply