There’s something truly magical about the velvety, creamy texture and festive colors in this Christmas Swirl White Chocolate Fudge Recipe. It’s a treat that brings joy with every bite and makes holiday gatherings feel extra special — plus, it’s surprisingly easy to make!

Jump to:
- Why You'll Love This Recipe
- Ingredients & Why They Work
- Make It Your Way
- Step-by-Step: How I Make Christmas Swirl White Chocolate Fudge Recipe
- Top Tip
- How to Serve Christmas Swirl White Chocolate Fudge Recipe
- Make Ahead and Storage
- Frequently Asked Questions:
- Final Thoughts
- Christmas Swirl White Chocolate Fudge Recipe
Why You'll Love This Recipe
I love how this Christmas Swirl White Chocolate Fudge Recipe balances rich sweetness with a playful pop of holiday colors. Making it feels like crafting a little edible ornament — and it always impresses the crowd with minimal fuss!
- Festive color swirl: The red and green swirls make it not just tasty but gorgeous and gift-worthy.
- Simple ingredients: You only need a handful of pantry staples, so it’s perfect for last-minute treats.
- Delicious creamy texture: It melts in your mouth but holds a perfect slice — easier than you’d think!
- Customizable and fun: You can tweak colors or portion sizes to fit your vibe and occasion.

Ingredients & Why They Work
This recipe relies on classic ingredients that combine to create that signature white chocolate fudge richness. Choosing quality components really amps up the flavor, so it’s worth picking good white chocolate and accurate food coloring for those vibrant swirls.

- White chocolate chips: I use Ghirardelli for its creamy melt and smooth finish — regular baking chips work fine but avoid cheaper brands that can be waxy.
- Sweetened condensed milk: It sweetens and thickens the fudge, giving it that dense, luscious texture without any fuss.
- Unsalted butter: Adding buttery richness and helps the fudge set just right — cold cubes make it easier to stir into the warm mixture.
- Red gel food coloring: I start with a small amount and add gradually for the perfect festive shade without altering taste.
- Green gel food coloring: Same as for red, a little goes a long way to brighten the swirl.
Make It Your Way
I like to switch things up depending on my mood or who I’m gifting this fudge to. You can play with the colors or even sprinkle in crushed peppermint for an extra festive crunch — it’s all about making it feel like your own creation.
- Variation: Once, I swapped red and green for gold and silver gel coloring for a more elegant shimmer effect — it wowed everyone at the office party!
- Dietary tweak: For a dairy-free version, try coconut milk condensed milk alternatives and vegan white chocolate chips; results vary but still delicious.
Step-by-Step: How I Make Christmas Swirl White Chocolate Fudge Recipe
Step 1: Prepare your pan like a pro
First things first — line an 8×8-inch baking pan with parchment paper that extends over the edges. This little step is a lifesaver because once your fudge is set, you’ll be able to lift it out cleanly for slicing. I sprayed the parchment lightly with cooking spray to prevent any sticky surprises.
Step 2: Melt and mix your fudge base
In a medium saucepan over medium-low heat, add your white chocolate chips, sweetened condensed milk, and those cold butter cubes. Stir constantly for about 4-6 minutes until everything has melted and the mixture is silky smooth. The key here is patience and consistent stirring — if you rush or turn the heat too high, your fudge can get grainy, and nobody wants that!
Step 3: Divide and color the fudge
Take about a third of that luscious white chocolate blend and pop it into a small bowl. Add your red gel food coloring starting with a quarter teaspoon; stir until perfectly uniform with no white streaks. Then do the same with another third for your green fudge. Keep the last third plain white. Quick tip: work swiftly because the fudge starts to thicken as it cools — if it firms up too fast, warm each bowl briefly for 15-20 seconds to smooth it out.
Step 4: Create your holiday swirl
Drop dollops of the white, red, and green fudge randomly into the parchment-lined pan. Then take a wooden skewer or butter knife and gently swirl them together to form those gorgeous holiday patterns. I like to be delicate here — swirl enough to blend just a little, but not so much that the colors muddy. Before chilling, press lightly with a piece of parchment paper to smooth the top without disturbing your beautiful design.
Step 5: Chill and slice
Pop your pan in the refrigerator for 2 to 3 hours until the fudge is firm to the touch. Once set, use the parchment paper overhangs to lift out the whole slab onto a cutting board and slice into 64 bite-sized 1-inch pieces — these smaller sizes help balance all that sweetness.
Top Tip
After making this fudge a handful of times, I’ve learned a few tricks that make all the difference between good fudge and show-stopping fudge.
- Consistent stirring: Keep the heat low and stir constantly when melting the chocolate to prevent graininess — that’s key to a creamy finish.
- Food coloring timing: Add gel colors immediately after melting while the mixture is still warm so they blend perfectly without clumps.
- Knife warming technique: Warm your knife under hot water, then dry it well before slicing fudge for smooth, clean cuts that don’t crumble.
- Don’t overcook: If you see signs the mixture is thickening too quickly, pull it from heat to avoid burning or separating.
How to Serve Christmas Swirl White Chocolate Fudge Recipe

Garnishes
I love topping the fudge edges with a few crushed candy canes or a sprinkle of edible glitter to give it that extra sparkle and festive crunch. A little sea salt on top balances out the sweetness wonderfully too.
Side Dishes
This fudge pairs beautifully with a cozy cup of hot cocoa, or you can serve alongside spiced nuts or fresh berries to cut through the richness — perfect for holiday dessert platters.
Creative Ways to Present
I’ve gifted this fudge layered in clear jars tied with festive ribbons, or nestled in decorative tins with parchment paper. For parties, arrange bite-sized pieces on a tiered stand for a charming display that doubles as decor.
Make Ahead and Storage
Storing Leftovers
I keep leftovers in an airtight container in the fridge, and it stays beautifully fresh for up to a week. Just make sure to separate layers with parchment paper so pieces don’t stick together.
Freezing
If you want to make this early, you’re in luck — it freezes exceptionally well! Wrap in plastic wrap and place in a freezer-safe container. When you’re ready, thaw overnight in the fridge to keep the texture perfect.
Reheating
Reheating isn’t usually necessary, but if your fudge feels firmed up, let it sit at room temp about 30 minutes before serving to soften slightly. Avoid microwaving, as it changes the texture.
Frequently Asked Questions:
You can use regular liquid food coloring, but gel coloring is preferable as it provides richer color without thinning the fudge mixture. Liquid coloring can sometimes affect the texture, making it more watery.
Constantly stirring the mixture over low heat while melting the chocolate and butter is key. Avoid overheating or cooking it too fast, as this causes sugar crystals to separate and results in grainy fudge.
Use a sharp chef’s knife warmed under hot water and dried before slicing. This helps the knife glide through the fudge smoothly without cracking or crumbling.
Absolutely! Adding chopped nuts, dried fruit, or crushed peppermint can enhance texture and flavor. Just fold them into the fudge mixture before swirling and chilling.
Final Thoughts
This Christmas Swirl White Chocolate Fudge Recipe holds a special place on my holiday table because it’s that perfect mix of simple, stunning, and scrumptious. I’m always amazed at how a few ingredients and a little swirling magic can create such a crowd-pleaser. I’m sure once you try it for yourself, you’ll find it’s just as rewarding to make as it is to share.
Print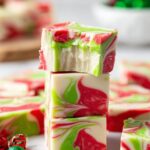
Christmas Swirl White Chocolate Fudge Recipe
- Prep Time: 15 minutes
- Cook Time: 6 minutes
- Total Time: 2 hours 21 minutes
- Yield: 64 pieces
- Category: Dessert
- Method: Stovetop
- Cuisine: American
Description
A festive and rich Christmas fudge made with creamy white chocolate, sweetened condensed milk, and colorful red and green swirls. Perfect for holiday gifting or enjoying as a sweet treat during the season.
Ingredients
Main Ingredients
- 22 oz (2 11-oz. bags) white chocolate chips
- 14 ounce can sweetened condensed milk
- 4 tablespoons unsalted butter, cold and cut into small cubes
Coloring
- ¼-½ teaspoon red gel food coloring
- ¼-½ teaspoon green gel food coloring
Instructions
- Prepare the pan: Line an 8×8-inch straight sided baking pan with parchment paper, ensuring overhang on the sides for easy removal later.
- Melt the fudge base: In a medium saucepan over medium-low heat, combine white chocolate chips, sweetened condensed milk, and cold unsalted butter cubes. Stir constantly for 6 minutes until smooth and melted. Remove from heat.
- Divide and color fudge: Transfer one-third of the melted mixture to a small bowl and mix in red gel food coloring starting with ¼ teaspoon until uniform in color. Repeat with another third in a separate bowl adding green gel food coloring similarly. Leave the last third white.
- Assemble fudge layers: Into the prepared pan, spoon dollops of the white, red, and green fudge mixtures randomly.
- Create swirl pattern: Using a wooden skewer or butter knife, gently swirl the colors together on top to form a decorative pattern without mixing completely.
- Smooth top: Press down gently on the surface with a small piece of parchment paper to smooth while preserving the swirl design.
- Chill the fudge: Refrigerate the pan for 2 to 3 hours until the fudge is fully set.
- Slice and serve: Remove fudge from pan using the parchment overhang. Place on a cutting board and slice into sixty-four 1×1 inch pieces. Serve chilled.
Notes
- Store fudge in an airtight container in the refrigerator for up to 1 week.
- For longer storage, freeze fudge in an airtight container for up to 2 months and thaw in refrigerator before serving.
- Use an 8×8-inch straight sided pan lined with greased parchment or wax paper for easy removal.
- Work quickly when adding gel food coloring as fudge mixture firms up fast once off heat.
- If fudge becomes too firm to stir, warm bowls in short bursts (15-20 seconds) to loosen without overheating.
- Avoid overheating or overcooking chocolate to prevent grainy texture; constant stirring is key during melting.
- Cut fudge in smaller pieces due to its richness; warming the knife under hot water before slicing helps achieve clean cuts.
Nutrition
- Serving Size: 1 piece
- Calories: 120 kcal
- Sugar: 18 g
- Sodium: 20 mg
- Fat: 5 g
- Saturated Fat: 3 g
- Unsaturated Fat: 2 g
- Trans Fat: 0 g
- Carbohydrates: 20 g
- Fiber: 0 g
- Protein: 1 g
- Cholesterol: 10 mg


Leave a Reply