There's something truly magical about biting into a soft, sweet Christmas tree-shaped treat that brings back childhood holiday memories. This Copycat Little Debbie Christmas Tree Cakes Recipe captures that festive flavor and texture perfectly — making it worth every minute in the kitchen, especially when you want to impress family and friends with homemade holiday joy.

Jump to:
- Why You'll Love This Recipe
- Ingredients & Why They Work
- Make It Your Way
- Step-by-Step: How I Make Copycat Little Debbie Christmas Tree Cakes Recipe
- Top Tip
- How to Serve Copycat Little Debbie Christmas Tree Cakes Recipe
- Make Ahead and Storage
- Frequently Asked Questions:
- Final Thoughts
- Copycat Little Debbie Christmas Tree Cakes Recipe
Why You'll Love This Recipe
From the moment I made these Copycat Little Debbie Christmas Tree Cakes, I knew they’d become a holiday staple. They’re not only super festive but also a fun project that results in show-stopping treats anyone will adore.
- Authentic Taste: It nails that classic Little Debbie flavor you remember, but fresh from your own oven.
- Fun to Make: Crafting those little tree shapes and icing them gives you that festive spark every baker loves.
- Perfect Texture: Light, moist cake combined with fluffy filling makes every bite just right.
- Customizable: You can tweak colors and decorating styles to match whatever holiday vibe you’re feeling.
Ingredients & Why They Work
Each ingredient plays a key role in achieving that perfect balance of flavor and texture. From the rich cake base to the fluffy filling and the smooth coating, every element blends beautifully.
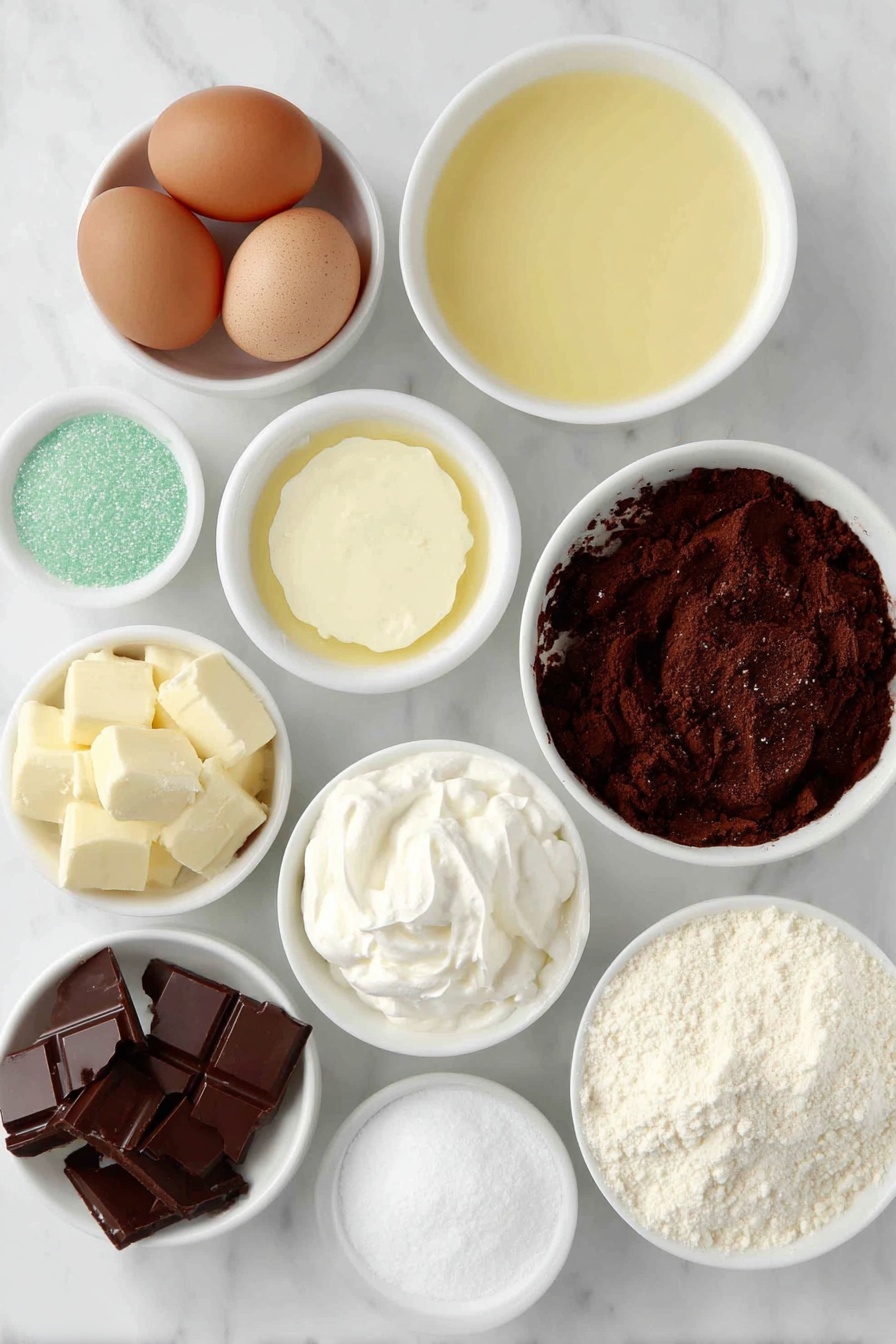
- Yellow Cake Mix: Using a boxed mix keeps it simple, yet the bright yellow adds the perfect golden hue and buttery flavor.
- Eggs and Egg Yolk: Eggs give structure and moisture, while the extra yolk adds richness that helps with softness.
- Whole Milk: Keeps the cake tender and adds depth to the batter.
- Melted Butter: Nothing beats butter for flavor, it also helps the cake stay moist longer.
- Marshmallow Fluff: This is the secret to the signature filling’s light, creamy texture — don’t skip it!
- Powdered Sugar: Sweetens and thickens the filling for that perfect spreadability.
- White Almond Bark: It melts smoothly for the coating and hardens with a nice snap.
- Red Candy Melts: For those festive stripes — easy to melt and pipe for decoration.
- Green Sanding Sugar: Adds sparkle and a little crunch, evoking tree needles under snow.
Make It Your Way
I love playing around with the decorating part of these Copycat Little Debbie Christmas Tree Cakes. You can switch up the colors of the sanding sugar or candy melts to match your holiday theme — it’s such a fun way to make the recipe your own.
- Variation: Once, I swapped the white almond bark for milk chocolate coating and added crushed peppermint on top — it was a delightful twist that guests raved about.
- Dietary Shift: You can switch to dairy-free butter and almond bark alternatives if you want a vegan-friendly treat.
- Seasonal Fun: Besides Christmas, I’ve shaped the cake into hearts for Valentine’s Day using the same filling and coating recipe — so versatile!
Step-by-Step: How I Make Copycat Little Debbie Christmas Tree Cakes Recipe
Step 1: Whisk Up that Cake Batter
Start by preheating your oven to 350°F and lining a jelly roll pan with parchment — I clip the edges with binder clips so the paper stays put while spreading the batter. Whisk together your cake mix, eggs, egg yolk, milk, and melted butter until it's silky smooth, then spread evenly in the pan. Bake for 12–15 minutes; look for a toothpick to come out with moist crumbs, not raw batter.
Step 2: Whip Up the Dreamy Filling
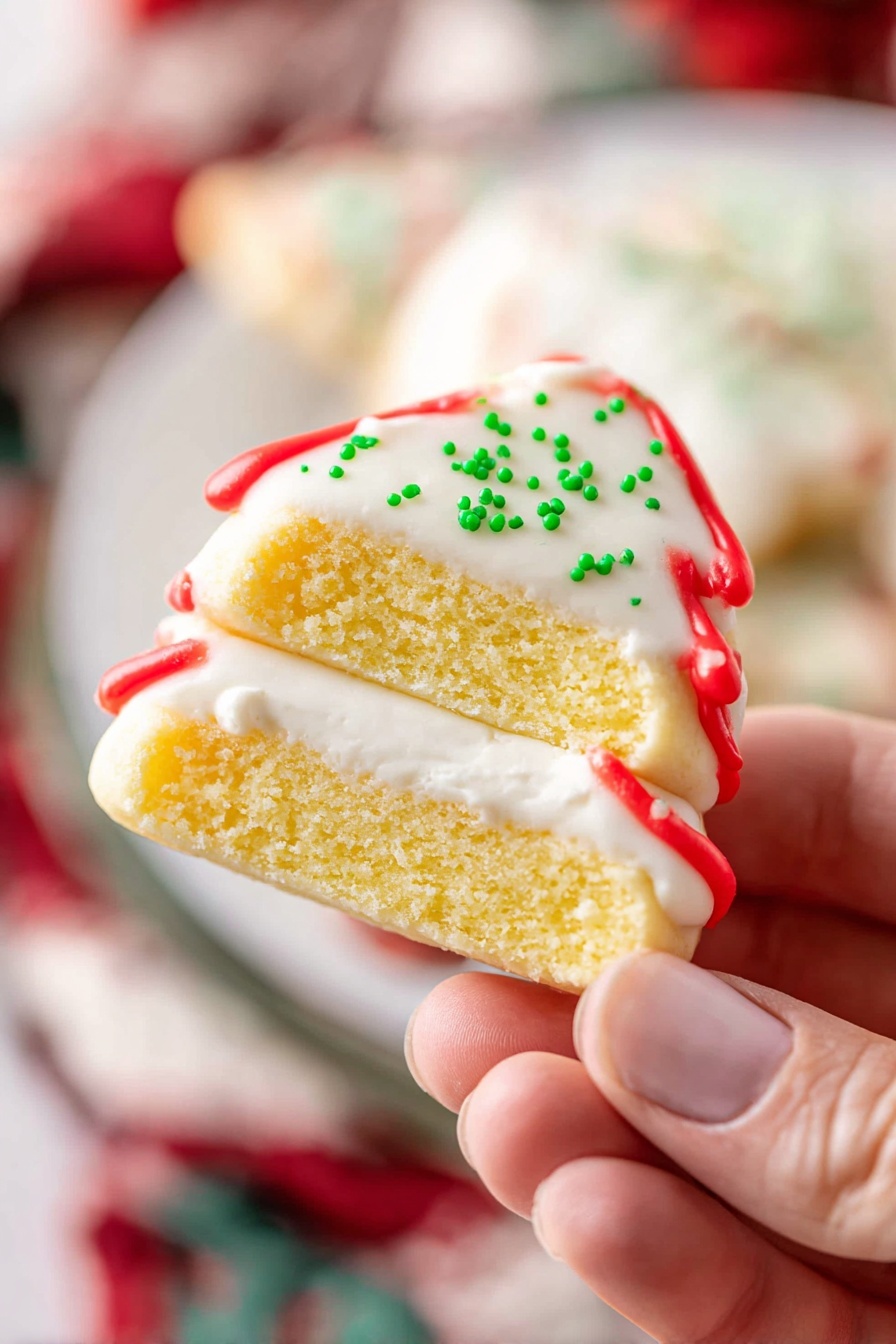
While your cake cools completely, blend the marshmallow fluff with butter and powdered sugar until smooth. Add the milk and beat until fluffy. This filling is light yet creamy — the key to that classic Little Debbie texture I really love.
Step 3: Layer and Chill the Cake
Slice your cooled cake in half horizontally and spread the filling on one layer, then top it with the other half. For a cleaner cut when making your trees, freeze this layered cake for about 30 minutes — trust me, it makes the shapes hold perfectly!
Step 4: Cut Out Those Festive Trees
Using a tree-shaped cookie cutter, carefully cut out your Christmas trees and place them on parchment-lined trays. Pop them back in the freezer for another 30 minutes so they hold their shape when dipped.
Step 5: Dip and Decorate with Joy
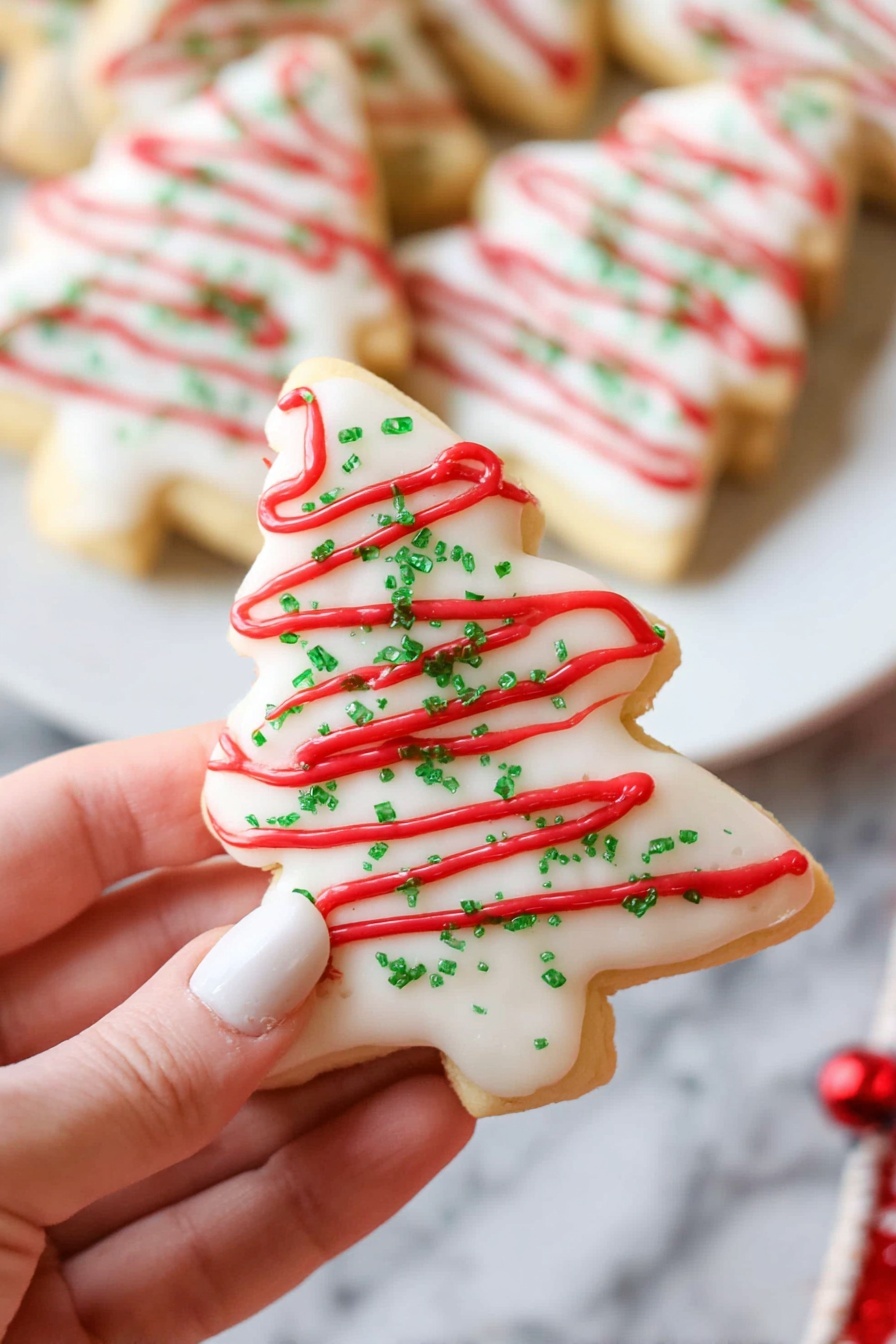
Melt your white almond bark in 30-second bursts, stirring until silky smooth. Dip your chilled trees one by one, letting excess drip off before setting them on parchment. Sprinkle generously with green sanding sugar right away so it sticks. Melt the red candy melts and pipe on wavy stripes — it’s such a festive finishing touch.
Top Tip
Having made these several times, I've learned some neat tricks to make them turn out picture-perfect every time — here’s what helped me the most:
- Freeze Layers Before Cutting: It keeps the filling from squishing out and ensures crisp tree edges.
- Use Binder Clips on Parchment Paper: Keeps the paper secure and prevents batter from seeping underneath.
- Don’t Overbake the Cake: Aim for moist crumbs on your toothpick test so your trees stay soft.
- Pipe Candy Melts with a Small Opening: Gives you better control for those cute red garland swirls.
How to Serve Copycat Little Debbie Christmas Tree Cakes Recipe
Garnishes
The green sanding sugar is my go-to because it adds that festive sparkle with a subtle crunch. Sometimes I throw on a few tiny edible silver balls to mimic ornaments — it really brings the trees to life without overwhelming the cake’s flavor.
Side Dishes
These cakes pair beautifully with hot cocoa topped with whipped cream or a cinnamon-spiced latte. For an adult twist, a spiced mulled wine complements the sweetness perfectly during holiday gatherings.
Creative Ways to Present
I like arranging these trees standing upright in a circle on a festive platter, creating a little “forest” centerpiece. Decorating the platter with fresh pine sprigs and cranberries adds a charming touch that guests always comment on.
Make Ahead and Storage
Storing Leftovers
Store your Copycat Little Debbie Christmas Tree Cakes in an airtight container at room temperature for up to 3 days, or in the fridge for 5 days if your kitchen is warm. I usually keep them in the fridge during holiday parties to keep the coating crisp and the filling fresh.
Freezing
These freeze beautifully! I wrap each tree individually in plastic wrap and place them in a freezer-safe container. When I want a treat, I thaw them in the fridge overnight — they come back soft and delicious, almost like fresh.
Reheating
Since they’re best enjoyed cool or at room temp, I usually just let frozen leftover trees thaw slowly in the fridge. If you’re eager to serve them sooner, let them rest on the counter for about 30 minutes — avoid heating as it can soften the coating too much.
Frequently Asked Questions:
Absolutely! While the recipe calls for a yellow cake mix to keep things simple and consistent, you can substitute your favorite scratch yellow cake recipe. Just make sure the batter isn’t too dense, so your trees stay light and tender.
Freezing the filled cake for at least 30 minutes before cutting is key. It firms up the filling and layers, making clean cuts easier without squishing or oozing.
You can substitute with homemade marshmallow creme or a smooth marshmallow spread. Alternatively, a whipped cream cheese frosting can work, though the texture and flavor will be a bit different.
If you’re pressed for time, using canned frosting in place of the homemade marshmallow filling works well. Also, you can skip the freezing steps, but your cuts might be messier and decorating a bit trickier.
Final Thoughts
This Copycat Little Debbie Christmas Tree Cakes Recipe is one of those joyful kitchen adventures I always look forward to during the holidays. It’s simple enough to whip up with friends or family, and the festive result truly lights up the dessert table. I can’t wait for you to try it and make sweet memories over these charming holiday treats!
Print
Copycat Little Debbie Christmas Tree Cakes Recipe
- Prep Time: 30 minutes
- Cook Time: 15 minutes
- Total Time: 1 hour 45 minutes
- Yield: 12 cakes
- Category: Dessert
- Method: Baking
- Cuisine: American
Description
These Copycat Little Debbie Christmas Tree Cakes are delightful holiday treats featuring a moist yellow cake filled with fluffy marshmallow filling, coated in smooth white almond bark, and decorated with festive green sanding sugar and red candy melts. Perfect for celebrating the season with a homemade twist on a classic favorite.
Ingredients
Cake
- 13.25 ounce box yellow cake mix
- 3 large eggs
- 1 large egg yolk
- 1 cup whole milk
- ½ cup melted butter
Filling
- 7 ounces marshmallow fluff
- ¾ cup butter room temperature
- 2 cups powdered sugar
- 2 tablespoons whole milk
Coating
- 1 pound white almond bark
- 1 cup red candy melts
- Green sanding sugar
Instructions
- Preheat and prepare pan: Preheat oven to 350 degrees F. Line a 16×12 inch jelly roll pan with parchment paper and lightly grease it with nonstick cooking spray. Use binder clips to secure parchment paper overhang to keep it in place.
- Mix cake batter: In a large mixing bowl, combine yellow cake mix, 3 whole eggs, 1 egg yolk, 1 cup whole milk, and ½ cup melted butter. Whisk until completely smooth.
- Bake cake: Spread batter evenly in the prepared pan using an angled spatula. Bake in preheated oven for 15 minutes or until a toothpick inserted in the center comes out clean or with moist crumbs. Remove and let cool completely.
- Prepare filling: In a medium bowl, add 7 ounces marshmallow fluff, ¾ cup room temperature butter, and 2 cups powdered sugar. Beat with a hand mixer on medium speed until smooth. Add 2 tablespoons whole milk and whip on high speed for 1 to 2 minutes until light and fluffy.
- Assemble cake layers: Cut the cooled cake in half horizontally. Spread the filling evenly on one half and top with the remaining half. Place the filled cake layers together.
- Cut shapes: Carefully cut out tree shapes from the filled cake layers using a tree-shaped cookie cutter. Place on a parchment-lined baking sheet. Freeze for 30 minutes if needed to make cutting easier. Then, place the trees back in the freezer for 30 minutes to chill.
- Melt coating: In a microwave-safe bowl, melt 1 pound white almond bark in 30-second intervals, stirring after each until smooth.
- Coat trees: Dip each tree into the melted white almond bark, tapping off excess, and place on a parchment-lined tray. Immediately sprinkle green sanding sugar on top so it sticks. Repeat for all trees.
- Melt candy melts and decorate: Melt 1 cup red candy melts in a microwave-safe bowl in 30-second intervals, stirring until smooth. Add ¼ teaspoon melted shortening or coconut oil if too thick. Pour melted candy melts into a sandwich bag and cut a small hole in one corner. Pipe red wavy stripes onto each tree as decoration.
Notes
- Store leftovers in an airtight container for up to 3 days or refrigerate for up to 5 days.
- If short on time, use canned frosting instead of making filling from scratch.
- Yield depends on the size of the cookie cutter used to cut tree shapes.
- Freezing the filled cake before cutting makes it easier to handle and achieve clean shapes.
- For smoother candy melts, stirring well and adding a small amount of shortening helps achieve the right consistency.
Nutrition
- Serving Size: 1 cake
- Calories: 320 kcal
- Sugar: 28 g
- Sodium: 190 mg
- Fat: 18 g
- Saturated Fat: 10 g
- Unsaturated Fat: 6 g
- Trans Fat: 0 g
- Carbohydrates: 38 g
- Fiber: 0.5 g
- Protein: 3 g
- Cholesterol: 70 mg


Leave a Reply