If you’ve ever craved something that’s both crispy and comforting, this Crispy Chicken Katsu Curry Recipe is exactly what you need. Imagine tender chicken breast encased in a golden panko and parmesan crust, paired with rich, hearty Japanese curry – pure bliss in every bite!

Jump to:
Why You'll Love This Recipe
I can’t tell you how many times I’ve turned to this recipe when I want a warm, satisfying meal that feels special but is still totally doable on a weeknight. It brings the tastes of Japan right to your kitchen with simple ingredients you might already have!
- Comfort food classic: Crispy chicken katsu meets a rich, homemade Japanese curry that’s thick and flavorful.
- Make-ahead friendly: You can prepare the curry in advance and quickly fry up fresh katsu when you’re ready to eat.
- Perfect texture: The parmesan in the panko coating adds an unexpected layer of savory crunch that’s addictive.
- Family-approved: This dish serves 4 and is a guaranteed crowd-pleaser, perfect for sharing or leftovers.
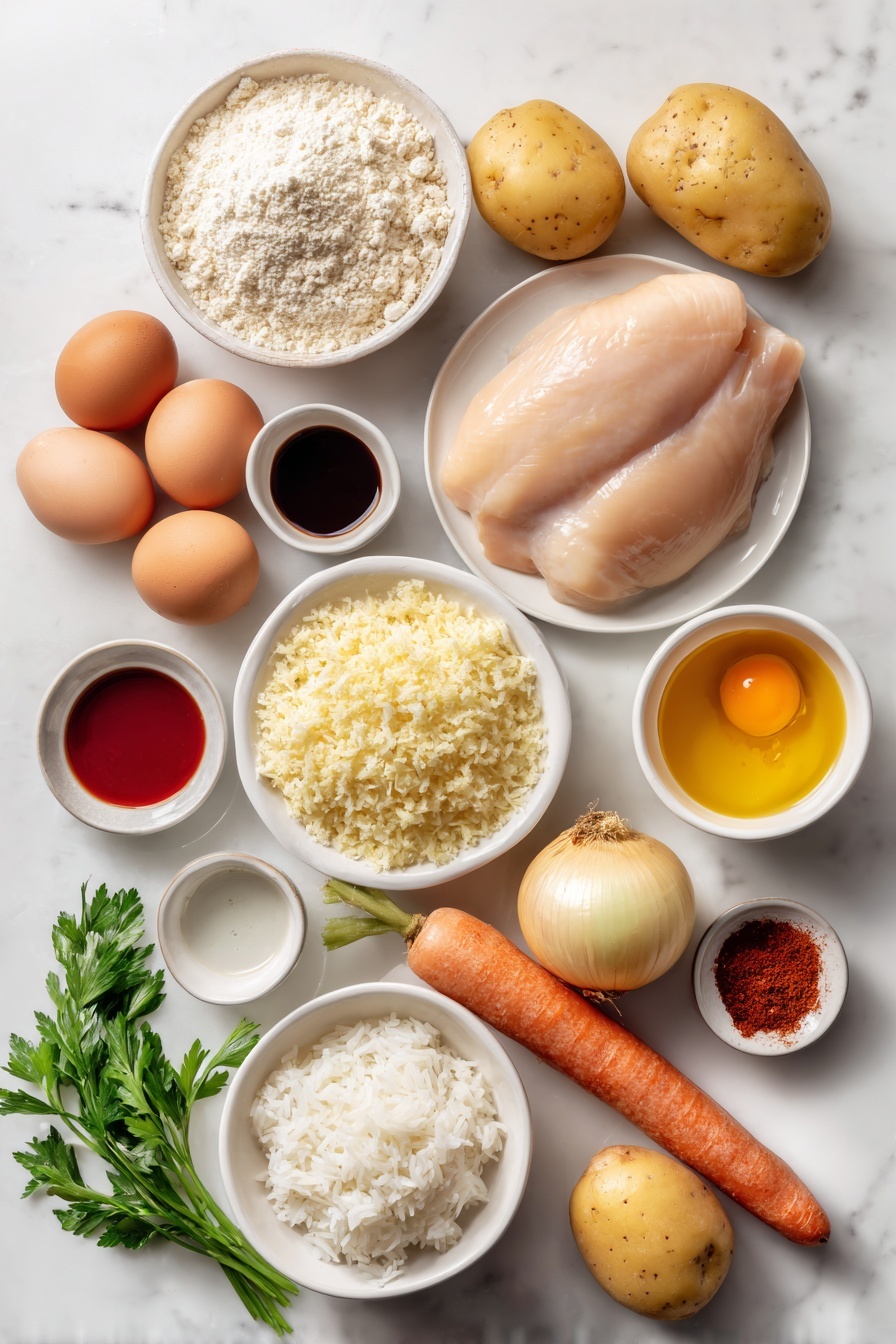
Ingredients & Why They Work
Let’s talk ingredients before we dive in because what you choose really makes a difference here. Opting for fresh chicken breasts or thighs, quality panko, and good Japanese curry roux can elevate this dish from tasty to unforgettable.
- Boneless chicken thigh or chicken breast: Thighs bring juiciness, breasts keep it lean—your call depending on the texture you prefer for your katsu.
- Butter: Adds a subtle richness to the curry base that's key to that homemade comforting flavor.
- Onion, potato, and carrot: Classic Japanese curry veggies that give the sauce heart and body.
- Japanese curry roux: The cornerstone for that thick, savory, slightly sweet curry taste—homemade or boxed both work.
- Tsuyu sauce: Adds umami depth and enhances the overall flavor complexity without overpowering.
- Honey and sake: Bring a gentle sweetness and subtle aroma, balancing the spices beautifully.
- Fenugreek powder and tomato ketchup: Small but mighty ingredients that round out the curry’s flavor profile.
- Cooking oil for frying: Use a neutral oil with a high smoke point to ensure crispy, golden chicken katsu.
- All-purpose flour, eggs, and water: The batter ingredients that create the perfect sticky base for the crumb coating.
- Panko breadcrumbs and grated parmesan cheese: The secret to that ultra-crispy, flavorful coating you’ll want every time.
- Japanese short-grain rice: The perfect starchy side to soak up all that delicious curry sauce.
- Fukujinzuke pickles and fresh parsley (optional): These add a refreshing contrast and a pop of color to your plate.
Make It Your Way
One of the best things about this Crispy Chicken Katsu Curry Recipe is how adaptable it is. Whether you're craving a juicier cut or want to dial up the spice, feel free to tweak it to suit your taste and dietary needs.
- Chicken Thigh Swap: I personally love using chicken thighs instead of breasts for an extra juicy and tender katsu. It fries up beautifully and keeps that crisp coating perfectly crisp.
- Spice it Up: If you like a bit more heat, add a little extra chili powder or even a touch of Japanese shichimi togarashi into your curry for a lively kick without overpowering the flavors.
- Gluten-Free Option: For friends or family who are gluten sensitive, swapping out the all-purpose flour and panko for gluten-free flour and breadcrumbs works great. The curry thickness will hold wonderfully too!
- Make Ahead Magic: The curry base can be made in advance and reheated gently. You can also keep the katsu warm in a low oven while you get everything plated perfectly.
- Vegetable Variations: Feel free to add other root veggies like sweet potatoes or parsnips for a seasonal twist—just add them alongside the potatoes and carrots to simmer until tender.
Step-by-Step: How I Make Crispy Chicken Katsu Curry Recipe
Step 1: Preparing the curry base ingredients
Start by cutting 300 grams of boneless chicken thigh into bite-sized pieces and seasoning them lightly with salt and pepper. I find this little pinch of seasoning at the start builds layers of flavor in the curry. Then, thinly slice your onion and peel your potatoes and carrot, cutting them into rustic chunks that will soften and soak up the curry’s rich sauce.
Step 2: Building the flavor foundation
Heat a tablespoon of butter over medium heat in a large pot until melted and shimmering. Toss in your chicken and cook just until the outside seals—this keeps the meat juicy inside. Next, add your sliced onions and cook until they start melting and become translucent, releasing their sweetness into the mix.
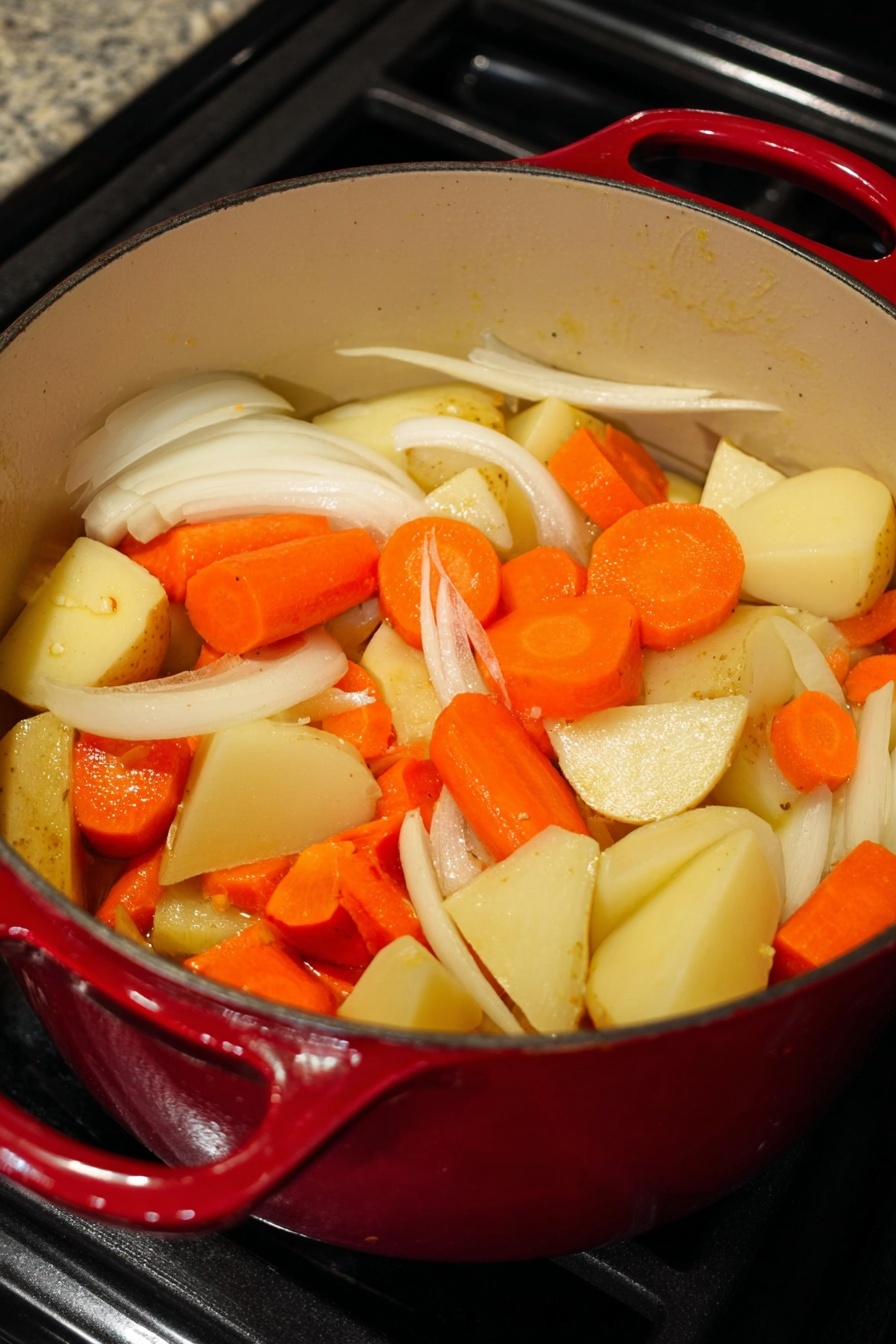
Step 3: Adding vegetables and liquids
Now, stir in the potatoes and carrots along with a tablespoon of tsuyu sauce for that quintessential savory umami punch. Mix everything for about a minute to coat the veggies in flavor. Pour in 600 ml of water and bring the pot to a gentle boil. Lower the heat and gradually stir in 4 servings worth of Japanese curry roux until completely dissolved, forming a smooth, thick sauce.
Step 4: Deepening the curry’s character
Enhance your curry by stirring in half a tablespoon of honey for subtle sweetness, a tablespoon of sake to add depth, half a teaspoon of fenugreek powder, and a teaspoon of tomato ketchup to round out the flavors. Add a pinch of chili powder if you want a little gentle heat. Let this simmer gently for 10 to 20 minutes, stirring occasionally, until it thickens to your liking. Keep it covered with a lid to retain warmth.
Step 5: Preparing the chicken katsu
While the curry simmers, heat about 1.5 liters of cooking oil to 170 °C (338 °F) in a deep fryer or large pot. Meanwhile, slice 2 chicken breasts horizontally into thinner cutlets and season both sides with salt and pepper. Wrapping the chicken in plastic wrap, pound each piece to an even 1 cm thickness using a meat tenderizer or rolling pin—this ensures they cook evenly and stay tender.
Step 6: Making your batter and coating station
Whisk together 100 ml water, 2 eggs, and 100 g all-purpose flour in a bowl to create a thick batter—this will give your katsu that signature crispy yet delicate exterior. On one plate, mix 50 g panko breadcrumbs with 4 tablespoons of grated parmesan cheese for a wonderful savory crunch. On another plate, spread out 6 tablespoons of flour, which you’ll use for dusting the chicken before dipping it into the batter.
Step 7: Coating and frying the katsu
First, lightly dust each chicken piece with flour and shake off the excess—this helps the batter stick better. Then, dip it fully into the batter, letting the excess drip away slightly before pressing it firmly into the panko and parmesan mix until fully coated. Carefully lower the coated chicken into the hot oil, frying for about 6 minutes total and turning halfway through, until your katsu is a beautiful golden brown and cooked through. Remove and let drain on a wire rack to keep that crisp exterior perfect.
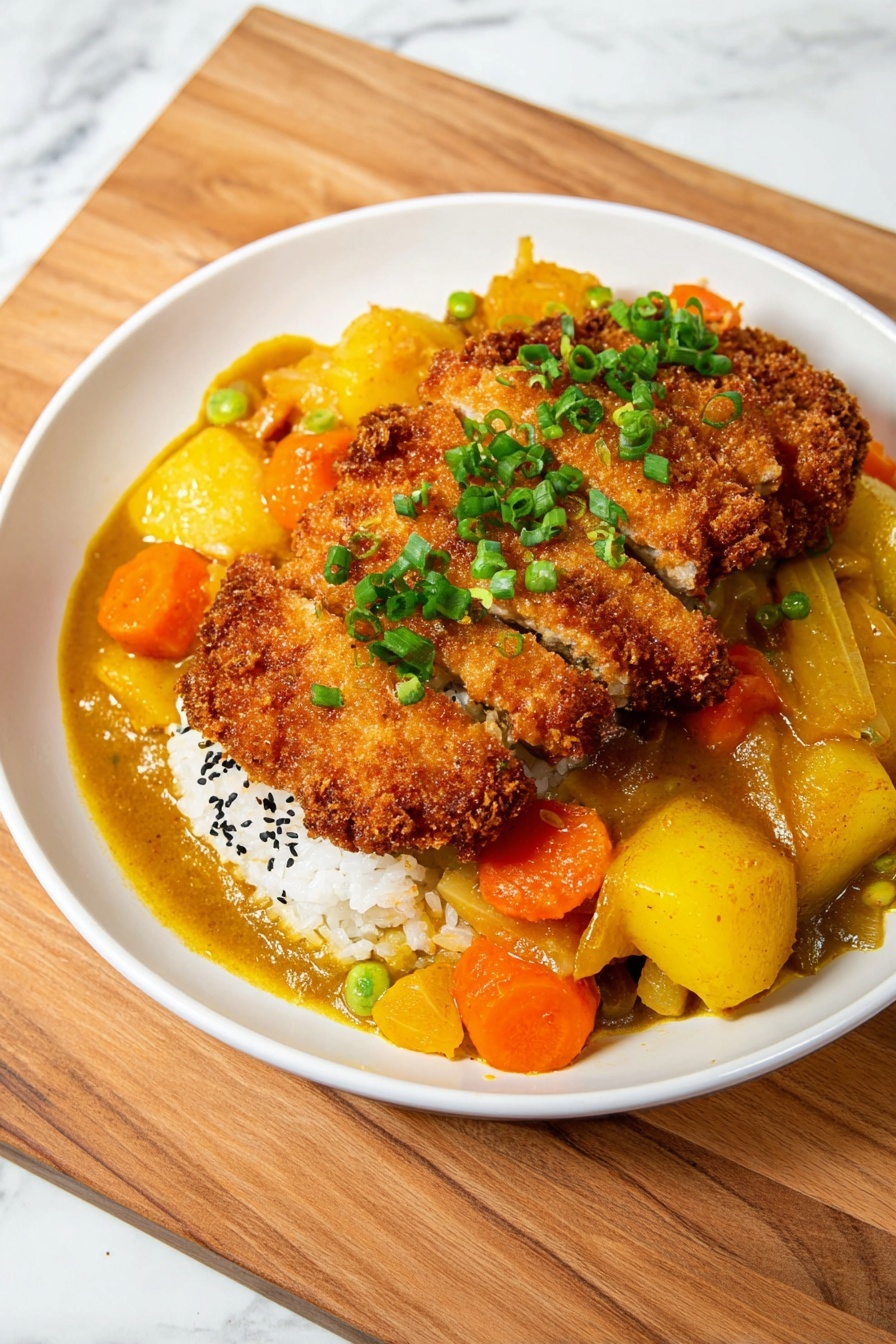
Step 8: Serving your Crispy Chicken Katsu Curry
Plate four portions of fluffy Japanese short-grain rice on one side, spoon the rich curry alongside, then slice the katsu into 1 cm strips and arrange them nestled between rice and sauce. Garnish with fukujinzuke pickles and a sprinkle of fresh parsley for brightness and a wonderful textural contrast. Serve this comforting masterpiece warm and watch it disappear fast!
Top Tip
Getting that perfect crispy crust on your chicken and a beautifully rich curry sauce can be tricky, but a few key tips will take your Crispy Chicken Katsu Curry Recipe from great to unforgettable.
- Maintain Oil Temperature: Keep your frying oil steady at 170 °C (338 °F). Too hot and the coating burns before the chicken cooks; too low and it soaks up excess oil, losing its crunch.
- Evenly Pound the Chicken: I learned that pounding the chicken to an even 1 cm thickness ensures it cooks quickly and uniformly, making your katsu juicy inside with a crisp outside.
- Press the Panko Coating: Press the panko and parmesan mixture firmly onto the batter-covered chicken to create that irresistibly crunchy texture that sticks well during frying.
- Rest on a Wire Rack: After frying, place the chicken on a wire rack—not paper towels—to let excess oil drip while keeping the coating crisp instead of soggy.
How to Serve Crispy Chicken Katsu Curry Recipe
Garnishes
Fukujinzuke pickles are the classic accompaniment, providing a crunchy, sweet, and tangy contrast to the savory curry. Fresh parsley adds a splash of color and a subtle herby note that brightens each bite. For an extra touch, a drizzle of Japanese mayo atop the katsu can add creamy richness.
Side Dishes
Serve your Crispy Chicken Katsu Curry Recipe alongside steamed Japanese short-grain rice to soak up all that delicious curry sauce. Miso soup works wonderfully as a warming starter or side, and a simple green salad with sesame dressing can balance the hearty, rich flavors perfectly.
Make Ahead and Storage
Storing Leftovers
Store any leftover curry in an airtight container in the refrigerator for up to 3 days. The chicken katsu is best kept separate to maintain its crispness. You can refrigerate the cooked katsu on a wire rack covered loosely with foil.
Freezing
The curry sauce freezes well—in a freezer-safe container for up to 2 months. For best texture, freeze the chicken katsu separately wrapped tightly in plastic wrap and placed in a freezer bag. Thaw in the refrigerator overnight before reheating.
Reheating
Reheat curry gently on the stovetop over low heat, stirring occasionally. To revive the katsu’s crispness, reheat it in an oven or toaster oven at 180 °C (356 °F) for 5–7 minutes rather than microwaving, which can make it soggy.
Frequently Asked Questions:
Absolutely! Chicken thighs offer more juiciness and flavor. Just follow the same preparation steps, including pounding them to 1 cm thickness for even cooking.
You can substitute boxed curry roux with mild curry powder mixed with a thickening agent like flour or cornstarch. Adjust spices carefully to mimic the flavor balance of Japanese curry.
Place the fried chicken on a wire rack to drain excess oil instead of paper towels, which can trap moisture and make the coating soggy.
Yes! The curry sauce actually tastes better the next day as the flavors deepen. Make it in advance and store it in the fridge to enjoy later; just reheat gently before serving.
Final Thoughts
This Crispy Chicken Katsu Curry Recipe is more than just a meal—it’s a delicious way to bring a touch of warm, home-cooked Japanese comfort into your kitchen. Whether it’s a weeknight dinner or a weekend treat, the combination of crispy chicken and rich curry never fails to satisfy. I hope these tips and tricks help you master this dish and create many happy moments around your dining table.
Print
Crispy Chicken Katsu Curry Recipe
- Prep Time: 20 minutes
- Cook Time: 40 minutes
- Total Time: 1 hour
- Yield: 4 servings
- Category: Main Course
- Method: Frying
- Cuisine: Japanese
Description
Japanese chicken katsu curry is a comforting dish featuring tender chicken breast coated in a crispy panko and parmesan cheese batter, served over thick, rich homemade Japanese curry with hearty vegetables. Perfect for make-ahead meals and enjoyed with steamed Japanese short-grain rice.
Ingredients
Japanese Style Curry (sweet)
- 300 g boneless chicken thigh or chicken breast
- 1 pinch salt and pepper
- 1 tablespoon butter
- 1 onion
- 2 potato
- 1 carrot
- 4 servings worth Japanese curry roux (homemade curry roux or boxed)
- 600 ml water (adjust if using premade curry cubes)
- 1 tablespoon tsuyu sauce (noodle soup base)
- ½ tablespoon honey
- 1 tablespoon sake
- 1 pinch chili powder (optional)
- ½ teaspoon fenugreek powder
- 1 teaspoon tomato ketchup
Chicken Katsu
- Cooking oil for deep frying (approximately 1.5 liters)
- 2 chicken breasts
- 2 pinches salt and pepper
- 6 tablespoon all-purpose flour (for coating)
- 100 ml water
- 2 eggs
- 100 g all-purpose flour (for batter)
- 50 g panko breadcrumbs
- 4 tablespoon grated parmesan cheese
To Serve
- 4 portions cooked Japanese short-grain rice
- Fukujinzuke pickles (optional)
- Fresh parsley (optional)
Instructions
- Prepare the curry: Cut 300 g boneless chicken thigh into bite-size pieces and season with salt and pepper. Thinly slice 1 onion, peel and cut 2 potatoes and 1 carrot into rough bite-size pieces.
- Cook the curry base: Heat a large pot on medium heat and melt 1 tablespoon butter. Add the chicken pieces and fry until sealed on the outside. Add sliced onion and cook until slightly softened.
- Add vegetables and seasonings: Add potato and carrot along with 1 tablespoon tsuyu sauce; mix over heat for 1 minute. Pour in 600 ml water and bring to a boil. Reduce heat to simmer and dissolve 4 servings of Japanese curry roux completely.
- Enhance flavor and simmer: Stir in ½ tablespoon honey, 1 tablespoon sake, ½ teaspoon fenugreek powder, 1 teaspoon tomato ketchup, and a pinch of chili powder if using. Simmer for 10-20 minutes until curry thickens to your liking. Keep warm with a lid on.
- Prepare the chicken katsu: Heat cooking oil to 170 °C (338 °F). Meanwhile, slice 2 chicken breasts in half horizontally, season both sides with salt and pepper. Pound them to 1 cm thickness using a meat tenderizer or rolling pin wrapped in plastic wrap.
- Make the batter and coating: In a bowl, whisk together 100 ml water, 2 eggs, and 100 g all-purpose flour to form a thick batter. On a plate, combine 50 g panko breadcrumbs and 4 tablespoon grated parmesan. On another plate, spread 6 tablespoon flour for dusting.
- Coat the chicken: Lightly coat each chicken piece in flour and shake off excess. Dip into the batter, then press firmly into the panko and parmesan mixture until fully coated.
- Fry the katsu: Carefully place coated chicken pieces into hot oil. Fry for 6 minutes, turning halfway, until golden brown and cooked through. Transfer to a wire rack to drain excess oil.
- Serve: Plate cooked Japanese rice on one side and spoon curry on the other. Slice katsu into 1 cm strips and arrange in the middle. Garnish with fukujinzuke pickles and fresh parsley if desired. Enjoy warm.
Notes
- Use chicken thighs instead of breasts for juicier katsu.
- If you can’t find Japanese curry roux, substitute with mild curry powder and add thickening agents like flour or cornstarch.
- Maintain oil temperature around 170 °C for optimal crispy coating without burning.
- For a gluten-free version, substitute all-purpose flour and panko with gluten-free alternatives.
- Katsu can be kept warm in a low oven while you finish cooking curry.
- Homemade curry roux can be made ahead and stored for convenience.
- Adjust chili powder amount to control spice level.
Nutrition
- Serving Size: 1 serving
- Calories: 700 kcal
- Sugar: 8 g
- Sodium: 900 mg
- Fat: 28 g
- Saturated Fat: 7 g
- Unsaturated Fat: 18 g
- Trans Fat: 0 g
- Carbohydrates: 75 g
- Fiber: 8 g
- Protein: 40 g
- Cholesterol: 140 mg


Leave a Reply