If you love soft, buttery bread with a garlicky kick, then you're going to adore this Crispy Garlic Knots Recipe. These little knots are delightfully tender on the inside with a flavorful, golden crust coated in the perfect garlic butter glaze—trust me, they’ll disappear fast!

Jump to:
Why You'll Love This Recipe
I’ve made this recipe more times than I can count because it’s just so darn satisfying. Whether you’re serving them alongside pasta or enjoying as an appetizer, these garlic knots bring that cozy, homemade vibe we all crave.
- Made from scratch: You control every ingredient, making for fresher, tastier knots than store-bought.
- Perfectly soft yet crispy: The texture strikes the ultimate balance—light and fluffy inside, golden outside.
- Simple ingredients: Pantry staples come together effortlessly for this impressive Italian appetizer.
- Versatile and shareable: Ideal for parties, family dinners, or an easy snack anytime you want to impress.
Ingredients & Why They Work
Before you dive in, gather the staples carefully for the best results—especially the flour and yeast, which are key players in getting that perfect dough consistency and rise.
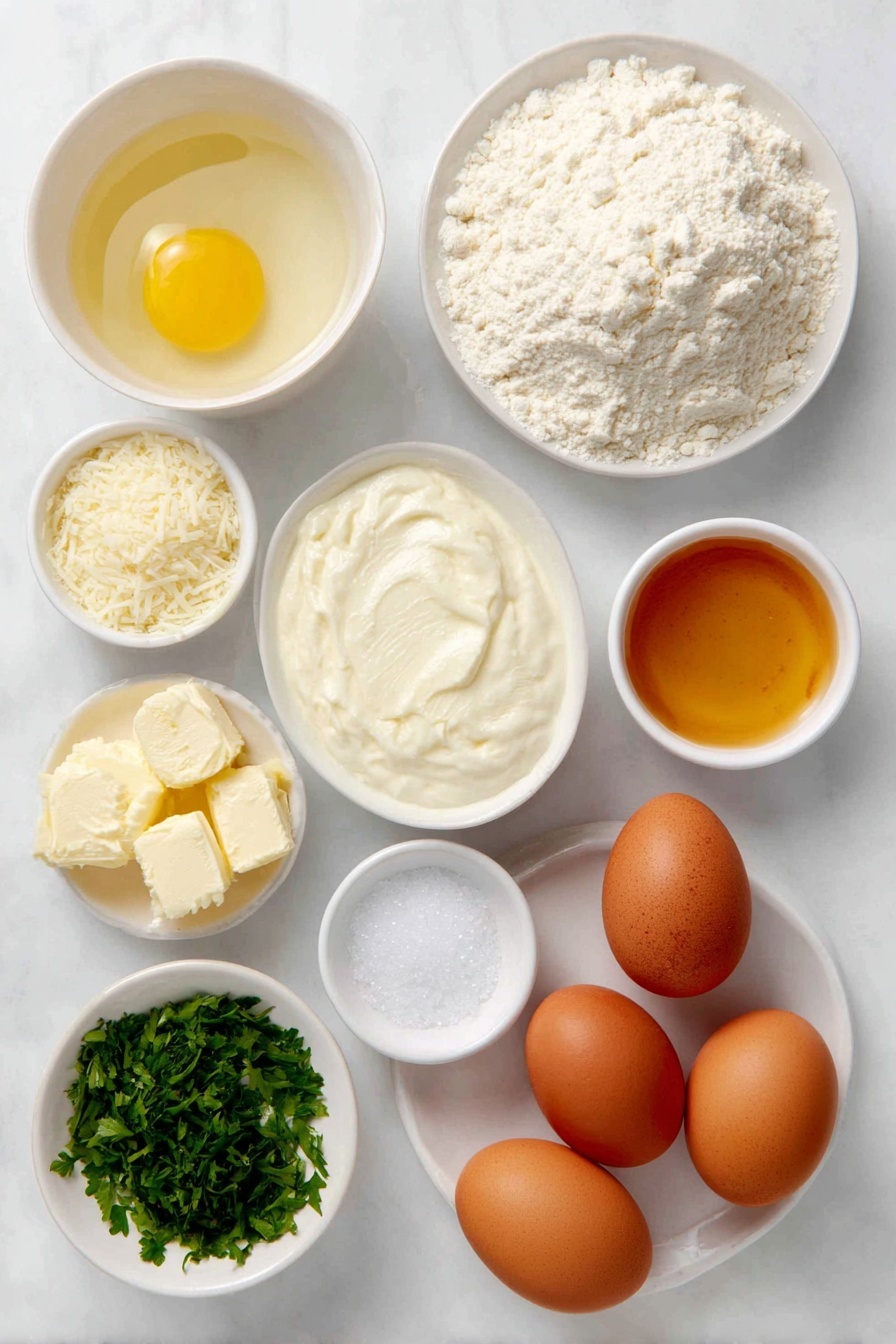
- Water: The base liquid that hydrates the flour and activates the yeast.
- Melted butter: Adds richness and depth to the dough and the garlic butter glaze.
- Milk: Tenderizes the dough for that soft crumb inside the knots.
- Honey: Feeds the yeast gently and adds a subtle, natural sweetness.
- Active-dry yeast: The rising agent that makes these knots fluffy and light.
- All-purpose flour: The structure-giver, ensuring stability and chewiness.
- Fine sea salt: Balances flavors and enhances the taste of the bread and toppings.
- Garlic powder: Imparts savory garlic flavor directly into the dough and again in the butter.
- Freshly-grated Parmesan cheese: A salty, nutty topping that complements the garlic butter beautifully.
- Flaky sea salt: Adds bursts of texture and flavor on top of the finished knots.
- Salted butter (for garlic butter): Creates a luscious, velvety coating to keep the knots moist and flavorful.
- Fresh parsley: Brings a bright, herby contrast to the rich garlic butter.
Make It Your Way
One of the best parts about this Crispy Garlic Knots Recipe is how easy it is to tweak and make it your own. Whether you want to add more herbs, spice things up, or tailor it to your dietary needs, these garlic knots are incredibly versatile.
- Herb-Infused Knots: I love adding a mix of fresh herbs like rosemary and thyme to the garlic butter for an extra fragrant touch—it really makes the flavor pop!
- Cheesy Garlic Knots: For a gooey twist, sprinkle some shredded mozzarella inside the knots before tying them. It adds a delightful surprise with every bite.
- Spicy Garlic Knots: If you’re into heat, toss a pinch of red pepper flakes into the garlic butter. It gives a nice subtle kick without overpowering the garlic.
- Dairy-Free Option: Swap out the butter and milk for plant-based alternatives to make these knots dairy-free but just as delicious.
- Garlic Freshness Swap: If you prefer fresh garlic over garlic powder, finely mince or grate 2-3 cloves and add to the garlic butter—adjust to taste and enjoy the vibrant garlic flavor.
Step-by-Step: How I Make Crispy Garlic Knots Recipe
Step 1: Warm Up Your Liquids Just Right
Start by mixing the water, melted butter, milk, and honey in a microwave-safe bowl. Heat this combination in the microwave for 1 minute, then stir well. Continue heating in 15-second bursts until the mixture reaches around 110°F—warm to the touch but never hot. This perfect temperature wakes up the yeast without harming it, setting the foundation for fluffy, airy dough.
Step 2: Activate the Yeast
Pour your warm liquid mixture into the stand mixer bowl. Sprinkle the active-dry yeast evenly over the surface, then give it a gentle stir with a fork. Let it sit undisturbed for about 5 minutes until you see a foamy layer forming on top. This bloom is your sign the yeast is alive and ready to work its magic.
Step 3: Mix in Flour and Seasonings
Add 3 ½ cups of flour, sea salt, and garlic powder to the yeast mixture. Using the dough hook attachment, mix on medium-low until combined. The dough will be sticky at first; if it sticks to the sides of the bowl, add flour little by little—up to ½ cup more—until the dough pulls away from the edges but remains slightly tacky. Continue mixing for 4 to 5 minutes on low speed until the dough feels smooth and elastic. Then form it into a ball and place it in a greased bowl.
Step 4: Let the Dough Rise
Cover your dough bowl with a damp towel or paper towel and set it aside for 15 minutes. This quick rise helps the dough relax and become easier to shape—plus it kickstarts the yeast activity, making your knots wonderfully fluffy.
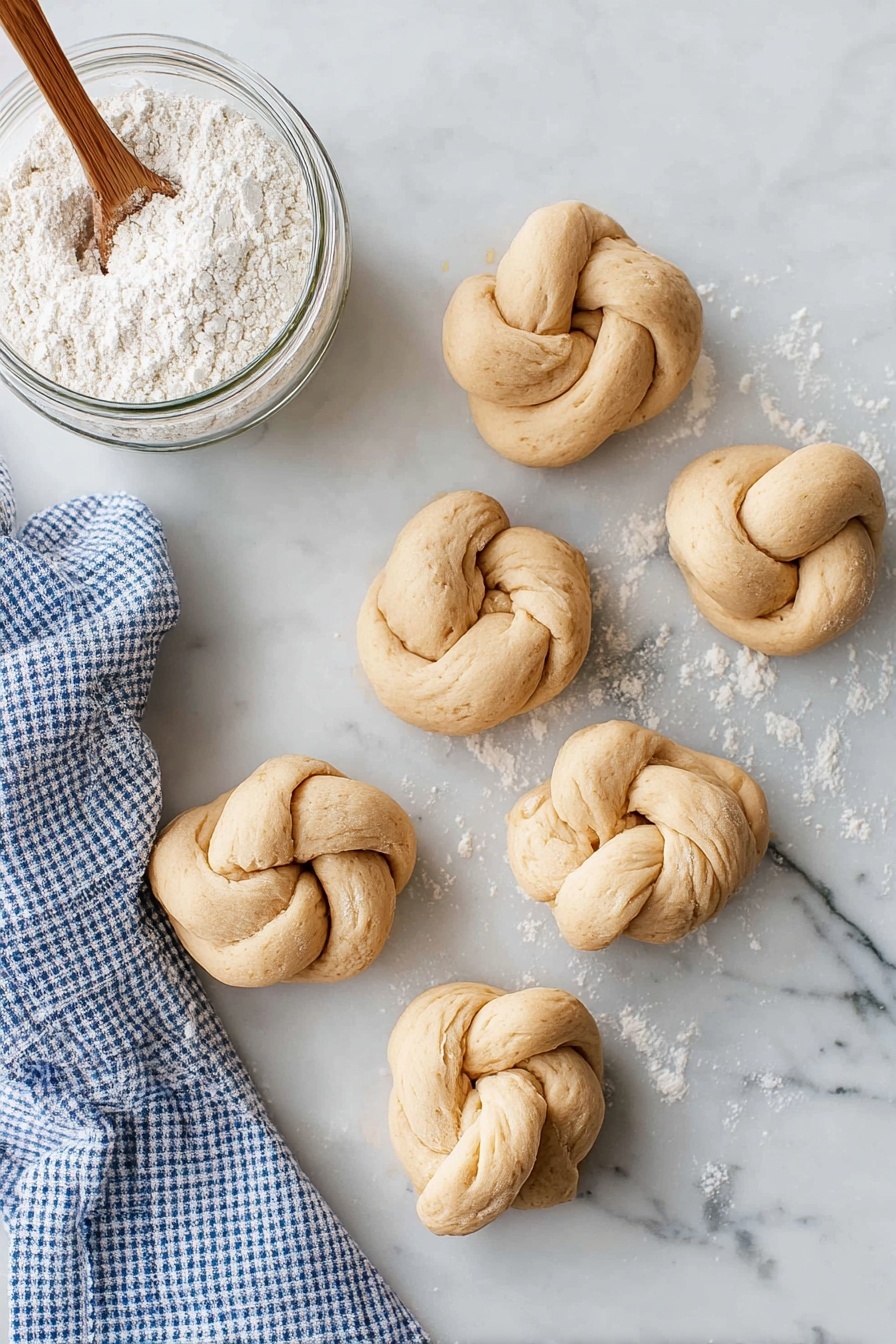
Step 5: Shape Your Garlic Knots
After the initial rise, gently shape the dough into a 16-inch log with a consistent width. Slice this log into 15 or 16 equal pieces. Roll each piece into an 8-inch rope, then tie it into a knot, tucking the ends under or leaving them out, whichever you prefer. Place them spaced evenly on a parchment-lined baking sheet. Cover the knots loosely and allow them to rise for another 15 minutes—this second proof ensures a light and airy texture.
Step 6: Bake to Golden Perfection
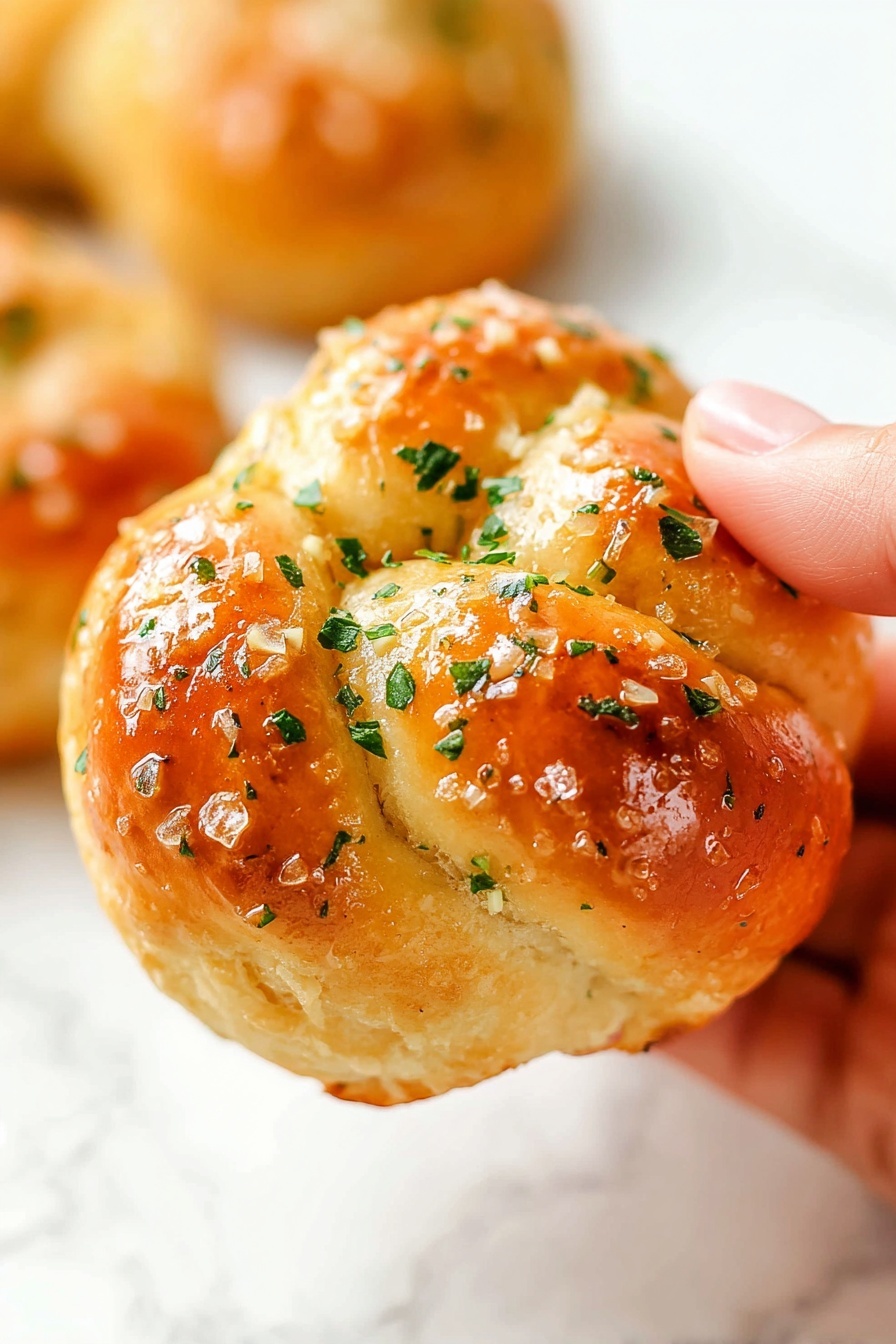
Preheat your oven to 400°F before putting the knots in. Bake uncovered for 15 minutes, until they’re lightly golden and cooked through. As they bake, whisk together your garlic butter mixture—melted butter combined with fresh parsley and garlic powder—to brush on the knots immediately after they come out.
Step 7: Brush, Sprinkle, and Serve
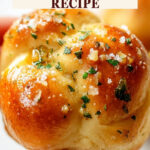
Once your garlic knots are out of the oven, transfer the baking sheet to a wire rack. Quickly brush each knot with the warm garlic butter, then sprinkle generously with freshly grated Parmesan and a pinch of flaky sea salt. Serve warm and watch these little bites disappear fast!
Top Tip
Getting your Crispy Garlic Knots Recipe just right can take your homemade bread game to the next level. Here are some tried-and-true tips that will help ensure your knots come out perfectly every time.
- Warm Liquids Make a Difference: Make sure your liquid mixture reaches that cozy 110°F mark—not too hot, not too cold—to activate the yeast properly without killing it.
- Flour Gradually: I learned the hard way that adding all the flour at once can lead to dry knots. Adding flour bit by bit lets you find the perfect slightly sticky dough texture that bakes up soft.
- Double Rise Magic: Letting the dough rise twice—once before shaping and once after—really improves the fluffiness and tender crumb inside every knot.
- Brush Immediately: Don’t wait to brush with garlic butter right out of the oven—that warm finish locks in flavor and ensures the parmesan sticks beautifully.
How to Serve Crispy Garlic Knots Recipe
Garnishes
While freshly-grated Parmesan and flaky sea salt are classic finishing touches, don’t be afraid to experiment with other garnishes like finely chopped fresh basil, a sprinkle of red pepper flakes for some heat, or a drizzle of aged balsamic vinegar for a tangy twist.
Side Dishes
These garlic knots pair beautifully with a variety of dishes. Serve them alongside a vibrant tomato basil soup, a hearty pasta like spaghetti aglio e olio, or a fresh Caesar salad. They’re also fantastic as part of an appetizer spread with marinara sauce for dipping or alongside roasted veggies for a comforting meal.
Make Ahead and Storage
Storing Leftovers
To keep your leftover garlic knots fresh, store them in an airtight container at room temperature for up to 2 days. If you want to extend their life a bit, refrigeration is an option, though they’re best enjoyed the same day they're made for maximum crispiness and softness inside.
Freezing
You can freeze baked garlic knots by first letting them cool completely, then placing them in a freezer-safe bag or container. They will keep well for up to 1 month. For best results, freeze them flat on a sheet before bagging to avoid squashing.
Reheating
To reheat frozen or stored garlic knots, pop them in a preheated 350°F oven for about 8-10 minutes until warmed through and the exterior crisps back up. Avoid microwaving if you want to keep that lovely crispy texture.
Frequently Asked Questions:
Absolutely! You can swap the garlic powder for finely minced fresh garlic. Just start with about 2 cloves and adjust according to your taste, as fresh garlic tends to be more pungent.
If your dough is too sticky, gradually add small amounts of flour while mixing until you reach a slightly sticky but manageable texture. If it’s too dry, add a teaspoon of water at a time to help moisten it.
Yes, simply substitute the butter with plant-based margarine or oil, and use a dairy-free milk alternative to keep the recipe vegan-friendly and delicious.
After sprinkling the yeast over the warm liquid mixture, let it rest for 5 minutes. You should see a foamy layer rise to the top, which means the yeast is active and ready to work its magic in your dough.
Final Thoughts
There’s something wonderfully comforting about making your own Crispy Garlic Knots Recipe from scratch, and I hope this guide inspires you to give it a try. These soft, garlicky bites bring warmth and flavor to any table, whether as a cozy appetizer or a scrumptious side. Enjoy baking—there’s truly nothing like the smell of fresh garlic knots wafting through your kitchen!
Print
Crispy Garlic Knots Recipe
- Prep Time: 1 hour
- Cook Time: 15 minutes
- Total Time: 1 hour 15 minutes
- Yield: 15 servings
- Category: Appetizer
- Method: Baking
- Cuisine: Italian
- Diet: Vegetarian
Description
Deliciously soft and flavorful Garlic Knots made from scratch with a rich garlic butter glaze, perfect as an appetizer or side dish for any meal.
Ingredients
Dough Ingredients
- 1 cup water
- 2 tablespoons melted butter
- ½ cup milk
- 2 tablespoons honey
- 1 tablespoon active-dry yeast
- 3 ½ to 4 cups all-purpose flour
- 1 teaspoon fine sea salt
- ½ teaspoon garlic powder
Toppings
- freshly-grated Parmesan cheese
- flaky sea salt
Garlic Butter
- 4 tablespoons salted butter, melted
- 1 tablespoon finely-chopped fresh parsley
- ½ teaspoon garlic powder
Instructions
- Heat the liquids: In a microwave-safe bowl, stir together the water and melted butter, then add in the milk and honey and stir until combined. Microwave the mixture for 1 minute and stir. Continue microwaving in 15 second intervals until it reaches 110°F, warm but not hot to the touch.
- Add yeast: Pour the liquid mixture into the bowl of a stand mixer. Sprinkle the yeast evenly on top and stir with a fork to combine. Let the yeast rest and activate for 5 minutes until foamy.
- Add dry ingredients: Add 3 ½ cups flour, salt, and garlic powder to the yeast mixture. Use a dough hook to mix on medium-low speed until combined. If dough sticks to bowl sides, add up to ½ cup more flour gradually until the dough pulls away and is slightly sticky. Continue mixing on low speed for 4-5 minutes until the dough is smooth. Form a dough ball and transfer to a greased bowl.
- Let the dough rise: Cover the bowl with a damp towel or paper towel and let rise for 15 minutes.
- Prep oven and baking dish: Preheat oven to 400°F. Line a large baking sheet with parchment paper and set it aside.
- Form the garlic knots: Shape dough into a 16-inch log with even width. Cut into 15-16 equal pieces. Roll each piece into an 8-inch rope, knot it, and place on the baking sheet, tucking ends under or leaving out. Cover loosely with a kitchen towel and let rise for 15 minutes.
- Bake: Uncover and bake knots for 15 minutes until lightly golden brown and cooked through. Meanwhile, whisk garlic butter ingredients until combined.
- Brush with garlic butter: Remove baking sheet to wire rack. Immediately brush knots with garlic butter, then sprinkle with Parmesan and flaky sea salt.
- Serve: Serve the garlic knots warm and enjoy!
Notes
- Ensure liquids are warm (110°F) to properly activate yeast without killing it.
- Adding flour gradually helps achieve the perfect slightly sticky dough texture.
- Letting dough rise twice improves fluffiness and texture of knots.
- You can substitute fresh garlic for garlic powder if preferred, adjusting quantity to taste.
- For a dairy-free option, use plant-based butter and milk substitutes.
Nutrition
- Serving Size: 1 knot
- Calories: 140 kcal
- Sugar: 2 g
- Sodium: 170 mg
- Fat: 6 g
- Saturated Fat: 3.5 g
- Unsaturated Fat: 2 g
- Trans Fat: 0 g
- Carbohydrates: 18 g
- Fiber: 1 g
- Protein: 3 g
- Cholesterol: 15 mg


Leave a Reply