There’s something incredibly comforting about biting into a chewy, buttery blondie with pockets of melty chocolate. This Gluten-Free Chocolate Chip Blondies Recipe is the perfect sweet treat that’s not only naturally gluten-free but also incredibly easy to whip up for any occasion—trust me, you’ll want to keep this one on repeat.

Jump to:
- Why You'll Love This Recipe
- Ingredients & Why They Work
- Make It Your Way
- Step-by-Step: How I Make Gluten-Free Chocolate Chip Blondies Recipe
- Top Tip
- How to Serve Gluten-Free Chocolate Chip Blondies Recipe
- Make Ahead and Storage
- Frequently Asked Questions:
- Final Thoughts
- Gluten-Free Chocolate Chip Blondies Recipe
Why You'll Love This Recipe
Honestly, this gluten-free chocolate chip blondies recipe has become a staple in my kitchen. The balance of almond flour and tapioca starch creates that perfect chewy texture I crave, and the way the chocolate chips melt right on top? Pure bliss.
- Simple Ingredients: The recipe uses everyday pantry staples you probably already have, making it super accessible.
- Chewy, but Tender Texture: Thanks to almond flour combined with tapioca starch, the blondies are moist without being cakey.
- Extra Chocolatey Goodness: Adding chocolate chips halfway through baking keeps a gorgeous melty chocolate layer on top.
- Versatile for Any Occasion: Whether for a casual snack or a dessert centerpiece, these blondies fit right in.
Ingredients & Why They Work
Let’s talk about what goes into these blondies and why each ingredient is there. The combination creates a flawless texture and flavor that won’t make you feel like you’re missing out just because it’s gluten-free.

- Almond flour: Provides a rich, nutty flavor and moist, tender crumb that keeps blondies chewy.
- Tapioca starch: Adds lightness and elasticity, which prevents the blondies from crumbling.
- Baking soda: Helps the blondies rise slightly for that soft yet structured texture.
- Sea salt: Balances sweetness and enhances all the flavors.
- Creamy almond butter: Adds healthy fat and depth, plus a subtle almond flavor that I adore.
- Avocado oil: Keeps the blondies moist without overpowering the taste—neutral and heart-healthy.
- Maple syrup: A natural sweetener that creates a lovely caramel undertone.
- Eggs: Bind everything together, giving structure and richness.
- Vanilla extract: Elevates the flavor with warm aromatic notes.
- Chocolate chips: The star ingredient for pockets of gooey sweetness – plus, adding some on top halfway through baking is a game-changer!
Make It Your Way
I love how flexible this Gluten-Free Chocolate Chip Blondies Recipe is. It invites creativity—you can tweak it to fit your personal taste or dietary needs without losing that satisfying blondie texture.
- Variation: I often swap half of the chocolate chips for chopped toasted pecans or walnuts for a crunch that pairs beautifully with the almond flour base.
- Dairy-Free: This recipe is already free from dairy, so it's perfect if you're avoiding it. Just be sure to use dairy-free chocolate chips to keep it consistent.
- Sweetener Swap: I’ve tried using honey instead of maple syrup—results were delicious, but the texture was slightly denser.
- Oil Options: If you don't have avocado oil, a light olive oil or melted coconut oil works well—though coconut oil can add a subtle coconut flavor.
Step-by-Step: How I Make Gluten-Free Chocolate Chip Blondies Recipe

Step 1: Mix the Dry Ingredients
Start by preheating your oven to 350°F and lining an 18"x13" sheet pan with parchment paper—this helps for even baking and easy removal later. In a large bowl, whisk together almond flour, tapioca starch, baking soda, and sea salt. This ensures the leavening and salt are distributed evenly, which is key for that perfect rise and flavor balance.
Step 2: Combine Wet Ingredients Smoothly
In a separate bowl, mix creamy almond butter, avocado oil, maple syrup, eggs, and vanilla until smooth and well combined. Using room temperature eggs helps the mixture come together more easily—trust me, it saves time and frustration.
Step 3: Create The Batter
Gradually add the dry ingredients to the wet, folding gently until you get a thick batter. It should be smooth but sturdy enough to spread in the pan. Resist the urge to overmix here—it can make the blondies dense.
Step 4: Fold in Chocolate Chips and Bake
Fold in 1 cup of the chocolate chips, pour the batter evenly into your lined pan, and smooth the top with a spatula. Bake for 10 minutes, then carefully pull the pan out and sprinkle the remaining ¼ cup of chocolate chips over the surface. This step gives the blondies that irresistible melty chocolate topping. Pop the pan back in for another 10 minutes until the edges are lightly golden.
Step 5: Cool Completely and Cut
Let the blondies cool completely in the pan to set—they might seem a bit soft when warm but firm up nicely as they rest. Use the parchment to lift them out and cut into squares. This cooling step is crucial for clean slices, and your patience will pay off.
Top Tip
From making these blondies multiple times, I’ve learned a few tricks that really bring the recipe to the next level and help avoid common pitfalls.
- Perfect Pan Choice: Using an 18"x13" sheet pan ensures even baking and gives you those thin, chewy blondie edges we all love.
- Chocolate Chip Timing: Adding chocolate chips halfway through baking keeps them visible and melty on top instead of all sinking into the batter.
- Don’t Skip Cooling: Blondies are easier to cut and hold their shape best once completely cooled—warm blondies can crumble.
- Mix Gently: Overmixing the batter makes the texture dense. Fold just until combined for a tender bite.
How to Serve Gluten-Free Chocolate Chip Blondies Recipe

Garnishes
My go-to garnish is a simple dusting of powdered sugar for a touch of elegance. If I’m feeling fancy, a drizzle of melted chocolate or a sprinkle of flaky sea salt on the hot blondies elevates every bite. Those little finishing touches make all the difference when sharing with guests.
Side Dishes
These blondies pair beautifully with a scoop of vanilla ice cream for an indulgent dessert. I also love serving them alongside fresh berries or a cup of strong coffee or chai tea—the contrasting flavors balance the richness perfectly.
Creative Ways to Present
For parties, I slice blondies into bite-size squares and arrange them on a decorative platter with fresh mint leaves and a small bowl of chocolate sauce for dipping—guests love that interactive touch! I’ve also layered them in desserts jars alternating with whipped cream and fruit for a pretty and portable treat.
Make Ahead and Storage
Storing Leftovers
I store leftover blondies in an airtight container at room temperature—they stay moist and fresh for up to 3-4 days that way. If my kitchen is particularly warm, I keep them refrigerated, which extends their life to about a week without drying out.
Freezing
These blondies freeze wonderfully! I freeze whole batches in airtight containers or wrap individual squares tightly in plastic wrap and place them in a freezer bag. They keep great for up to 3 months, making them ideal for prepping desserts in advance.
Reheating
To enjoy, I thaw individual blondie squares at room temperature or gently warm them in a 300°F oven for 5-7 minutes to revive that fresh-baked softness. A second is to briefly microwave pieces but be careful not to overheat—they can go from melty to tough quickly.
Frequently Asked Questions:
Coconut flour behaves very differently than almond flour due to its high absorbency, so it’s not a direct substitute. Using coconut flour will require adjusting the liquid ingredients and generally reducing the flour amount, which might change the texture of your blondies. For best results, stick with almond flour in this recipe or find a specific coconut flour recipe.
This recipe includes eggs and uses maple syrup as a sweetener, so it’s not vegan as written. You could experiment with egg replacers like flax eggs or commercial vegan egg substitutes, but texture might vary. For a guaranteed vegan blondie, I’d recommend a recipe designed for vegan baking.
Sprinkling some chocolate chips halfway through baking keeps them visible on the surface, creating a beautiful melty chocolate topping. If you mix all the chips into the batter at once, they tend to sink to the bottom, which means you miss out on that gorgeous gooey top layer everyone loves.
Absolutely! Peanut butter, cashew butter, or sunflower seed butter can be great substitutes. Keep in mind that each nut butter brings a slightly different flavor and texture, and some oil separation might occur with certain types, but the recipe is adaptable that way.
Final Thoughts
These Gluten-Free Chocolate Chip Blondies have quickly become one of my favorite go-to treats because they’re easy, dependable, and utterly delicious. They remind me of cozy afternoons spent baking with friends, sharing stories over sweet bites. I’m confident you’ll find them just as satisfying—so grab your ingredients, and let's bake up some happiness!
Print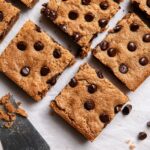
Gluten-Free Chocolate Chip Blondies Recipe
- Prep Time: 10 minutes
- Cook Time: 20 minutes
- Total Time: 30 minutes
- Yield: 24 servings
- Category: Dessert
- Method: Baking
- Cuisine: American
- Diet: Gluten Free
Description
These Easy Gluten-Free Chocolate Chip Blondies are a delicious and simple treat made with almond flour and tapioca starch. Moist and chewy, they feature creamy almond butter and a generous amount of chocolate chips, perfect for a gluten-free dessert that everyone will love.
Ingredients
Dry Ingredients
- 1 cup almond flour
- ¾ cup tapioca starch
- 1 teaspoon baking soda
- ¼ teaspoon sea salt
Wet Ingredients
- 1 cup creamy almond butter
- ½ cup avocado oil
- 1 ¼ cup maple syrup
- 2 large eggs
- 1 teaspoon vanilla extract
Other
- 1 ¼ cup chocolate chips, divided
Instructions
- Preheat Oven and Prepare Pan: Preheat the oven to 350 degrees Fahrenheit. Line an 18"x13" sheet pan with parchment paper to ensure easy removal and even baking.
- Mix Dry Ingredients: In a large mixing bowl, combine the almond flour, tapioca starch, baking soda, and sea salt, stirring well to distribute evenly.
- Mix Wet Ingredients: In a separate bowl, whisk together the creamy almond butter, avocado oil, maple syrup, eggs, and vanilla extract until the mixture is smooth and fully combined.
- Combine Wet and Dry: Pour the dry mixture into the wet ingredients bowl and mix thoroughly until a thick, smooth batter forms.
- Fold in Chocolate Chips: Gently fold in 1 cup of the chocolate chips into the batter to ensure even distribution.
- Pour and Spread Batter: Pour the batter into the prepared sheet pan and spread it out evenly using a spatula, smoothing the top.
- Bake First Stage: Bake the blondies in the preheated oven for 10 minutes to set the batter partially.
- Add Topping Chocolate Chips: Remove the pan from the oven and sprinkle the remaining ¼ cup of chocolate chips evenly over the top of the partially baked blondies.
- Bake Second Stage: Return the pan to the oven and bake for an additional 10 minutes until the blondies are golden and cooked through.
- Cool and Serve: Allow the blondies to cool completely in the pan before cutting them into squares to serve.
Notes
- Use the right pan: An 18"x13" sheet pan ensures even baking. Adjust baking time if using a different size.
- Topping tip: Sprinkle extra chocolate chips halfway through baking for a pretty finish. Otherwise, they’ll sink into the batter.
- Store blondies in an airtight container at room temperature for up to 3-4 days or in the fridge for a week.
- These blondies freeze beautifully! Store in an airtight container for up to 3 months. You can also wrap each blondie in plastic wrap and store them in a freezer bag.
- To enjoy, thaw individual squares and warm them in the oven for a few minutes. For an extra treat, top with chocolate frosting for a dessert that doubles as a sheet pan cake.
Nutrition
- Serving Size: 1 square (about 2x2 inches)
- Calories: 180 kcal
- Sugar: 14 g
- Sodium: 75 mg
- Fat: 12 g
- Saturated Fat: 3 g
- Unsaturated Fat: 8 g
- Trans Fat: 0 g
- Carbohydrates: 18 g
- Fiber: 2 g
- Protein: 4 g
- Cholesterol: 30 mg


Leave a Reply