There's something truly nostalgic and satisfying about this crunchy, sweet treat. The Homemade Hard Tack Candy Recipe takes me back to afternoons spent in my grandma’s kitchen, where the air was filled with sugary warmth and anticipation. It’s worth making because this candy is not only deliciously simple but also a timeless craft you get to enjoy from start to finish.

Jump to:
Why You'll Love This Homemade Hard Tack Candy Recipe
I’ve made hard tack candy more times than I can count, and every batch feels like a small celebration. It’s simple to whip up but feels fancy enough to impress, plus you get to play with flavors and colors, making it totally your own.
- Simple Ingredients: Uses pantry staples that you probably already have, so no need for a special trip to the store.
- Customize Every Batch: Choose your favorite oil flavorings and colors to make unique candies every time.
- Perfect Gift Idea: Homemade hard candy wrapped up is such a sweet and personal treat to give friends and family.
- Fun & Hands-On: From boiling sugar to breaking the cooled candy, it’s a crafty kitchen adventure that’s really rewarding.

Ingredients & Why They Work
Each ingredient in this Homemade Hard Tack Candy Recipe plays a vital role. Combining sugar, corn syrup, and water carefully gets you the perfect brittle texture, while the oil flavorings and food coloring make it festive and flavorful. I always recommend picking quality flavor oils—they really shine in this recipe.

- Sugar: The main structure of your candy, it caramelizes and hardens to give you that crunch.
- Light Corn Syrup: Keeps the sugar from crystallizing, ensuring your candy stays smooth and clear.
- Water: Dissolves the sugar and helps reach the right boiling temperatures.
- Food Coloring: Adds a pop of color to your candy, making it look as festive as it tastes.
- Oil Flavorings: Choose from mint, vanilla, cinnamon, or any fun flavor to really personalize your candy.
- Powdered Sugar: Used to coat the pieces after breaking to prevent them from sticking together.
Make It Your Way
One thing I love about this Homemade Hard Tack Candy Recipe is just how versatile it is. I always mix and match flavors or colors depending on the season or mood, and you should too. This way, it keeps feeling fresh every time you make it.
- Variation: I once made a peppermint batch during the holidays, adding crushed candy canes after pouring the candy on the sheet—it was a hit at our family party!
- Diet-Friendly Option: For gluten-sensitive friends, this candy is naturally free of gluten, so it’s always a safe bet.
- Seasonal Colors: Swap your food coloring for orange and black for Halloween or red and green around Christmas for fun, festive touches.
Step-by-Step: How I Make Homemade Hard Tack Candy Recipe
Step 1: Dissolve and Boil with Care
Start by mixing your sugar, corn syrup, and water in a non-stick pan over medium heat. Stir gently until all the sugar dissolves; this step is crucial because any undissolved sugar can lead to grainy candy. After that, resist the urge to stir further—let the mixture come to a steady rolling boil. A candy thermometer is your best friend here; watch for it to hit 260°F, then add your food coloring. Don’t stir just yet—trust the bubbling to mix things evenly.
Step 2: Finish Boiling and Flavor Up
Keep boiling until the thermometer reads 300°F—the hard crack stage where your candy will reach that perfect snap. Remove the pan from heat and wait a moment until the mixture stops bubbling. Now’s the time to add your chosen flavor oil. Stir carefully with a wooden spoon to evenly distribute the flavors without losing heat.
Step 3: Pour and Let Set
Prepare a large cookie sheet by greasing it lightly or dusting with powdered sugar to help prevent sticking. Pour the hot syrup carefully onto it, spreading if needed. Now, the hardest part—let it cool completely at room temperature. Avoid the fridge because candy cools best slowly, allowing it to set clear and hard without cracking prematurely.
Step 4: Break and Coat
Once your candy is fully set, grab a knife or a heavy utensil and break it into bite-sized chunks. Toss the pieces into a ziplock bag with a tablespoon of powdered sugar, then shake gently to coat. This little step keeps your hard tack candy from sticking together in storage and looks pretty, too.
Top Tip
Through my many attempts, I’ve learned a few tricks that make the Homemade Hard Tack Candy Recipe foolproof and even more enjoyable to make.
- Use a Reliable Candy Thermometer: Temperature is everything here—too low and you’ll get chewy candy, too high and it will burn. A candy thermometer keeps you right on track.
- Don’t Stir After Boiling Starts: I know it feels weird to just watch and wait, but stirring after dissolving encourages sugar crystals and makes your candy grainy.
- Wooden Spoon Over Metal: I prefer a wooden spoon when adding flavorings and mixing at the end—it won’t conduct heat as fast, giving you better control.
- Patience Is Key: Resist the urge to speed up the cooling process; rushing can cause cracks or cloudiness in your candy.
How to Serve Homemade Hard Tack Candy Recipe

Garnishes
I like to sprinkle a little extra powdered sugar on the serving plates for a snowy look. Sometimes, I’ll add edible glitter during the pouring phase for a sparkly effect that kids adore. These simple touches really elevate the experience without much fuss.
Side Dishes
Pair your hard tack candy with warm drinks like tea or coffee—its sweetness balances perfectly with a bitter brew. It’s also great alongside a simple fruit platter to offer a variety of textures and flavors during a get-together.
Creative Ways to Present
I’ve gifted hard tack candy in mason jars decorated with ribbons and hand-written labels—it’s colorful, charming, and feels truly homemade. For parties, I arrange chunks on pretty platters with little scoops, letting guests pick their favorite flavors and colors. It makes the candy table more interactive and fun.
Make Ahead and Storage
Storing Leftovers
I store leftover hard tack candy in an airtight container at room temperature. Keeping it out of heat or humidity prevents it from becoming sticky or melting. Thanks to the powdered sugar coating, the pieces stay nicely separated and ready to enjoy whenever the mood strikes.
Freezing
Freezing isn’t really necessary for this candy, but if you want to keep a large batch, wrap the pieces well and place them in a freezer-safe bag. When I’ve tried freezing, I found it best to let the candy thaw fully at room temperature before opening, as condensation can cause stickiness.
Reheating
If your hard tack candy ends up soft or sticky, a quick reheat in a low oven (around 175°F for a few minutes) helps to dry it out and crisp it back up. Just watch carefully so it doesn’t melt again—I’ve learned that small adjustments can rescue leftovers without starting over.
Frequently Asked Questions:
The key is to dissolve all the sugar completely before boiling and to avoid stirring once the mixture starts boiling. Using a candy thermometer to hit the exact temperature (300°F) ensures the right hard crack consistency. Also, letting it cool slowly at room temperature helps keep clarity.
Yes! You can use any food-grade oil flavorings like peppermint, cinnamon, lemon, or vanilla. Just make sure they're made specifically for candy or baking to ensure they blend well and aren’t overpowering.
Refrigeration causes the candy to cool too quickly, which can lead to cracks, cloudiness, or uneven texture. Room temperature cooling allows the candy to set uniformly and keeps it clear and shiny.
Stored properly in an airtight container at room temperature, hard tack candy can last for several weeks. Be sure to keep it away from humidity and heat to maintain its crunch and appearance.
Final Thoughts
This Homemade Hard Tack Candy Recipe is more than just a sweet treat—it’s a little kitchen adventure that’s both nostalgic and endlessly satisfying. I love making it because every batch reminds me of simple joys and the fun of creating something special with my own hands. I’m excited for you to try it, and I’m confident it’ll become one of your favorite homemade candies to share and enjoy.
Print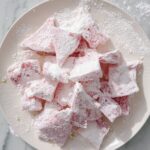
Homemade Hard Tack Candy Recipe
- Prep Time: 5 minutes
- Cook Time: 20 minutes
- Total Time: 1 hour 25 minutes
- Yield: 40 pieces
- Category: Dessert
- Method: Stovetop
- Cuisine: American
Description
This Hard Tack Candy recipe creates classic, crunchy bite-sized candies with customizable flavors and colors. Made by boiling sugar, corn syrup, and water to the hard crack stage, then flavored and cooled before breaking into chunks, this candy is perfect for sweet treats or gifts.
Ingredients
Main Ingredients
- 3¾ cups sugar
- 1½ cups light corn syrup
- 1 cup water
- 1 teaspoon food coloring
- 1 bottle oil flavorings (variety of flavors)
- 1 tablespoon powdered sugar
Instructions
- Combine Ingredients: Mix the corn syrup, sugar, and water in a non-stick pan on the stove.
- Dissolve Sugar: Turn the heat to medium and stir until the sugar is completely dissolved. Do not stir any more after this point to avoid crystallization.
- Boil Mixture: Let the mixture come to a rolling boil. When a candy thermometer reads 260 degrees Fahrenheit, add food coloring without stirring; allow the boiling to mix.
- Reach Hard Crack Stage: When the temperature reaches 300 degrees Fahrenheit, remove from heat and let the boiling stop naturally.
- Add Flavorings: Stir in your chosen oil flavorings with a wooden spoon.
- Pour Candy: Pour the hot candy mixture onto a well-greased or powdered sugar coated large cookie sheet.
- Cool Candy: Allow the candy to cool completely at room temperature. Do not refrigerate.
- Break Into Pieces: Once set, break the candy into chunks using a knife or other object.
- Coat Candy: Place the candy chunks in a Ziploc bag with 1 tablespoon of powdered sugar and shake to coat.
Notes
- Use a candy thermometer for accurate temperature readings to ensure proper hard crack texture.
- Do not stir the syrup once boiling begins to prevent sugar crystallization.
- Greasing the pan or dusting with powdered sugar prevents the candy from sticking.
- Allow candy to cool completely at room temperature for best texture; avoid refrigeration which can cause stickiness.
- Experiment with different oil flavorings to create a variety of candy flavors.
- Store candy in an airtight container to preserve freshness and prevent moisture absorption.
Nutrition
- Serving Size: 1 piece
- Calories: 60 kcal
- Sugar: 15 g
- Sodium: 0 mg
- Fat: 0 g
- Saturated Fat: 0 g
- Unsaturated Fat: 0 g
- Trans Fat: 0 g
- Carbohydrates: 15 g
- Fiber: 0 g
- Protein: 0 g
- Cholesterol: 0 mg


Leave a Reply