There’s something truly magical about that crisp, minty chocolate hit you get from a perfect Thin Mint. That’s exactly why this Homemade Thin Mint Cookies Recipe is a total game changer – it brings those nostalgic flavors straight to your kitchen with fresh, buttery goodness and just the right hint of peppermint, all wrapped in a perfectly thin, melt-in-your-mouth cookie.

Jump to:
Why You'll Love This Recipe
This Homemade Thin Mint Cookies Recipe isn’t just a treat—it’s my tried-and-true way to bring the iconic girl scout cookie experience home, with real ingredients, no preservatives, and easy steps you’ll actually enjoy following. It’s SO worth making, trust me.
- Authentic Flavor: The combination of peppermint extract and rich cocoa powder captures the true essence of classic Thin Mints, but fresher and more vibrant.
- Perfect Crunch & Texture: Thin, tender, yet crisp edges that don’t crumble too easily—just the right bite every time.
- Easy to Customize: You can tweak the peppermint strength or use different chocolates for dipping to match your personal taste.
- Great for Gifting: They look beautiful dipped in glossy chocolate and make lovely gifts that friends actually want to eat!
Ingredients & Why They Work
Every ingredient plays its role perfectly in this Homemade Thin Mint Cookies Recipe. From the cocoa to the peppermint, each adds a piece of the puzzle. Here’s why I choose these specifically and what I recommend when you’re shopping.

- Unsalted Butter: Provides richness and a tender crumb. I always use real butter at room temperature for the creamiest dough.
- Granulated Sugar: To keep the texture crisp and light—brown sugar would make them too soft.
- Egg: Acts as the binder and adds just enough moisture without weighing down the dough.
- Vanilla Extract: Adds warmth that balances the mint and chocolate.
- Peppermint Extract: The star flavor here—avoid mint extract since it can taste artificial or like spearmint toothpaste.
- All-Purpose Flour: The base that holds everything together; spooned and leveled to avoid dry, crumbly dough.
- Unsweetened Cocoa Powder: I prefer natural cocoa for brightness, but Dutch process works if you want a deeper chocolate flavor.
- Baking Powder: Just a touch to give the cookies a slight lift and delicate crumb.
- Salt: To enhance all the sweet and chocolatey flavor notes.
- Semi-Sweet Chocolate: For dipping, choose good quality – it melts smoother and sets up shiny with a hint of oil for shine and snap.
- Canola or Vegetable Oil: Keeps the melted chocolate silky and easier to work with when dipping cookies.
Make It Your Way
I love to tinker with this recipe depending on the mood. Sometimes I’ll boost the peppermint a little for an extra refreshing zing, or swap semi-sweet chocolate for dark chocolate if I want a richer, slightly less sweet finish. You should feel free to experiment too!
- Variation: One year around Christmas, I added a tiny sprinkle of crushed candy canes on top of the dipped cookies before chilling – talk about festive and delicious!
- Slice ‘n’ Bake: If you want to skip rolling, I’ve shaped the dough into logs, chilled, then sliced and baked. The texture is slightly different but still fantastic and easier on the wrist.
- Gluten-free: I’ve had success replacing the flour with a 1:1 gluten-free blend. Just be mindful of chilling the dough well—it’s stickier but workable.
- Vegan: You can try vegan butter and an egg substitute like a flax “egg”—though texture changes slightly, it’s a winning option for dairy-free friends.
Step-by-Step: How I Make Homemade Thin Mint Cookies Recipe
Step 1: Cream the Butter and Sugar until Light & Fluffy
This is where the base of your cookie’s texture gets built. Use a handheld or stand mixer with a paddle attachment, beat the softened butter on medium speed for about a minute until it's smooth. Then add the sugar and crank it up to medium-high until the mixture is visibly lighter and fluffy—a real texture game changer. Don't rush this step or your cookies can end up dense.
Step 2: Add Egg and Extracts - The Minty Goodness Begins
Once your butter and sugar look perfect, add in the egg, vanilla, and peppermint extracts. Beat on high speed to fully incorporate them. Remember to scrape down the bowl sides a couple times here to get every bit mixed evenly especially the peppermint so your flavor is consistent throughout.
Step 3: Combine Dry Ingredients and Slowly Add to Wet Mix
Sift together the flour, cocoa powder, baking powder, and salt in a separate bowl. This ensures there are no lumps and your cocoa blends in smoothly. Then, on low speed, slowly add the dry ingredients to the wet mixture. Stir just until combined—don’t overmix or your cookies will toughen.
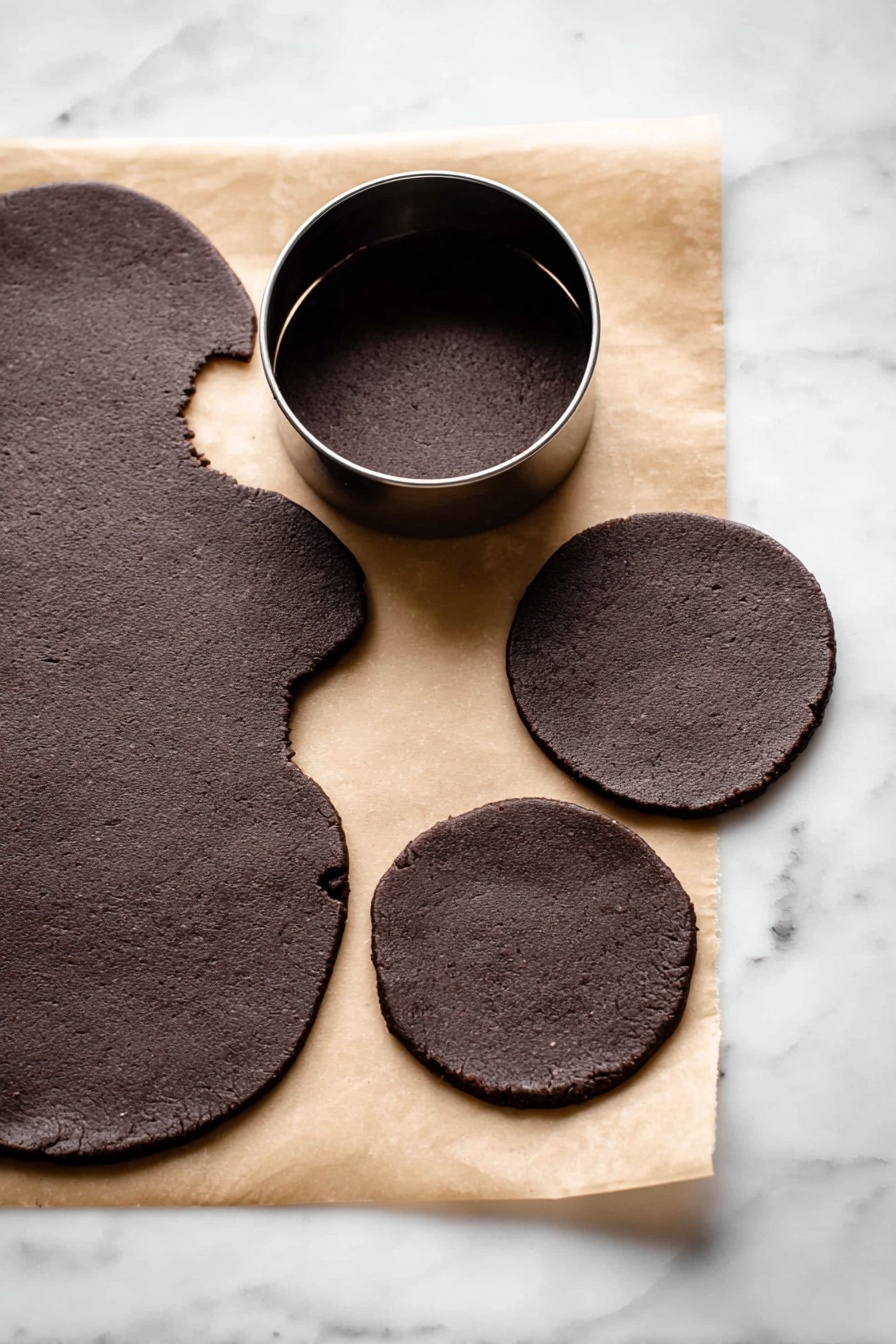
Step 4: Roll, Chill, and Prepare for Cutting
Divide your dough into two equal pieces. Roll each out between parchment sheets to about a quarter-inch thick. I usually stack the rolled dough—parchment between layers—and chill them at least an hour (overnight is even better). This chilling step is key for clean, easy cookie cutting and to avoid spreading during baking.
Step 5: Cut, Bake, and Cool
Preheat your oven to 350°F (177°C). Using a 2-inch round cookie cutter, cut circles from one dough piece at a time. Re-roll scraps to get every last bite. Bake for 8-10 minutes, watching carefully—the edges should look set but centers will still seem soft. Rotate your baking sheets halfway through baking for even cooking. Let cookies cool on the pan for 5 minutes before transferring to racks to cool completely.
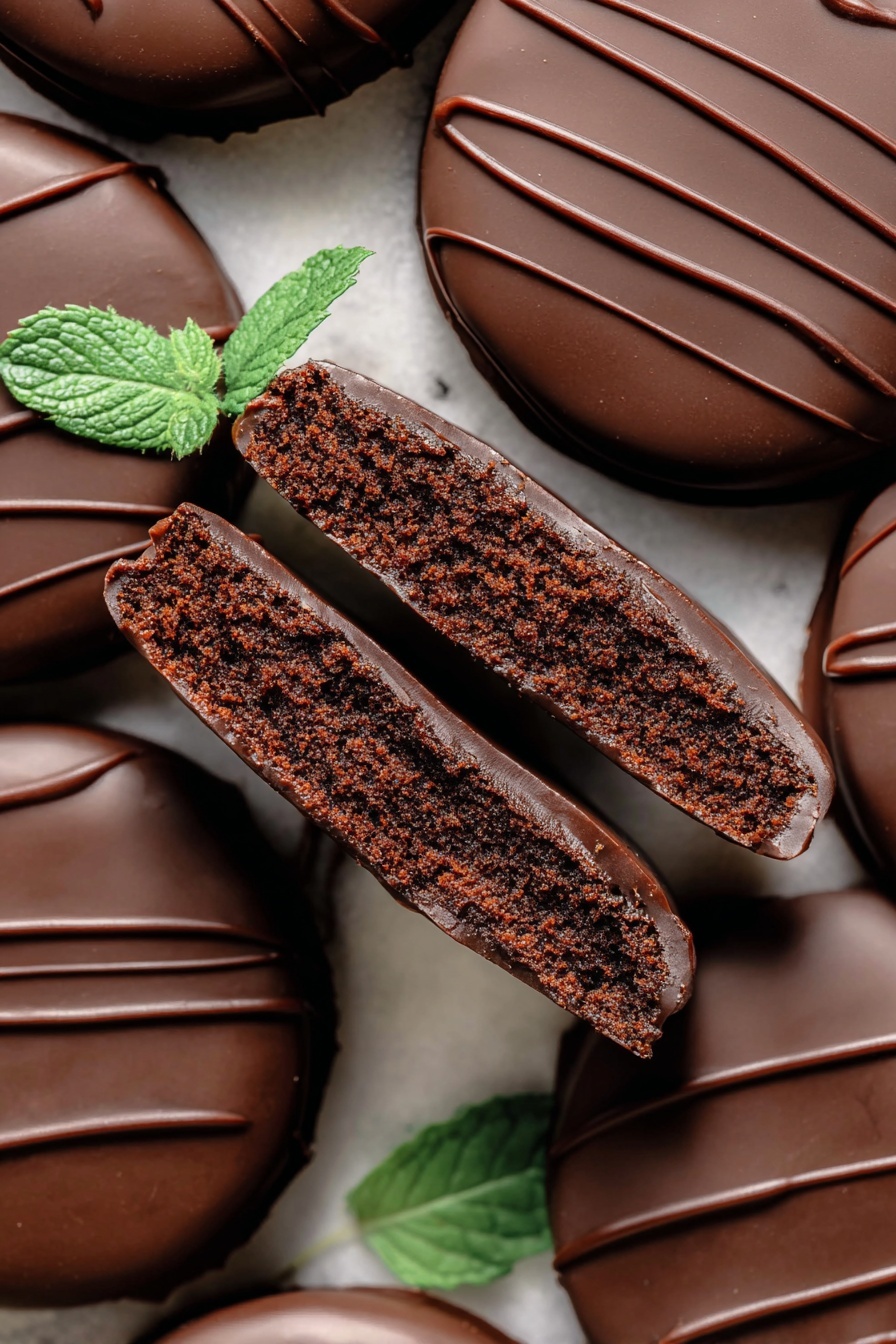
Step 6: Dip in Peppermint Chocolate and Chill
Melt your chopped semi-sweet chocolate with oil gently—either over a double boiler or in the microwave in short bursts. Stir in the peppermint extract while warm. Then dip each cooled cookie fully into the chocolate, using a fork to lift it out and gently tap off the excess. Place the cookies on parchment and refrigerate to instantly set the chocolate. This glossy coating is what makes these cookies so irresistible.
Top Tip
From all the times I’ve baked these, a few tricks truly made a difference. I want to share them so your experience is smoother and results spectacular every time.
- Chilling Is Crucial: Don’t skip or shorten the dough chilling (at least an hour). It’s the secret to getting that clean cut and preventing excess spread in the oven.
- Use Real Peppermint Extract: Mint extract tastes overly medicinal in these—peppermint gives a refreshingly authentic Thin Mint flavor that pairs with chocolate beautifully.
- Rotate Baking Sheets: Halfway through baking, rotate pans front to back and top to bottom for even baking, especially if your oven has hot spots.
- Chocolate Dipping Made Easy: Add a bit of neutral oil for a thinner, shinier chocolate coating that sets up firm and looks professional.
How to Serve Homemade Thin Mint Cookies Recipe
Garnishes
I usually keep it simple with these mint-chocolate beauties—maybe a small sprinkle of crushed peppermint on top before the chocolate sets if I’m feeling fancy. It adds a festive crunch and an extra layer of aroma that really wakes up your senses.
Side Dishes
These cookies are a perfect pairing with a cold glass of milk (always a classic in my house) or a warm mug of peppermint tea for a cozy treat. They also work great as dessert at dinner parties alongside something creamy, like vanilla ice cream or whipped cream.
Creative Ways to Present
For holidays or parties, I like arranging my dipped Thin Mint cookies in a circular pattern on a pretty platter, garnished with fresh mint leaves or tiny edible flowers. Gift-wise, a clear cellophane bag tied with a green ribbon always looks adorable and lets those homemade beauties shine right through.
Make Ahead and Storage
Storing Leftovers
I usually store my leftover cookies in an airtight container at room temperature for a few days, but honestly they rarely last that long! They maintain their crispness and the chocolate stays smooth. If your kitchen is warm, tossing them in the fridge is a good idea to avoid melting.
Freezing
Freezing is a fantastic option for this Homemade Thin Mint Cookies Recipe. I freeze both cookie dough and baked cookies. Dough logs freeze well up to three months and thaw overnight in the fridge before slicing and baking. Baked cookies freeze best after chocolate coating is fully set, then thaw at room temperature—still just as crisp!
Reheating
Since these are thin and crisp, I personally don’t reheat once baked. But if you want a warm cookie, 10–15 seconds in the microwave softens them beautifully, perfect with a scoop of ice cream. Just be careful not to melt the chocolate coating too much!
Frequently Asked Questions:
I definitely recommend using peppermint extract because it has that clean, cool, refreshing flavor that pairs beautifully with chocolate. Mint extract tends to have a more artificial taste and can remind people of spearmint toothpaste, which isn’t quite the vibe we want here.
Rolling to about a ¼-inch thickness is perfect. It’s thin enough to get that crispy texture but thick enough to hold together when dipped in chocolate. Thicker dough results in less delicate cookies, while thinner dough might be too fragile to handle easily.
Chilling is really key for this recipe. It firms up the dough for clean cookie cutter edges and helps prevent spreading during baking. If you’re short on time, a minimum of one hour is necessary. Less than that and you risk flat, greasy cookies that don’t hold shape.
High-quality semi-sweet chocolate works best for a balanced sweetness and smooth melt. Add a little vegetable or canola oil to thin it out and give it a shiny finish. You can experiment with bittersweet or dark chocolate if you prefer a richer coating, but semi-sweet tends to be crowd-pleaser.
Final Thoughts
Honestly, making Homemade Thin Mint Cookies Recipe feels like a little kitchen celebration each time. They bring back fond memories and get everyone smiling with that familiar mint-chocolate combo—only better because you made them yourself. Give this recipe a try and savor every bite; I promise you’ll be hooked, just like I am!
Print
Homemade Thin Mint Cookies Recipe
- Prep Time: 2 hours 15 minutes
- Cook Time: 10 minutes
- Total Time: 3 hours 15 minutes
- Yield: 36 2-inch cookies
- Category: Dessert
- Method: Baking
- Cuisine: American
- Diet: Vegetarian
Description
Delicious homemade Thin Mint Cookies featuring a rich chocolate peppermint dough coated in smooth semi-sweet chocolate, perfect for mint and chocolate lovers.
Ingredients
Cookie Dough
- ¾ cup unsalted butter (12 Tbsp; 170g), softened to room temperature
- 1 cup granulated sugar (200g)
- 1 large egg, at room temperature
- 1 teaspoon pure vanilla extract
- ¼ teaspoon peppermint extract
- 1 ½ cups all-purpose flour (188g), spooned & leveled
- ¾ cup unsweetened natural cocoa powder (62g)
- 1 teaspoon baking powder
- ⅛ teaspoon salt
Topping
- 14 ounces quality semi-sweet chocolate (395g), coarsely chopped
- ½ teaspoon canola or vegetable oil
- ¼ teaspoon peppermint extract
Instructions
- Prepare the cookie dough: In a large bowl, beat the softened butter on medium speed for 1 minute until smooth and creamy. Add sugar and beat on medium-high speed until fluffy and light in color. Add egg, vanilla extract, and peppermint extract and beat on high speed until combined, scraping the bowl as needed.
- Combine dry ingredients: Sift flour and cocoa powder together in a medium bowl. Whisk in baking powder and salt until evenly mixed.
- Mix dry and wet ingredients: Slowly add the dry mixture to the wet mixture on low speed until just combined, avoiding overmixing.
- Chill the dough: Divide dough into two equal portions. Roll each onto parchment paper to about ¼-inch thickness. Stack the dough layers with parchment between and refrigerate for at least 1 hour, up to 2 days. Cover the top with parchment if chilling longer.
- Preheat oven and cut cookies: Preheat oven to 350°F (177°C). Line baking sheets with parchment or silicone mats. Remove one dough piece from fridge, cut 2-inch rounds with cookie cutter, and place on baking sheet. Re-roll scraps and continue cutting until all dough is used.
- Bake the cookies: Bake for 10 minutes until edges are set but centers remain soft. Rotate baking sheet halfway through baking. Let cookies cool 5 minutes on sheet, then transfer to wire rack to cool completely.
- Prepare chocolate coating: Melt chopped chocolate and oil in a double boiler or microwave in 15 second increments, stirring until smooth. Stir in peppermint extract.
- Dip cookies: Dip cooled cookies fully into melted chocolate, lift with fork, tap to remove excess, and place on parchment-lined baking sheet. Refrigerate to set the chocolate coating.
- Store and serve: Store cookies at room temperature for 2-3 days or refrigerated up to 1 week. Cookies are also delicious cold or directly from the freezer.
Notes
- Cookies freeze well for up to 3 months; thaw overnight in refrigerator before serving.
- Dough can be chilled for up to 2 days before baking or frozen for 3 months; thaw and bring to room temperature before rolling.
- Use peppermint extract, not mint extract, for best authentic Thin Mint flavor.
- You can slice the dough into logs and chill, then slice and bake as an alternative to rolling and cutting.
- Recommended tools include a mixer, rolling pin, cookie cutters, baking sheets, silicone mats or parchment paper, cooling rack, and double boiler or microwave-safe bowl.
Nutrition
- Serving Size: 1 cookie
- Calories: 130 kcal
- Sugar: 10 g
- Sodium: 40 mg
- Fat: 8 g
- Saturated Fat: 5 g
- Unsaturated Fat: 2 g
- Trans Fat: 0 g
- Carbohydrates: 14 g
- Fiber: 2 g
- Protein: 1 g
- Cholesterol: 15 mg


Leave a Reply