There’s something utterly delightful about the creamy sweetness paired with crunchy Oreos that makes this Oreo Polar Bear Paws Recipe stand out. These little treats are fun to make, look adorable, and bring a snowy winter vibe to any dessert table—perfect for cozy afternoons or festive celebrations.

Jump to:
Why You'll Love This Recipe
I love this recipe because it’s a perfect blend of simplicity and charm. You don’t need to be a pro baker to get dazzling results that are as tasty as they are cute—plus, it’s a big hit with both kids and adults.
- Super Easy to Make: Just a few ingredients and quick steps make it entirely doable after a busy day.
- Fun and Festive: The polar bear paws design adds a playful, wintry touch that never fails to spark smiles.
- Customizable: You can switch up candies or decorations to suit your taste or occasion.
- Great for Gifting: Packaged nicely, these treats become delightful homemade gifts that everyone appreciates.
Ingredients & Why They Work
The magic of the Oreo Polar Bear Paws Recipe lies in mixing creamy white chocolate with the crunchy Oreo cookies and little candy details that bring the paws to life. Each ingredient brings texture, flavor, and charm.

- White Chocolate: I like using melting wafers for their smooth melting properties and glossy finish, making each paw look picture-perfect.
- Oreos: Classic Oreos form the sturdy base and give that rich chocolate crunch we all love.
- Junior Mints: These add a cool, refreshing touch and serve as the "pad" of the bear paw—you can find them tucked right in the center.
- Mini Brown M&Ms: Perfect for the tiny "toes," their size and color mimic bear paw pads beautifully.
- Sanding Sugar: Sprinkled on top, this adds a sparkling frosty look that’s just so festive and fun.
Make It Your Way
I like to mix things up sometimes depending on the occasion or who’s coming over. You can easily swap out the candies or even drizzle a bit of dark chocolate over the paws for extra flair.
- Variation: Once, I tried using crushed peppermint candies instead of sanding sugar for a festive peppermint crunch—everyone loved that little twist!
- Dietary Mod: For a gluten-free version, gluten-free chocolate sandwich cookies work just as nicely.
- Seasonal Change: Switching out the brown M&Ms for red and green ones instantly makes these paws holiday-themed.
Step-by-Step: How I Make Oreo Polar Bear Paws Recipe

Step 1: Melt the White Chocolate Gently
I usually start by lining a large sheet pan with parchment paper—it keeps everything neat and makes cleanup a breeze. Then, I place my white chocolate melting wafers in a microwave-safe bowl and heat them in 30-second increments, stirring after each time. This slow melting prevents overheating and helps me get that perfectly smooth finish.
Step 2: Coat the Oreos
Next, I drop one Oreo into the melted chocolate and use a fork to carefully flip it over, making sure it's fully coated. I lift it out, shake off extra chocolate, and scrape the bottom against the bowl’s edge to avoid pools that can harden unevenly.
Step 3: Decorate with Junior Mints and M&Ms
While the chocolate is still wet, I place one Junior Mint in the lower center as the foot pad. Then I arrange four mini brown M&Ms above it to form the toes, sprinkling generous sanding sugar over the whole paw to add sparkle and extra texture. I find doing five Oreos at a time helps me work quickly before the chocolate sets.
Step 4: Chill to Set Quickly
Finally, I pop the decorated Oreos into the freezer for about 5 to 10 minutes so the chocolate hardens completely. Once set, they're ready to enjoy or store.
Top Tip
Over the years, I’ve learned a few tricks that really make this Oreo Polar Bear Paws Recipe shine—and I want to pass those on so your baking goes smooth and looks fantastic!
- Gentle Melting: Be patient melting your white chocolate in short bursts and stir well—this prevents clumps or burnt chocolate in your coating.
- Quick Decorating: Have your candies ready and work in small batches because the chocolate hardens fast!
- Removing Excess Chocolate: Scraping excess off the bottom of the Oreos prevents messy pools that can cause uneven paws or sticky bottoms.
- Chilling Time: Don’t skip the freezer step. It helps the paws firm up perfectly without waiting too long at room temperature.
How to Serve Oreo Polar Bear Paws Recipe

Garnishes
I usually add an extra sprinkling of sanding sugar around the display platter to evoke a snowy feel—makes these paws look like they just walked out of a winter wonderland! Sometimes, I toss in a few extra Junior Mints to keep the theme going.
Side Dishes
To complement these sweet paws, I like serving them alongside hot cocoa or a simple vanilla frosting dip. They also pair beautifully with light fruit salad to balance the richness.
Creative Ways to Present
For holiday parties, I’ve arranged the paws in circular “bear tracks” leading across the dessert table or nestled them among pine branches and fairy lights for an enchanting display. Kids especially love when you add tiny edible snowflakes or glitter dust.
Make Ahead and Storage
Storing Leftovers
I keep leftover Oreo Polar Bear Paws in an airtight container at room temperature for up to a week. This keeps the white chocolate smooth and the Oreos crunchy without condensation or stickiness.
Freezing
I've tried freezing these, but the M&Ms tend to lose their vibrant color as they thaw, which dulls the look. If you want to freeze them, consider leaving the M&Ms off until after thawing for the best presentation.
Reheating
Since these are more of a no-bake treat, reheating isn’t necessary. If they get a little soft, just leave them out at room temperature for a few minutes, and they’ll be perfect to enjoy again.
Frequently Asked Questions:
Yes, you can use milk or dark chocolate as an alternative to white chocolate in this Oreo Polar Bear Paws Recipe, but the look will change since white chocolate gives that classic snowy paw appearance. Melt carefully to avoid burning.
The key is to shake off excess chocolate and scrape the bottom of the Oreo gently against the bowl’s edge before setting it on parchment paper. This prevents uneven puddles and keeps the paw shapes neat.
Absolutely! Made a day ahead, these Oreo Polar Bear Paws will be even easier to serve at parties or gatherings. Just keep them stored in an airtight container at room temperature to maintain freshness.
Since this recipe uses Oreos, white chocolate, and candies, be mindful of common allergens like dairy, gluten, and soy. For allergies, select alternative cookies and chocolate products that fit your needs.
Final Thoughts
This Oreo Polar Bear Paws Recipe has such a special place in my holiday and winter repertoire. It’s one of those recipes I turn to when I want a no-fuss dessert that still wows and brings joy. I hope you’ll enjoy making (and munching!) on these charming treats just as much as I do—give them a try and watch your loved ones’ faces light up!
Print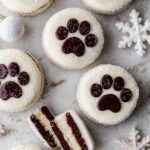
Oreo Polar Bear Paws Recipe
- Prep Time: 20 minutes
- Cook Time: 0 minutes
- Total Time: 20 minutes
- Yield: 35 pieces
- Category: Dessert
- Method: No-Cook
- Cuisine: American
Description
Oreo Polar Bear Paws are a fun and festive treat featuring Oreo cookies coated in smooth white chocolate and decorated with Junior Mints and mini brown M&Ms to resemble adorable polar bear paw prints. Perfect for parties or a winter-themed snack, these no-bake delights are easy to make and sure to impress with their cute presentation and sweet flavors.
Ingredients
Chocolate Coating
- 20 ounces white chocolate melting wafers
Decorations
- 1 13.9-ounce package Oreos
- 1 box Junior Mints
- 100 mini brown M&Ms from 1 family size package
- Sanding sugar, for sprinkling
Instructions
- Prepare the workspace. Line a large sheet pan with parchment paper to place the coated Oreos for setting.
- Melt the white chocolate. Add the white chocolate wafers to a microwave-safe bowl and microwave in 30-second increments, stirring well between each increment until the chocolate is melted completely and smooth.
- Coat the Oreos. Using a fork, dip one Oreo into the melted white chocolate, flipping it over to coat all sides thoroughly. Lift the Oreo, shaking off excess chocolate and scraping the bottom against the edge of the bowl to prevent pooling.
- Decorate the Oreos. Place the coated Oreo on the parchment paper. Attach one Junior Mint to the bottom center as the paw pad, then surround the top with 4 mini brown M&Ms arranged as toes. Sprinkle generously with sanding sugar to add sparkle and texture.
- Repeat the process. Continue dipping and decorating Oreos in batches of about 5 at a time until all Oreos are coated and decorated.
- Set the treats. Transfer the decorated Oreos to the freezer for 5 to 10 minutes to allow the chocolate to set completely and harden.
- Store properly. Once set, store the Oreo Polar Bear Paws in an airtight container at room temperature for up to one week. Avoid freezing if possible, as M&Ms may lose color when thawed.
Notes
- Storage: Keep cookies in an airtight container at room temperature for up to 1 week or refrigerate for up to 2 weeks for extended freshness.
- Freezing: Freezing is not recommended because the M&Ms can lose their vibrant color after thawing.
- Chocolate melting: Stir the white chocolate thoroughly after each microwave interval to prevent burning and ensure a smooth consistency.
- Decoration tip: Work in small batches to prevent the chocolate from setting before decorating the Oreos.
- Alternative decorations: You can substitute the Junior Mints and brown M&Ms with other small candies that fit the paw print design as desired.
Nutrition
- Serving Size: 1 piece
- Calories: 150 kcal
- Sugar: 20 g
- Sodium: 90 mg
- Fat: 8 g
- Saturated Fat: 5 g
- Unsaturated Fat: 2 g
- Trans Fat: 0 g
- Carbohydrates: 19 g
- Fiber: 1 g
- Protein: 1 g
- Cholesterol: 0 mg


Leave a Reply