There’s something irresistibly festive about a perfectly chewy yet crisp macaron with a cool peppermint twist and rich chocolate center. This Peppermint Chocolate Macarons Recipe strikes that magical balance, making it a standout treat worth your time in the kitchen.

Jump to:
Why You'll Love This Recipe
I've made a ton of macarons over the years, but combining peppermint and chocolate in this way takes it to a whole new level. It’s not just about taste; it’s about the texture interplay and the joy of that little candy cane crunch on the edge.
- Perfect Texture: Chewy inside with that iconic macaron "foot" and smooth crisp exterior every time.
- Festive Flavor Combo: Peppermint meets rich chocolate in a buttery filling that feels indulgent but balanced.
- Visual Appeal: Those delicate red-tinted shells with white chocolate accents make for a gorgeous holiday display.
- Room for Creativity: You can easily adjust the peppermint intensity or chocolate richness to suit your preferences.
Ingredients & Why They Work
Each ingredient plays a crucial role to create those delicate shells and luscious filling. Paying attention to quality and technique here will set you up for success. Here are a few things I’ve learned about each main component.

- Almond flour: Opt for superfine almond flour or almond meal; it ensures your shells are smooth and tender without a gritty texture.
- Powdered sugar: Sift it well with almond flour to keep the batter free of lumps, which helps the shells rise evenly.
- Egg whites: Room temperature and properly beaten are essential for those light yet sturdy meringue shells.
- Cream of tartar: Stabilizes the egg whites so your macarons hold their shape during baking.
- Granulated sugar: Sweetens and provides structure in the meringue; add gradually to get to stiff peaks.
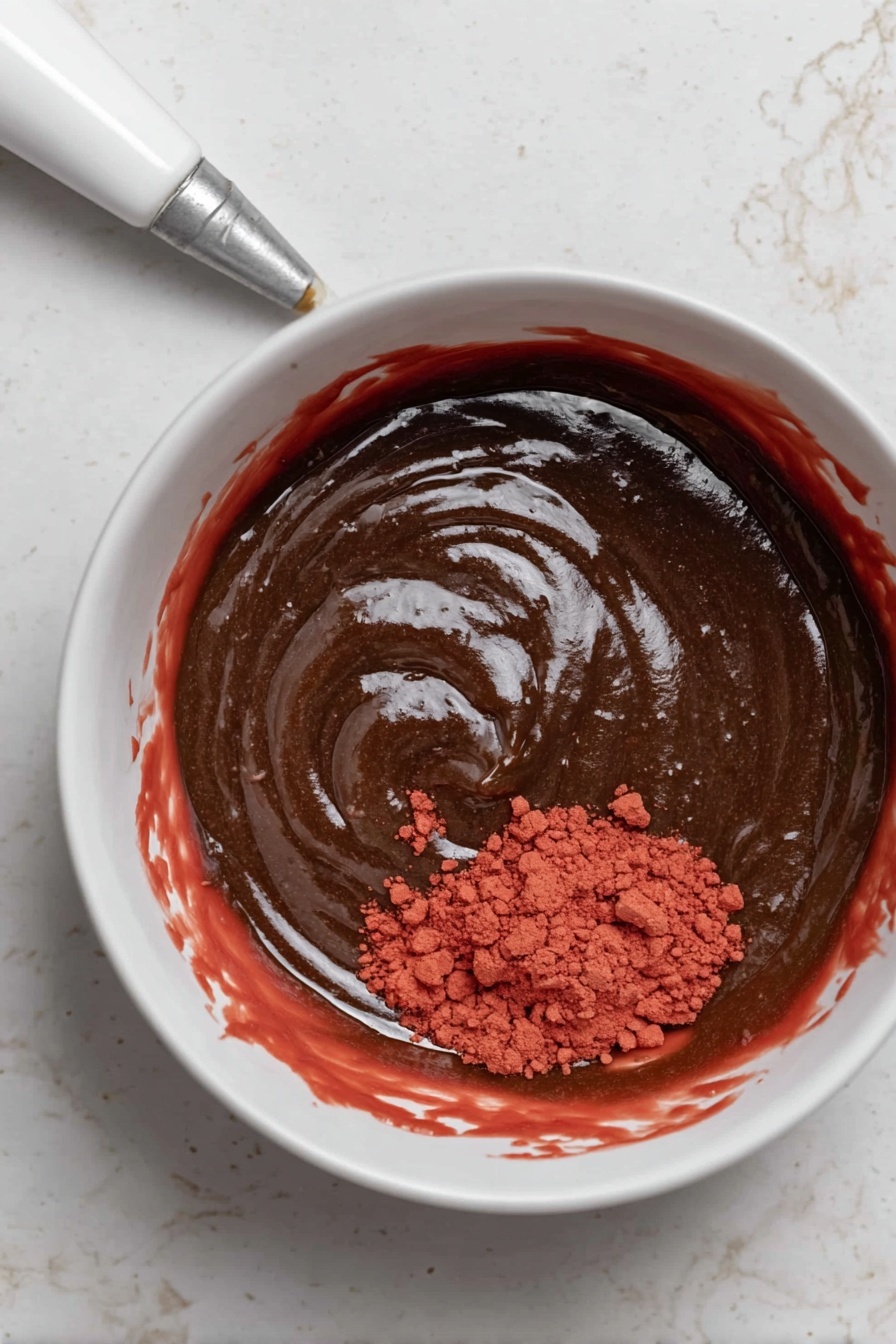
- Red gel food coloring: Gel color is your best bet because it won’t water down the egg whites like liquid colorings do.
- Peppermint extract: Adds that minty zing; a little goes a long way to brighten the flavor without overpowering.
- Butter (unsalted): Softened for creamy smooth buttercream, which balances the strong peppermint and cocoa taste.
- Unsweetened cocoa powder: Intensifies the chocolate notes in the buttercream making it rich but not cloying.
- Heavy whipping cream: Thins the buttercream just enough for easy piping and silky texture.
- Crushed candy canes: Adds delightful crunch and festive flair around the edges of your finished macarons.
Make It Your Way
I love tweaking this Peppermint Chocolate Macarons Recipe depending on the occasion — sometimes dialing down the peppermint for a mellow hint, other times going full-on minty for a vibrant holiday treat. You should definitely feel free to play with the filling ratios and decorative touches to match your vibe!
- Variation: One year, I swapped peppermint extract for orange zest and a splash of vanilla for a refreshing twist. It was a hit, showing how flexible these shells really are.
- Dietary tweak: Use aquafaba (chickpea water) if you want an egg-free version, but be prepared for a slightly different texture.
- Difficulty level: If you’re new to macarons, try piping smaller circles to make uniform bites that bake more evenly.
Step-by-Step: How I Make Peppermint Chocolate Macarons Recipe
Step 1: Sifting & Mixing the Dry Ingredients
Sift your almond flour and powdered sugar together—not once, but twice. I can’t stress enough how this step makes the batter smoother and helps the macarons come out flawless. It removes any clumps that could mess with the texture or appearance, so go slow and be thorough for the best results.
Step 2: Whip Up Perfect Meringue
Beat your room-temp egg whites and cream of tartar on medium-low speed until soft peaks form. Slowly add the granulated sugar and crank up the speed. The goal is stiff peaks that hold shape and don’t slip when you tip the bowl. Add in the food coloring and peppermint extract toward the end and give it a final whip. This step makes or breaks your macaron’s rise — so patience here is key.
Step 3: Folding the Batter - The Magic Motion
Gently fold a third of your dry mixture into the meringue with a spatula — slow and steady wins here to keep those lovely air bubbles. Fold until the batter flows off the spatula in a smooth figure-8 without breaking. It took me a few tries to find the right balance — overmix and you lose volume, undermix and your shells crack or won’t form feet.
Step 4: Piping & Resting
Scoop that batter into a piping bag with a large round tip and pipe neat little circles onto parchment paper or a silicone mat. Tap the baking sheet on your counter like you’re shaking out the air bubbles. Use a toothpick to pop any stubborn bubbles on the surface. Here’s the golden rule: let them rest for 30 to 60 minutes in a dry spot so the surfaces dry out and become slightly tacky — this creates that shiny smooth shell after baking.
Step 5: Baking to Perfection
Preheat your oven to a steady 315°F (157°C). I always use an oven thermometer to be sure because temperature fluctuations can ruin macarons. Bake each tray for about 17 minutes until they puff up and develop the classic "feet." Resist the urge to open the oven too soon — it can cause cracking or deflation!
Step 6: Cooling & Making the Filling
Once baked, cool the sheets on a rack for around 10 minutes before peeling your macarons off the parchment. The shells should come away cleanly—no sticking or crumbling. While they cool fully, whip up your peppermint chocolate buttercream: beat softened butter, powdered sugar, cocoa powder, peppermint extract, and heavy cream until luscious and pipeable.
Step 7: Assembling and Decorating
Pipe a generous dollop of buttercream on the flat side of half the macarons, then sandwich with the others. Roll the edges in crushed candy canes for that crunch and festive flair. It’s a showstopper, trust me.
Top Tip
Getting macarons right takes a little love and finesse, but I promise the payoff is worth it! After several batches, I’ve discovered these tips that make a huge difference.
- Resting Time Is Crucial: Don’t rush the drying stage before baking; your shells won’t be smooth or glossy without it.
- Use Gel Food Coloring: It won’t add unwanted moisture that could compromise the meringue’s stability.
- Tap and Pop: Tapping the tray and popping bubbles ensures your shells won’t crack or have large holes.
- Oven Accuracy Matters: Test your oven temperature with a thermometer — it’s the secret to consistent feet and texture.
How to Serve Peppermint Chocolate Macarons Recipe

Garnishes
I adore rolling the finished macarons in crushed candy canes — it adds a beautiful crunch and that signature holiday pop of color. Sometimes, I lightly dust with edible silver glitter for a sparkly finish when serving at parties.
Side Dishes
Pair these peppermint chocolate macarons with a steamy cup of hot cocoa or a peppermint mocha to really elevate the festive experience. They also complement fresh fruit platters or a mild cheese board for a balanced party spread.
Creative Ways to Present
For holiday gatherings, I like arranging them in a pretty tiered stand or nestled in clear glass jars tied with ribbon. Individually wrapped in cellophane bags with a sprig of mint or candy cane is a charming gift idea too!
Make Ahead and Storage
Storing Leftovers
Store your macarons in an airtight container at room temperature for up to 3 days for optimal texture. I usually refrigerate mine for up to a week if keeping longer, but bring them to room temp before serving to revive that perfect softness.
Freezing
Freezing is a lifesaver here! I let the assembled macarons rest at room temperature for 8–12 hours before freezing in airtight containers. When you want to enjoy them, thaw in the fridge a few hours ahead — they maintain flavor and texture beautifully.
Reheating
Since macarons are best enjoyed at room temp, I avoid reheating. Just let frozen or refrigerated macarons sit out for about 30 minutes to an hour before serving to bring back their ideal chew and flavor.
Frequently Asked Questions:
Liquid food coloring isn’t recommended because it adds moisture, which can prevent the egg whites from whipping properly and affect the macaron’s texture. Gel food coloring is the best choice as it doesn’t interfere with the batter’s consistency.
Resting allows the piped shells to dry and form a tacky skin. This step is crucial for avoiding cracked shells and helps develop that smooth, shiny surface once baked. Skipping this can result in uneven texture and appearance.
The batter should flow slowly off the spatula and form a thick ribbon in the shape of a figure 8 without breaking. It’s a balance between deflating enough to remove some air but still keeping enough volume for rise. Overmixing leads to flat, dense macarons.
At room temperature, they stay fresh about 3 days. In the refrigerator, they last up to a week stored airtight. For longer storage, freeze for up to two months. Proper storage preserves both texture and flavor.
Final Thoughts
This Peppermint Chocolate Macarons Recipe holds a special place in my kitchen — it’s a blend of challenge and joy, a way to bring smiles and warm memories around holiday tables. I encourage you to try it, because once you master these macarons, you’ll have a festive classic that impresses every time, and trust me, your friends will be asking for more.
Print
Peppermint Chocolate Macarons Recipe
- Prep Time: 1 hour 30 minutes
- Cook Time: 34 minutes
- Total Time: 2 hours 4 minutes
- Yield: 24 servings
- Category: Dessert
- Method: Baking
- Cuisine: French
- Diet: Vegetarian
Description
Delight in these festive Peppermint Chocolate Macarons featuring delicate almond meringue shells infused with peppermint and vibrantly colored, sandwiched with a rich peppermint chocolate buttercream, and finished with crushed candy cane edges. Perfect for holiday gatherings or as a special treat.
Ingredients
Macarons:
- 100 grams almond flour (≈ 1 cup)
- 180 grams powdered sugar (≈ 1½ cups)
- 3 large egg whites (around 90 grams, room temperature)
- ¼ teaspoon cream of tartar
- ¼ cup granulated sugar
- ½ teaspoon red gel food coloring
- ½ teaspoon peppermint extract
Peppermint Chocolate Buttercream Filling:
- ½ cup unsalted butter (room temperature)
- 2 cups powdered sugar
- 2 tablespoons unsweetened cocoa powder
- 1 to 2 tablespoons heavy whipping cream
- 1 teaspoon peppermint extract
- 12 crushed candy canes (for decoration)
Instructions
- Sift Dry Ingredients: Using a large sieve, sift the almond flour and powdered sugar together into a large bowl. Then sift the mixture a second time into another large bowl. Set aside to ensure a smooth batter.
- Beat Egg Whites: In a large bowl, combine the egg whites and cream of tartar. Beat on medium-low speed until soft peaks form.
- Add Granulated Sugar: Gradually add granulated sugar to the egg whites. Continue beating until the mixture reaches almost stiff peaks.
- Incorporate Color and Flavor: Add the red gel food coloring and peppermint extract, then beat until stiff peaks form such that the meringue holds its shape even if the bowl is tilted upside down.
- Fold Dry Ingredients: Fold one-third of the dry ingredient mixture into the egg whites using a spatula until fully incorporated. Repeat folding with the remaining dry ingredients until the batter flows off the spatula in a figure-8 shape without breaking, being careful not to overmix.
- Pipe Macarons: Transfer the batter into a large piping bag fitted with a large round tip. Pipe 1 to 1½ inch circles onto parchment-lined baking sheets, spacing them 1 to 2 inches apart. Tap the baking sheet on the counter at least five times to release air bubbles and use a toothpick to pop any surface bubbles.
- Rest Macarons: Allow the piped macarons to rest in a dry area for 30 to 60 minutes until their tops are no longer tacky to the touch, which helps achieve smooth tops after baking.
- Preheat Oven: Preheat the oven to 315°F (157°C).
- Bake Macarons: Bake one sheet at a time for 17 minutes. The macarons should rise and develop feet as they bake.
- Cool Macarons: Let the baked macarons cool on the pan placed over a cooling rack for 10 minutes. Then carefully transfer the parchment paper with macarons to the cooling rack and cool completely for at least another 10 minutes before removing from the parchment.
- Prepare Buttercream Filling: In a large bowl, cream the softened butter on medium speed with a handheld mixer. Gradually add powdered sugar, beating until smooth with no lumps.
- Add Cocoa and Peppermint: Mix in the unsweetened cocoa powder completely, then add peppermint extract and 1 tablespoon heavy cream. Beat until smooth and creamy. If too thick, add a second tablespoon of cream and mix again.
- Assemble Macarons: Fill a piping bag with the buttercream and pipe onto the flat side of half the macaron shells. Top each with the remaining shells to form sandwiches.
- Decorate Edges: Roll the assembled macarons gently in crushed candy canes to coat the edges.
Notes
- Use Gel Food Coloring: Liquid food coloring adds moisture which can affect egg whites. Gel colors maintain batter integrity.
- Let Macarons Rest: Resting dries the surface and helps create smooth tops during baking.
- Check Oven Temperature: Use an oven thermometer to ensure accurate temperature for optimal results.
- Don’t Open Oven Early: Avoid opening the oven during baking to prevent temperature fluctuations that can cause cracking.
- Storing: Store in an airtight container. Macarons remain fresh at room temperature for 3 days, refrigerated for 7 days, and frozen for up to 2 months.
- Freezing: Both shells and assembled macarons freeze well. Thaw in the refrigerator for a few hours before serving.
Nutrition
- Serving Size: 1 macaron sandwich
- Calories: 120 kcal
- Sugar: 14 g
- Sodium: 15 mg
- Fat: 6 g
- Saturated Fat: 3.5 g
- Unsaturated Fat: 2.5 g
- Trans Fat: 0 g
- Carbohydrates: 15 g
- Fiber: 1 g
- Protein: 3 g
- Cholesterol: 20 mg


Leave a Reply