There’s just something magical about the cool, minty crunch combined with buttery softness in a snowball cookie. This Peppermint Snowball Cookies Recipe is my go-to when I want a festive treat that’s both refreshing and incredibly comforting. Trust me, these cookies will fill your kitchen with the kind of cozy aromas that instantly lift the spirit.

Jump to:
Why You'll Love This Recipe
Honestly, every time I make these peppermint snowball cookies, I’m reminded why they’ve been holiday classics for ages. The blend of peppermint candy, rich butter, and that powdery sugar coating is just unbeatable. Plus, you really don’t need to be a pro baker to get perfect results — that’s the best part!
- Perfect Peppermint Flavor: Using real peppermint extract and crushed candy canes gives these cookies a bright, fresh minty kick without tasting artificial.
- Buttery Soft Texture: The dough melts in your mouth, creating that classic snowball’s buttery tenderness combined with a satisfying chew.
- Easy to Make: The recipe uses simple methods and ingredients you probably already have — no fancy equipment necessary.
- Perfectly Party-Ready: These cookies hold their shape well and look stunning coated in confectioners’ sugar, making them ideal for gift-giving or holiday gatherings.

Ingredients & Why They Work
This Peppermint Snowball Cookies Recipe balances simple ingredients for a festive cookie that’s crunchy on the outside with a melt-in-your-mouth center. Pay attention to quality butter and fresh peppermint extract — they make all the difference here!

- Unsalted Butter: Start with softened, room-temperature butter for easy mixing and that rich, tender crumb.
- Confectioners’ Sugar: Used both in the dough and to coat the cookies, it gives that signature snowball look and a lovely melt-away sweetness.
- Pure Vanilla Extract: Adds warmth and depth to balance the peppermint.
- Peppermint Extract: This is your star flavor — choose a good-quality peppermint extract for the freshest taste.
- All-Purpose Flour: The base of the cookies that holds everything together perfectly.
- Salt: Just a pinch to enhance all the flavors.
- Crushed Candy Canes: Adds texture and bursts of peppermint crunch — don’t skip this festive touch!
Make It Your Way
One of the things I adore about this Peppermint Snowball Cookies Recipe is its versatility. I often add a splash of cocoa powder for a chocolatey twist or experiment with different types of crushed candies beyond candy canes. Don’t hesitate to tweak the mint level to your liking!
- Chocolate Peppermint: Adding ¼ cup cocoa powder into the dry ingredients turns these into peppermint chocolate snowballs — my family calls it ‘the perfect holiday hybrid’!
- Nutty Variation: Chop up some toasted pecans or walnuts for added crunch that pairs amazingly with peppermint.
- Gluten-Free Swap: I’ve tried replacing the flour with a gluten-free blend, and as long as you stick to blends made for baking, they turn out just as delicious.
Step-by-Step: How I Make Peppermint Snowball Cookies Recipe
Step 1: Cream the Butter and Sugar to Perfection
Start by beating the softened butter with your mixer on medium speed until it’s velvety smooth — about 1 minute. Then mix in ¾ cup of confectioners’ sugar on low until it’s just combined before raising the speed again to cream it thoroughly. This step is key because a well-creamed base gives the cookies that tender, melt-in-your-mouth texture.
Step 2: Add the Flavors and Flour
Beat in the vanilla and peppermint extracts next. I like to smell the dough here — the mint instantly perks up the whole kitchen! Now, sprinkle in the flour and salt slowly on low speed. It’ll seem dry at first, but don’t fret. Once all the flour is in, crank up the mixer to high to bring the dough together. The magic lies in this transformation from crumbly to cohesive.
Step 3: Fold in the Crushed Candy Canes
Lastly, gently beat in the crushed candy canes. This is when the dough starts looking festive with pretty specs of red and white. The candy cane impart little bursts of crunch and that unmistakable peppermint zing throughout every bite.
Step 4: Chill Out (Seriously, Don’t Skip!)
Tightly cover the dough and pop it in the fridge. You want at least 30 minutes, but I often chill it up to 3 days if I’m prepping ahead. If chilling longer than a few hours, be sure to let the dough come to room temp for about 30 minutes before rolling — otherwise, it’s too hard to handle. This rest makes rolling out perfectly round snowballs way easier.
Step 5: Shape and Bake
Preheat your oven to 350°F (177°C). Line baking sheets with parchment or silicone mats for easy cleanup. Scoop or roll heaping tablespoons of dough into balls and space them two inches apart on the trays. Pop them in the oven for about 15 minutes — look for golden bottoms and lightly toasted tops. The smell alone will make you want to dive straight into the kitchen!
Step 6: Sugar Coat Like a Pro
Once out of the oven, let the cookies cool on the sheet for 5 minutes. Then gently roll each one in confectioners’ sugar — don’t push too hard or the cookies might break. Place them on a wire rack to cool fully, then do a second sugar roll. This double coating seals in that classic snowball look and adds to the delicate sweetness you’ll love.
Top Tip
I’ve learned over the years that chilling the dough isn’t just a suggestion — it’s essential for the right texture and for handling the dough easily. When you skip this step, the cookies tend to spread too much during baking and lose that adorable snowball shape we’re after.
- Chill the Dough Well: At least 30 minutes or overnight for the best texture and manageable dough.
- Double Sugar Coating: Roll the cookies in confectioners’ sugar twice for that perfect snowy finish and signature taste.
- Use Fresh Candy Canes: Crush them just before adding to keep that vibrant color and crunch intact.
- Gentle Handling: When rolling the dough and coating cookies, be gentle to keep the right shape and prevent crumbling.
How to Serve Peppermint Snowball Cookies Recipe

Garnishes
I love dusting these cookies with a little extra crushed candy cane on top right after the second sugar coating — it adds a playful pop of red and extra peppermint flair. Sometimes, I serve them with a sprig of fresh mint or a peppermint stick for a festive touch.
Side Dishes
These cookies pair perfectly with hot chocolate or a peppermint mocha for a dessert spread. I also enjoy serving them alongside a simple cheese platter during holiday parties; the sweetness balances out creamy cheeses beautifully.
Creative Ways to Present
I once arranged a batch in a circle on a serving platter and placed a small glass of milk in the center — it was such a cute presentation for Christmas morning! You can also gift-pack them in decorative tins lined with wax paper for a thoughtful homemade holiday gift.
Make Ahead and Storage
Storing Leftovers
I keep these cookies fresh by storing them in an airtight container at room temperature. They stay tender and delicious for up to a week. Just make sure not to overcrowd the container to preserve that coating.
Freezing
One of my favorite hacks is freezing both the baked cookies and the cookie dough balls. Wrapped well, they freeze beautifully for up to 3 months. When you’re ready, thaw the baked cookies in the fridge or at room temp, and bake frozen dough balls for about a minute longer without thawing.
Reheating
If you want that fresh-baked warmth, pop a couple on a baking sheet and heat in a 300°F oven for about 5 minutes. This revives the soft texture without melting the sugar coating too much.
Frequently Asked Questions:
Peppermint extract really gives these cookies their signature flavor. If you don’t have it, you can try using a drop or two of spearmint extract, though the flavor will be milder and less crisp. Vanilla alone isn’t quite the same, so I recommend hunting down peppermint extract for an authentic taste.
Chilling the dough helps solidify the butter, which means the cookies hold their shape better when baking instead of spreading too thin. It also allows the flavors to meld together and keeps the dough easier to handle when rolling into balls.
Yes! Crushed peppermint candies or starlight mints work perfectly in this recipe. Just make sure they are finely crushed to ensure they mix well in the dough and don’t create rough spots.
When stored in an airtight container at room temperature, these cookies stay fresh and soft for up to a week. Just avoid stacking too many layers to keep the sugar coating intact. You can also freeze for longer storage.
Final Thoughts
This Peppermint Snowball Cookies Recipe holds a special place in my heart, especially during the chill of winter. Baking a batch instantly brightens the day and brings everyone closer at the kitchen table. Give these a try — I promise you’ll enjoy the delicate peppermint crunch and buttery softness that make each bite feel like a little holiday celebration.
Print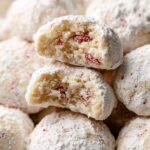
Peppermint Snowball Cookies Recipe
- Prep Time: 45 minutes
- Cook Time: 15 minutes
- Total Time: 1 hour
- Yield: 36 cookies
- Category: Dessert
- Method: Baking
- Cuisine: American
- Diet: Vegetarian
Description
Peppermint Snowball Cookies are delightful buttery treats infused with peppermint extract and crushed candy canes, rolled in confectioners’ sugar for a festive, melt-in-your-mouth finish. These cookies are perfect for holiday celebrations and gift-giving, offering a crisp exterior and a tender, flavorful center with refreshing peppermint notes.
Ingredients
Dough
- 1 cup (16 Tbsp; 226g) unsalted butter, softened to room temperature
- ¾ cup (90g) confectioners’ sugar
- 1 teaspoon pure vanilla extract
- 1 teaspoon peppermint extract
- 2 and ¼ cups (281g) all-purpose flour (spooned & leveled)
- ⅛ teaspoon salt
- ⅓ cup (40g) crushed candy canes (about 3–4 regular-size candy canes)
Coating
- 1 and ¼ cups (150g) confectioners’ sugar
Instructions
- Prepare the dough: In a large bowl, use a handheld mixer or stand mixer with a paddle attachment to beat the softened butter for 1 minute on medium speed until smooth and creamy. Add ¾ cup confectioners’ sugar and beat on low speed until incorporated, then increase to medium-high speed and beat until creamy. Scrape down the sides and bottom of the bowl as needed. Beat in the vanilla and peppermint extracts on medium-high speed until combined. Add the flour and salt and beat on low speed; the dough will seem dry at first. Once all flour is incorporated, increase mixer speed to high until the dough comes together. Finally, beat in the crushed candy canes.
- Chill the dough: Cover the dough tightly and refrigerate for at least 30 minutes and up to 3 days. If chilled for more than 3 hours, let the dough sit at room temperature for 30 minutes before rolling, as it will become very stiff.
- Preheat oven and prepare baking sheets: Preheat the oven to 350°F (177°C). Line two large baking sheets with parchment paper or silicone baking mats.
- Shape cookies: Scoop or roll 1 tablespoon (20g) of dough into balls and place on baking sheets at least 2 inches apart to allow for spreading.
- Bake cookies: Bake for about 15 minutes, until the bottoms are golden brown and the tops are just barely browned.
- Coat cookies: Let cookies cool for 5 minutes on the baking sheet, then gently roll them in confectioners’ sugar until fully coated. Transfer cookies to wire racks to cool completely. Once cooled, roll again in confectioners’ sugar to ensure a thick, sticky coating.
- Store cookies: Keep cookies covered at room temperature for up to 1 week.
Notes
- Make Ahead & Freezing: Baked cookies freeze well for up to 3 months; thaw in the refrigerator or at room temperature. Unbaked cookie dough balls also freeze for up to 3 months; bake frozen dough balls for an extra minute without thawing.
- Use an electric mixer (handheld or stand) to ensure the dough is creamy and well combined.
- Line baking sheets with parchment paper or silicone mats to prevent sticking and aid even baking.
- Allow cookies to cool completely before the final sugar coating to achieve the best texture and appearance.
Nutrition
- Serving Size: 1 cookie
- Calories: 120 kcal
- Sugar: 8 g
- Sodium: 40 mg
- Fat: 7 g
- Saturated Fat: 4.5 g
- Unsaturated Fat: 2 g
- Trans Fat: 0 g
- Carbohydrates: 14 g
- Fiber: 0.3 g
- Protein: 1 g
- Cholesterol: 22 mg


Leave a Reply