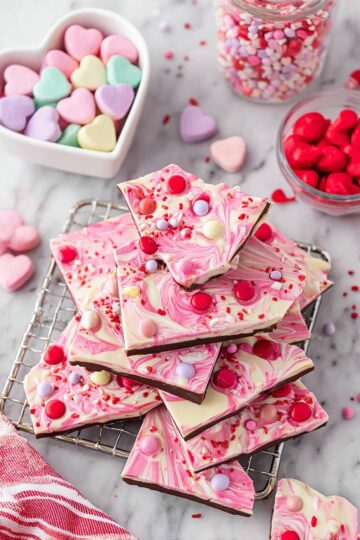
If you’re looking for a sweet and charming way to celebrate love, this Valentine Heart-Shaped White Chocolate Fudge Recipe is a must-try! Creamy layers of luscious white chocolate tinted with vibrant red and topped with cute heart sprinkles make this treat both stunning and delicious.

Jump to:
- Why You'll Love This Recipe
- Ingredients & Why They Work
- Make It Your Way
- Step-by-Step: How I Make Valentine Heart-Shaped White Chocolate Fudge Recipe
- Top Tip
- How to Serve Valentine Heart-Shaped White Chocolate Fudge Recipe
- Make Ahead and Storage
- Frequently Asked Questions:
- Final Thoughts
- Valentine Heart-Shaped White Chocolate Fudge Recipe
Why You'll Love This Recipe
I absolutely adore making this Valentine Hearts Fudge because it’s easy, visually festive, and always a crowd-pleaser. Plus, it’s one of those recipes that makes you feel like a kitchen pro without any fuss!
- Simple ingredients: You only need a handful of pantry staples to whip up this fudge.
- Quick prep and cook time: Just 10 minutes of prep and 3 minutes of melting ensures you’re not stuck in the kitchen all day.
- Festive presentation: Red and white layers with heart-shaped sprinkles make it perfect for Valentine’s Day or any romantic occasion.
- Great for gifting: These adorable heart-shaped pieces are easy to package in pretty boxes or bags.
Ingredients & Why They Work
When making this Valentine Heart-Shaped White Chocolate Fudge Recipe, choosing the right ingredients is key. I always reach for high-quality white chocolate chips and genuine sweetened condensed milk to get that rich, creamy texture that melts perfectly.

- White chocolate chips: Use a high-quality brand for smooth melting and the best flavor. Generic brands often don’t melt as evenly.
- Sweetened condensed milk: It’s essential for that creamy fudge texture—make sure not to substitute with evaporated milk!
- Unsalted butter: Adds richness and helps with the fudgy consistency.
- Red food coloring: Gives the fudge that vibrant Valentine’s red shade to contrast the white layer beautifully.
- Heart-shaped sprinkles: For that final festive touch that makes each bite feel special.
Make It Your Way
One of my favorite things about this Valentine Heart-Shaped White Chocolate Fudge Recipe is how easy it is to put your own spin on it. Whether you want to amp up the color, swap in different toppings, or even tweak textures, this fudge welcomes creativity with open arms.
- Variation: For a fun twist, try stirring in a handful of crushed peppermint candies into the white chocolate layer before setting it. I did this one winter and was amazed at how the minty crunch added a refreshing kick to the creamy fudge – very festive and perfect for gift-giving!
- Dietary tweak: Use dairy-free white chocolate chips and vegan butter to make a dairy-free version that still melts beautifully and keeps that silky texture.
- Seasonal variation: Swap the red food coloring for green during the holidays or pink in spring to match the season’s mood while keeping that lovely layered look.
- Topping options: Besides heart-shaped sprinkles, chopped nuts, edible glitter, or even freeze-dried raspberries can add a surprising crunch or burst of flavor atop your fudge hearts.
Step-by-Step: How I Make Valentine Heart-Shaped White Chocolate Fudge Recipe

Step 1: Prepare Your Pan for Easy Removal
Start by lining an 8x8 inch square pan with parchment paper or sprayed aluminum foil. This little prep step makes a huge difference later on when it’s time to lift out the fudge and slice those charming heart shapes. Having a smooth, non-stick surface underneath ensures clean edges and less frustration—trust me, it’s worth the extra minute!
Step 2: Make the Red Fudge Layer
In a microwave-safe bowl, combine 2¼ cups of white chocolate chips (that’s about ⅔ of your total), ⅔ of the sweetened condensed milk, and 2 tablespoons of unsalted butter. Microwave this mix in 20-second bursts, stirring well each time to ensure smoothness, for about 2 minutes total. When melted, stir in approximately 10 drops of red food coloring. Keep mixing until the color is evenly distributed and you have the perfect festive red shade. This part smells heavenly — that sweet white chocolate aroma is such a tease!
Step 3: Set Your First Red Layer
Spoon half of this luscious red fudge mixture into your lined pan. It will be sticky, so go slow and use the back of your spoon to gently spread and smooth it out as evenly as possible. Don’t worry if it’s a bit tacky — that’s normal. Pop the pan into the freezer for a few minutes to let this layer firm up nicely. Meanwhile, wrap the bowl holding the remaining red fudge in some towels to keep it warm and pliable for later use.
Step 4: Whip Up the Creamy White Middle Layer
Now, for the white chocolate layer. In a clean microwave-safe bowl, mix together the remaining 1¼ cups of white chocolate chips, the rest of the sweetened condensed milk, and 1 tablespoon of butter. Again, microwave this mix in 20-second bursts, stirring after each, until completely melted and silky smooth—this should take no longer than 2 minutes. Be careful not to overcook to avoid that unwanted grainy texture.
Step 5: Pour and Chill the White Layer
Pour your creamy white fudge gently over the set red layer in the pan. Using a spoon or spatula, smooth it out evenly for that perfect two-tone effect. Return the pan to the freezer and give it a few extra minutes to firm up this middle layer.
Step 6: Add the Final Red Layer
Warm that remaining red fudge mixture slightly (just enough to stir it smoothly) and then carefully spoon it over the white fudge layer. Smooth the top layer out gently to create that iconic triple-layer look — red, white, red — full of Valentine charm.
Step 7: Chill Until Set and Cut Out Hearts
Cover your fudge with plastic wrap and chill in the refrigerator for 2 hours. This waiting game is crucial for the fudge to fully set and become firm enough to cut. Once chilled, lift the fudge slab out of the pan by the edges of your parchment paper. Place it on a flat countertop and, using a small heart-shaped cookie cutter, carefully cut out as many hearts as you can. Try to work efficiently to minimize any leftover pieces.
Step 8: Add Your Final Touch and Enjoy
Sprinkle your freshly cut fudge hearts evenly with heart-shaped sprinkles for that extra festive touch. Now, dig in and enjoy these creamy, dreamy Valentine Hearts Fudge delights — they’re as charming to look at as they are delicious to savor!
Top Tip
These tips will help you create perfectly smooth and visually stunning Valentine Heart-Shaped White Chocolate Fudge every time — making your holiday treat truly shine!
- Choose quality chocolate: Using high-quality white chocolate chips really makes a difference in texture and melting ease. I’ve learned that cheaper brands can get grainy or refuse to melt smoothly, which is a hassle you don’t need.
- Watch the microwave time: I always microwave in short 20-second bursts and stir thoroughly between each. This prevents overheating and keeps the fudge silky instead of grainy.
- Lining the pan with parchment: This simple trick lets me lift the entire fudge block out with ease. It’s so much easier to cut neat hearts on the countertop rather than wrestling with a pan.
- Keep fudge warm when layering: Wrapping your fudge mixture in towels to maintain warmth while layering keeps it pliable and easy to spread, which means smoother, more defined layers.
How to Serve Valentine Heart-Shaped White Chocolate Fudge Recipe

Garnishes
To add extra charm to your Valentine Hearts Fudge, sprinkle atop the heart-shaped pieces with festive pink or red sanding sugar, edible glitter, or extra heart-shaped sprinkles. Fresh edible rose petals can add an elegant touch when serving for a romantic occasion.
Side Dishes
This luscious white chocolate fudge pairs beautifully with a light, fruity accompaniment. Think fresh raspberries or sliced strawberries to cut through the richness. A side of mint tea or a glass of lightly sparkling rosé also complements the sweet, creamy flavors perfectly.
Make Ahead and Storage
Storing Leftovers
Store your Valentine Heart-Shaped White Chocolate Fudge in an airtight container in the refrigerator, where it will stay fresh for up to two weeks. Bringing it to room temperature for a few minutes before serving softens the texture for easier eating.
Freezing
If you want to make your fudge in advance or save leftovers longer, freezing works great. Wrap the fudge tightly in parchment paper followed by aluminum foil to prevent freezer burn. It will keep well frozen for up to two months.
Reheating
Thaw frozen fudge overnight in the refrigerator, then bring to room temperature before serving to restore that perfect creamy texture. Avoid microwaving to prevent melting and losing its shape.
Frequently Asked Questions:
Yes! While standard red food coloring works best, you can also experiment with natural options like beet juice or powdered freeze-dried strawberries, but keep in mind these may alter the flavor and intensity of the color.
Sweetened condensed milk provides the necessary sugar and moisture combination to make the fudge set properly. Using evaporated milk instead won’t allow the fudge to thicken and will result in a runny texture.
While refrigeration will firm the fudge, placing it briefly in the freezer helps the layers set quickly and keeps the layers from mixing. It also makes cutting neat heart shapes easier.
Avoid overcooking the fudge mixtures by microwaving in short bursts and stirring after each. Also, use good-quality white chocolate chips and do not let the mixture boil.
Final Thoughts
Making this Valentine Heart-Shaped White Chocolate Fudge Recipe has been one of my favorite ways to celebrate special moments with loved ones. The creamy layers bursting with sweet white chocolate and festive red hues, topped with adorable heart sprinkles, always bring smiles and warmth. Whether you're gifting it or enjoying it together, this fudge offers a charming, homemade touch that says “I care” in the sweetest way. I hope you enjoy making and sharing it as much as I do!
Print
Valentine Heart-Shaped White Chocolate Fudge Recipe
- Prep Time: 10 minutes
- Chill Time: 2 hours
- Cook Time: 3 minutes
- Total Time: 2 hours 13 minutes
- Yield: 10 servings
- Category: Dessert
- Method: Microwaving is used but since the main cooking technique is melting and setting, the primary method aligns best with Stovetop as fudge is traditionally considered stovetop/cooked mixture although microwave is used here; since microwaving is not an option and stovetop is closest, select Stovetop
- Cuisine: American
- Diet: Vegetarian
Description
Delight in a festive treat with this Valentine Hearts Fudge recipe. Layers of creamy white chocolate fudge tinted with red food coloring and topped with heart-shaped sprinkles make it perfect for celebrating love and special occasions. Easy to prepare with simple ingredients and requiring just a few minutes of cooking time plus chilling, this fudge is sure to impress both visually and in taste.
Ingredients
Fudge Layers
- 3½ cups (2 – 12 ounce packages) white chocolate chips, divided
- 1 can sweetened condensed milk, divided
- 3 tablespoons unsalted butter, divided
- Red food coloring, about 10 drops
Topping
- 1 tablespoon heart-shaped sprinkles
Instructions
- Prepare the pan: Line a small square pan (8 x 8 inches or similar size) with parchment paper or sprayed aluminum foil for easy removal of the fudge.
- Make red fudge layer: In a microwave-safe bowl, combine 2 ¼ cups white chocolate chips (⅔ of total), ⅔ of the sweetened condensed milk, and 2 tablespoons butter. Microwave in 20-second bursts, stirring each time, until melted and smooth, about 2 minutes total. Stir in about 10 drops of red food coloring until evenly combined and the desired shade is reached.
- Set red fudge layer: Spoon half of the red fudge mixture into the prepared pan, smoothing with a spoon despite the stickiness. Place pan in the freezer for a few minutes to set. Keep the remaining red fudge warm by wrapping the bowl with towels.
- Make white fudge layer: Combine the remaining 1 ¼ cups white chocolate chips, remaining sweetened condensed milk, and 1 tablespoon butter in a microwave-safe bowl. Microwave in 20-second bursts, stirring well after each, until melted and smooth, about 2 minutes. Do not overcook.
- Set white fudge layer: Pour the white fudge mixture over the set red layer and smooth it out. Return the pan to the freezer for a few minutes until the white layer firms.
- Add final red fudge layer: Warm the remaining red fudge mixture slightly to make it stirrable, then spoon it carefully over the white fudge layer. Smooth the top evenly.
- Chill and cut hearts: Cover the fudge with plastic wrap and chill in the refrigerator for 2 hours to fully set. After chilling, lift the fudge out of the pan using the parchment paper. Use a small heart-shaped cookie cutter to cut hearts from the fudge, taking care to minimize waste.
- Decorate and serve: Evenly sprinkle heart-shaped sprinkles over the fudge hearts. Enjoy your festive Valentine Hearts Fudge!
Notes
- Use high-quality white chocolate chips for better melting and texture. Avoid generic brands as they can be temperamental.
- Ensure to use sweetened condensed milk, not evaporated milk, as evaporated milk will prevent the fudge from setting properly.
- Do not overcook the fudge when microwaving to avoid grainy texture.
- Lining the pan with parchment or foil makes it easier to remove the fudge and cut out shapes on a countertop instead of the pan.
- Store fudge in an airtight container in the refrigerator for up to two weeks.
- Fudge can be frozen for up to two months; wrap in parchment paper and tightly in aluminum foil for best results.
Nutrition
- Serving Size: 1 serving (approximate heart shape piece)
- Calories: 280 kcal
- Sugar: 32 g
- Sodium: 35 mg
- Fat: 15 g
- Saturated Fat: 9 g
- Unsaturated Fat: 5 g
- Trans Fat: 0 g
- Carbohydrates: 34 g
- Fiber: 0 g
- Protein: 2 g
- Cholesterol: 20 mg


Leave a Reply