Nothing says sweet celebration quite like my favorite Valentine’s Day Chocolate Bark Recipe. This festive treat layers silky dark chocolate, creamy white chocolate, and pretty pink candy melts for a dazzling dessert that’s as fun to make as it is to enjoy.

Jump to:
Why You'll Love This Recipe
Whenever I whip up this chocolate bark, it’s like capturing Valentine’s Day itself in a few simple steps. It’s effortless, gorgeous, and perfect for gifting or savoring with someone special.
- Easy to Make: No complicated baking required—just melt, layer, and set.
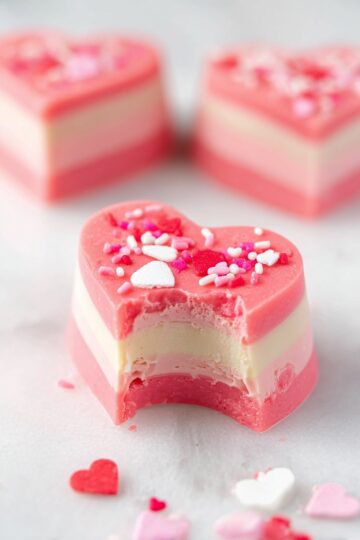
- Stunning Presentation: The marbled pink and white layers topped with festive candy make it look store-bought.
- Perfect for Sharing: Break it into pieces for an irresistible party treat or a thoughtful homemade gift.
- Customizable: Swap toppings to suit your style or Valentine’s Day theme.
Ingredients & Why They Work
The magic of this Valentine’s Day chocolate bark is really in the quality of the chocolate and the fun toppings. I always recommend grabbing good-quality baking bars and candy melts that melt smoothly for that perfect, glossy finish.

- Dark Chocolate Chips: They melt evenly and provide a rich, slightly bitter base that balances the sweetness beautifully.
- White Chocolate Baking Bars: These give a creamy, velvety layer that contrasts with the dark chocolate perfectly.
- Pink Candy Melts: They add that festive pop of color and a smooth texture for swirling and drizzling.
- Valentine’s Day Candy: Cute and colorful, these add crunch and extra sweetness on top.
- Valentine’s Day Sprinkles: Sprinkles bring fun texture and festive flair to finish off the bark.
Make It Your Way
One of the best parts of making this Valentine’s Day Chocolate Bark Recipe is how easy it is to customize. Whether you want to add your favorite festive candies or tweak the flavors, this treat invites you to make it truly your own.
- Nutty Delight: I love adding finely chopped toasted almonds or pecans on top for a wonderful crunch that balances the creamy chocolate layers beautifully.
- Dietary Twist: For a dairy-free version, swap the white chocolate bars for dairy-free white chocolate chips and choose vegan-friendly candy melts. It still turns out gorgeous and delicious!
- Seasonal Swap: Although this recipe is perfect for Valentine’s Day, you can switch out the pink candy melts and sprinkles for red and green shades to make a festive Christmas bark.
- Fruit Infusion: Try sprinkling freeze-dried raspberries or dried cherries over the top for a tart contrast that pairs amazingly with the sweet chocolate layers.
Step-by-Step: How I Make Valentine’s Day Chocolate Bark Recipe

Step 1: Prepping Your Pan for Success
Start by lining a half sheet baking pan with parchment paper. Be sure to leave an overhang on the sides — this little trick makes lifting out the bark after it’s hardened so much easier. Crease the paper along the edges for a neat, defined shape. Having your pan perfectly prepared sets the foundation for smooth spreading and effortless cleanup.
Step 2: Melting and Spreading the Dark Chocolate Base
Place 1½ cups of dark chocolate chips in a microwave-safe bowl. Heat for 30 seconds, stir well, then microwave in 15-20 second bursts—stirring thoroughly each time—until the chocolate is fully melted and silky smooth. Pour the melted dark chocolate onto your prepared pan and use a spreading spatula to create a thin, even layer. Let it rest for about 10 minutes at room temperature until it's mostly hardened but still slightly tacky—that’s the sweet spot for layering.
Step 3: Melting White Chocolate and Pink Candy Melts
Break up 12 ounces of white chocolate baking bars into a microwave-safe bowl. Heat for 30 seconds, stir, then continue heating in short intervals with stirring until smooth and creamy. In a separate bowl, melt ¾ cup of pink candy melts the same way—starting with 30 seconds and stirring every 15-20 seconds. Slow, gentle heating here is key to avoiding lumps and ensuring perfect spreadability.
Step 4: Layering the White Chocolate and Creating the Marble Effect
While the dark chocolate base is still slightly soft, quickly pour and spread the white chocolate evenly over it. This layer sets rapidly, so speed is your friend here! Before the white chocolate solidifies, drizzle the melted pink candy melts over the top. Grab a toothpick and gently swirl through the pink and white layers to create that charming marbled pattern, taking care not to disturb the dark chocolate below.
Step 5: Adding the Festive Toppings and Cooling
While the chocolate layers are still warm, sprinkle ¼ cup of Valentine’s Day candy and 2 tablespoons of sprinkles evenly over the surface. These colorful touches not only add texture and sweetness but also make the bark look irresistibly festive. Allow your creation to cool and harden completely for about 30 minutes—patience here will pay off with a perfect snap!
Step 6: Breaking and Serving
Once fully set, use the parchment paper overhang to lift your bark out of the pan. Break or cut it into pieces sized just how you like—smaller for sharing, larger if you want to indulge in big chocolatey bites. Now, it’s ready to enjoy or package up as a heartfelt gift.
Top Tip
Making Valentine’s Day Chocolate Bark can be such a joyful experience, especially when you nail that perfect marbled effect and smooth layers. These tips come from my own kitchen experiments and will help ensure your bark looks stunning and tastes heavenly every time.
- Use an Overhanging Parchment Paper: This little trick is a game changer. Leaving an extra flap of parchment paper hanging over the sides makes lifting the bark out a breeze, so you avoid breaking it while removing it from the pan.
- Heat the Chocolate Slowly: One of the trickiest parts is melting your chocolate and candy melts without seizing. I learned that heating in short increments, stirring often, keeps everything silky smooth and spreadable.
- Timing the Layers: Adding each chocolate layer when the previous one is mostly set but still a little tacky helps the layers meld together beautifully without blending into one another.
- Swirl Gently: When creating that pretty marble pattern with a toothpick, take your time. Too vigorous swirling can mix the layers too much or disturb the set dark chocolate below.
How to Serve Valentine’s Day Chocolate Bark Recipe

Garnishes
This chocolate bark is already a feast for the eyes with its vibrant pink candy melts and festive sprinkles, but you can elevate the presentation even more. Try adding edible gold flakes for a touch of luxury, or a light dusting of powdered sugar for a soft snowy effect. Fresh raspberries or strawberries on the side also complement the chocolate’s richness beautifully.
Side Dishes
Since Valentine’s Day Chocolate Bark is sweet and rich, pairing it with fresh fruit or a light cup of herbal tea makes a lovely balance. Consider serving it alongside a bright fruit salad, tangy Greek yogurt, or even a scoop of vanilla or raspberry sorbet for an indulgent dessert platter.
Make Ahead and Storage
Storing Leftovers
Store your Valentine’s Day Chocolate Bark in an airtight container at room temperature. It will stay fresh and delicious for 4 to 5 days. If your kitchen is warm or humid, refrigerating the bark extends its shelf life to up to 2 weeks while keeping the chocolate firm and fresh.
Freezing
You can freeze the bark too! Place it in a freezer-safe container, and it will keep its flavor and texture for up to 4 months. When you're ready to enjoy it, simply let it thaw in the refrigerator overnight or on the countertop for about an hour.
Reheating
No reheating needed here! Valentine’s Day Chocolate Bark is best enjoyed at room temperature or slightly chilled. If the pieces are too firm from the fridge or freezer, simply allow them to warm at room temperature for 10–15 minutes before serving to soften just enough.
Frequently Asked Questions:
Absolutely! While this recipe calls for dark, white, and pink candy melts to create that beautiful layered look, you can swap in milk chocolate or flavored melts. Just keep in mind the melting times and behaviors may vary slightly.
The key is to melt chocolate slowly in short increments, stirring often. Avoid getting any water in the chocolate, as even a tiny splash can cause it to seize. Using a clean, dry bowl and utensils helps a lot.
Definitely! Feel free to get creative with your Valentine’s Day candy or sprinkles. You can add crushed nuts, freeze-dried fruit, or even edible glitter to make it uniquely yours.
Once fully hardened, gently lift the bark using the parchment overhang and place it on a cutting board. Use a sharp knife to cut into desired shapes or simply break it into chunks by hand for a rustic look.
Final Thoughts
Making this Valentine’s Day Chocolate Bark Recipe is such a joyful way to celebrate the season of love. It’s simple, fun, and perfect for sharing with those you cherish. Whether you enjoy it as a festive treat yourself or gift it to friends and family, each bite offers a little moment of sweetness and warmth. I hope these tips and ideas inspire you to create your own charming chocolate masterpiece this Valentine’s Day and beyond. Happy indulging!
Print
Valentine’s Day Chocolate Bark Recipe
- Prep Time: 10 minutes
- Chill Time: 30 minutes
- Cook Time: 15 minutes
- Total Time: 55 minutes
- Yield: 6 servings
- Category: Dessert
- Method: No-Cook
- Cuisine: American
- Diet: Vegetarian
Description
This Valentine's Day Chocolate Bark is a festive and delicious treat perfect for sharing. It features layers of smooth dark chocolate, creamy white chocolate, and vibrant pink candy melts, topped with colorful Valentine’s Day candy and sprinkles for a charming, marbled effect. Easy to make and wonderful to gift or enjoy yourself, this bark combines rich flavors with a beautiful presentation.
Ingredients
Chocolate Layers
- 1.5 cups dark chocolate chips
- 12 ounces white chocolate baking bars (3 bars, 4 ounces each)
- 0.75 cup pink candy melts
Toppings
- 0.25 cup Valentine’s Day candy
- 2 tablespoons Valentine’s Day sprinkles
Instructions
- Prepare Pan: Line a half sheet baking pan with parchment paper, making sure to leave an overhang on the sides for easy removal. Set aside.
- Melt Dark Chocolate: Place dark chocolate chips in a microwave-safe bowl and heat for 30 seconds. Stir well, then continue heating in 15-20 second increments, stirring after each, until fully melted and smooth.
- Spread Dark Chocolate: Pour melted dark chocolate onto the prepared pan. Using a spreading spatula, spread it into a thin, even layer.
- Set Dark Chocolate: Let the dark chocolate layer rest at room temperature for about 10 minutes until mostly hardened but still slightly tacky.
- Melt White Chocolate: Break white chocolate bars into a microwave-safe bowl. Heat for 30 seconds, stir, then continue melting in short increments with stirring until smooth and creamy.
- Melt Pink Candy Melts: In a separate microwave-safe bowl, melt pink candy melts similarly: start with 30 seconds and then 15-20 second increments while stirring until smooth.
- Layer White Chocolate: Quickly pour and spread the melted white chocolate evenly over the dark chocolate layer while it is still slightly soft. Work fast as this layer hardens quickly.
- Drizzle Pink Candy: Before the white chocolate sets, drizzle the melted pink candy melts over the white layer.
- Create Marble Pattern: Using a toothpick, gently swirl through the pink and white layers to create a marbled effect, being careful to avoid disturbing the dark chocolate layer beneath.
- Add Toppings: While the chocolate is still warm, evenly sprinkle the Valentine’s Day candy and sprinkles over the top.
- Cool and Harden: Allow the bark to cool completely for about 30 minutes until fully hardened.
- Serve: Break or cut the bark into pieces and enjoy or package for gifting.
Notes
- Store the bark in an airtight container at room temperature for 4-5 days or refrigerate for up to 2 weeks.
- For longer storage, freeze bark in a freezer-safe container for up to 4 months.
- Adjust serving size by breaking into smaller or larger pieces according to preference.
- Use parchment paper with an overhang for easy removal of the bark once hardened.
- Heat chocolate layers slowly and stir frequently to avoid seizing or lumping the chocolate or candy melts.
- For best layering results, add each next chocolate layer when the previous layer is mostly hardened but slightly tacky. Fully hardened layers won't bond and may break apart.
- If you want a distinct swirl effect blending the layers, add the next layer before the previous one has hardened.
Nutrition
- Serving Size: ⅙ of batch
- Calories: 320 kcal
- Sugar: 30 g
- Sodium: 15 mg
- Fat: 21 g
- Saturated Fat: 13 g
- Unsaturated Fat: 7 g
- Trans Fat: 0 g
- Carbohydrates: 28 g
- Fiber: 3 g
- Protein: 3 g
- Cholesterol: 10 mg


Leave a Reply